Final Project Essay – Ariana Alvarez

Project Title: “Distorted”

This project seeks to create awareness among a general audience regarding the challenges faced by different races due to stereotypes. Psychologists at Harvard, the University of Virginia and the University of Washington, developed a platform called “Project Implicit”, which consists of an Implicit Association Test, that discovers the hidden bias within people. In my project, “Distorted”, I want to expose users to these same bias and stereotype-related issues, but on its specific relationship with inequality in education. As an a mixed Latin-American, I have been exposed to much inequality regarding race and labels, specially when it came to choosing my “identity” for college applications. For this reason I wanted to address this issue that I believe is of general conflict, but controversial to talk about. “Distorted” is meant to embark the user on a simulation of answering the famous “what race do you identify with” question that frequently appears on college application platforms such as the CommonApp. Through this immersion, the project is made to make the audience feel how their identity is distorted due to the stereotypes surrounding their race. Regardless of being directed to a general audience, the project focuses specifically on each user, as it creates a different experience for them depending on what their answer is.

My project aims to make people reflect upon the stereotypes and difficulties linked to their race that exist, specifically while applying to college. In order to achieve this, I plan to firstly display the question “Please indicate how you identify yourself (Select one),” and give them the 5 options of “A. Native American, B.Asian, C. African American, D. Hispanic, E. White (Middle Eastern),” which are the ones more commonly displayed on application platforms. After the user inputs an answer, I plan to make them simulate “taking a picture for their future college photo ID,” with the help of a laser-cut vintage camera that will be placed near the display.  The camera used will be vintage-style to induce the concept of how discrimination by race despite being an outdated idea, it is still existent. Lastly, the “photo ID” picture that the student takes, will be processed in such a way that the pixels of the image will be manipulated and converted into text. Therefore, the image of the user will be drawn with text rather than normal strokes.  The text that will be used are stereotypical phrases regarding the users race, therefore they will depend on their first response. For example, if a person inputs “D. Hispanic”, then their image will be drawn with the words “Mexican immigrant”. Hence, distorting the original image and showing how the labels that surround race, many ways change the true shape of who we truly are.

In my preparatory research and analysis, I included projects that regarded game and assistive technology, as I initially wanted to develop a project that was more oriented towards helping other people’s needs. However, as the development of my ideas continued, and after attending the Machine Learning Workshop, I realized that the best way to help others, was first to help myself, and address the problems I encountered on a personal level, which could relate with others as well. After listening to artists such as Vytas Jankauskas, who developed antique objects inspired in social problems/inconsistencies he has observed since his childhood, I was inspired to create a camera that reflected how racism in society was an outdated concept.  At the same time, this new change of aim in what I wanted to achieve through my project, aligns with my definition of interactivity as it involves a user interacting with technology and in return receiving a response of a processed image of themself. My definition of interactivity also included an aspect of needing to have a purpose. This project in particular, even though it doesn’t have the most clear purpose of “helping someone”, as it was originally planned. It will still have the significant purpose of creating awareness and educating people regarding how the outdatedness of race and stereotypes can still be encountered within education; as well as facilitating the talk about “race and labels,” that many times is hard to address. 

Week 5 Assignments – Ariana Alvarez

Project Development

a. Describe your partner

Our partner is a very kind, energetic and participative person. She is very eager to collaborate with the questions we ask her, and expresses her concerns freely. During this week’s interview, a new aspect that we encountered in our partner, was that she wants the umbrella holder to be fixed on her wheelchair, and comfortable to have around, as specially nowadays in the winter she was describing to us how she uses the umbrella quite often.  

b. What are their desires/challenges/difficulties?

An additional desire and challenge that our partner expressed regarding the umbrella holder, was for it to be situated in the middle of the wheelchair, that way it could cover the most area possible around her body. Furthermore, she also expressed wanting (if possible) to have an additional storage area where she would put the umbrella after using it, in order for it to dry. 

c. What is your project? 1 paragraph description + pictures or videos

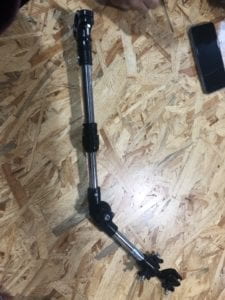
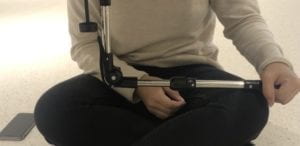
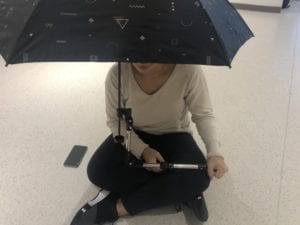
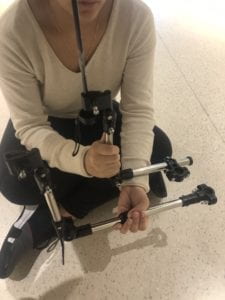
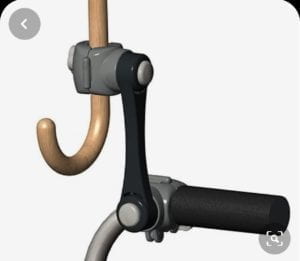
Our project is a collapsable umbrella holder that will be attached from the side tube of the wheelchair and will move towards the center of the users body, in order to support any type of umbrella with different sizes and weights. This product is aimed to help our partner hold her umbrella on rainy days without getting her hand tired. 

d. Development process. Include photos and video(s)

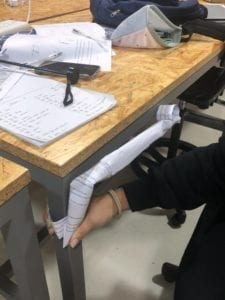
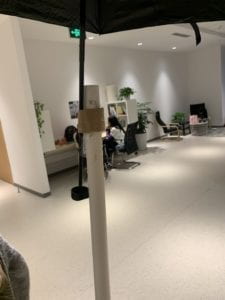
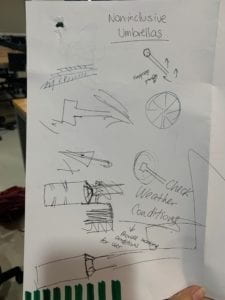
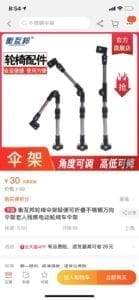
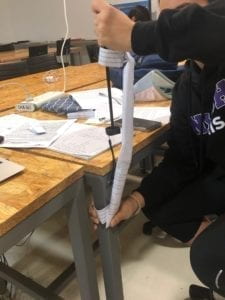
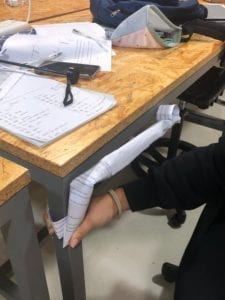
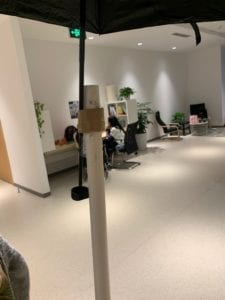
Our prototype has developed through different phases based on different materials. We initiated creating a model in paper, in order to see where it has to be placed, around what size, and how the rotations will actually occur. Later on, we used the paper prototype to create a basis of how strong the tube should be, by using as an example a water pipe. This design was tested on our partner’s wheelchair, and later iterated with materials bought on TaoBao for a steel holder. For this following week’s meeting, we will test this new prototype in order to find its most suitable place and length on the wheelchair based on our partner’s comfort as well. 

Recitation 9: Media Controller – Ariana Alvarez

For this week’s recitation, we were assigned to manipulate media in Processing through Arduino. I decided to explore the live video webcam in processing and manipulate the tint function in live images with the help of a potentiometer and infrared distance sensor in Arduino. 

For the first attempt in the code, I was able to change the opacity in the tint applied to the live video through the potentiometer. However, as I wasn’t redrawing the background in processing, the opacity was just change upon itself, and led to the creation of an even more interesting effect of blurred image, that made any user on the screen have some kind of a ghostly look.

The second manipulation, was inspired by the readings in “Computer Vision in Artists and Designer”, as it mentioned how algorithms and computing media has been used in detecting motion, specially that which involved “the movements of people”. Therefore, I developed a code that changed the tint of an image from blue to red, depending on how close an individual was situated from the infrared distance sensor in Arduino. 

For the codes of both iterations of media manipulation, I was going to use the multiple values example so that both sensors in Arduino were connected to processing. However, I first did it with the one value example, and when changing it to multiple values, both sensors were not working in the most efficient way while working simultaneously, therefore I changed it back to one value codes for the time provided. Here I am attaching the codes I used for both Arduino and Processing.

I was inspired in the ways technology was used in my project, specially in the sense that I felt as if I created an object that helped enhance security systems in stores. Similar to the idea of the game system LimboTime, which was developed for participants to attempt and pass below an imaginary line. If such individual crosses above the line, the game rings an alarm. Similar to this idea, for my second media manipulation, if a person went passed the allowed distance, the colors started to change in the webcam.

Code from Arduino

void setup() {
Serial.begin(9600);
}

void loop() {
int pin1 = analogRead(A0);
int sensorValue = map(pin1,0,1023,0,255);
Serial.write(sensorValue);

// too fast communication might cause some latency in Processing
// this delay resolves the issue.
delay(10);
}

Code from Processing

import processing.serial.*;


Serial myPort;
int valueFromArduino;


import processing.video.*; 
Capture cam;


void setup() { 
  size(1280, 480); 
  cam = new Capture(this, 640, 480);
  cam.start(); 
  
  
  printArray(Serial.list());
  // this prints out the list of all available serial ports on your computer.

  myPort = new Serial(this, Serial.list()[4], 9600);
  // WARNING!
  // You will definitely get an error here.
  // Change the PORT_INDEX to 0 and try running it again.
  // And then, check the list of the ports,
  // find the port "/dev/cu.usbmodem----" or "/dev/tty.usbmodem----" 
  // and replace PORT_INDEX above with the index number of the port.
  
} 

void draw() { 
  //background(255);
  if (cam.available()) { 
   cam.read(); 
  } 
     
  int x = valueFromArduino;
  scale(-1,1);
  image(cam, -640, 0); 
  scale(-1,1);
  image(cam, 640, 0);
  tint(0, 153, 204, x); 
 

//  if (valueFromArduino < 100) {
//      tint(0, 153, 204);
//  } else { 
//    tint(255,0,0);
//  }
  
   // to read the value from the Arduino
  while ( myPort.available() > 0) {
    valueFromArduino = myPort.read();
  }
  println(valueFromArduino);//This prints out the values from Arduino
}

*Side Note: I have been trying to include images of the circuit and pictures of the media manipulation, however it is not allowing me to do so as it says there’s an error with the images, therefore I’ll try it again tomorrow and if not possible I’ll send them through e-mail directly to Rudi*

Week 4 Assignments – Ariana Alvarez

  1. Reflection of field trip

The field trip to the Shanghai Pudong New Area Special School was very insightful as it provided me with a closer look on the difficulties faced by children with intellectual disabilities. We were able to observe children in different classes, personal development, and extracurricular activities such as performing arts, African music dance, and interacting with plants and nature. It was interesting to see how through the simplest of activities such as molding shapes with clay, playing with legos, and color coding drawings with small sparkles, kids learned the most. However, not only hands-on activities were used in the school, but actually technologies were employed to make children’s learning more efficient. Such case was seen in the personal development section of the school, where the teachers used an application in an iPad, to help kids learn and recognize basic everyday shapes like fruits and vegetables. These technologies went in hand with physical objects that also allowed children to touch the figures that were being displayed in technologies. In the end, the most beneficial factor of the field trip was allowing me to understand how there can be many ways of helping people with disabilities, even if it is through the slightest of change in an object. I am hoping this will help me improve in further ideation processes in Assistive Technology, since even though last week’s session went pretty well with my partner, there is always room for improvement in asking the correct questions in order to obtain the best results for the final project. 

  1. Project idea

a. Describe your partner as a person

My partner is a very happy, energetic, and passionate woman. She has worked before in assistive technology workshops, therefore she already knows the dynamic in us trying to make a product that will help her overcome her difficulties.

b. What were their desires/challenges/difficulties?

Since my partner uses a wheelchair, her main difficulty is carrying an umbrella when she is outside and its raining, as the umbrella is too heavy for her to hold onto the whole time. Therefore, her desire is for something that will help her facilitate that process; an object that will keep her umbrella in place under any circumstance that she may need it. 

c. What is your project? 1 paragraph description + Photos + Videos

Our project idea is an umbrella holder that will be fixed onto the left side of her wheelchair in such a way that it will be accessible to put an umbrella there at any time. The holder inside will have a structure similar to valves, in order to prevent the back flow, and allow the umbrella to stay in place under any weather conditions. I have attached photos of the development of the first prototype in cardboard and paper. 

Initial Prototype Sketch with partner

TaoBao inspiration design of

Second inspiration design “Paraplis Umbrella Holder”

First Prototype Idea made with paper

First Prototype Idea, storage function in wheelchair (Paper)

Prototype Iteration made with tube and cardboard, tested to support umbrella.

Recitation 8: Serial Communication – Ariana Alvarez

For this weeks’ recitation, we were assigned to develop two exercises that sent data through serial communication from Arduino to Processing, in exercise 1, and from Processing to Arduino, in exercise 2.

Exercise 1: Making a Processing Etch A Sketch

For this first exercise, I used serial communication to send information from two analog values from the potentiometers in Arduino, to Processing; in order to be able to create a sketch through Arduino that was reflected in Processing.  I used the sample code for sending multiple values from Arduino to Processing, however adapting it to the exercises needs. For the Arduino code, I had to declare two sensors for both potentiometers that were connected to analog values in Arduino. However, we needed to make sure to map the values of the potentiometer accordingly to the size of the processing sketch, in order for them to work more efficiently. On the other hand, the Processing code was edited in such a way that the NUM_OF_VALUES had to be set according to the amount of sensors, which in this case was 2. In order for each potentiometer to control the x-axis movement, and another one the y-axis movement of the drawing, we first tried it out by drawing an ellipse. In this case, the process was rather simple as when drawing ellipse(x,y,100,100);  x was replaced by the value of the first potentiometer, and y with the value of the second potentiometer; leaving it accordingly as ellipse (sensorValues[0], sensorValues[1], 100,100). However, when modifying the code to draw a line, two new float variables had to be introduced in order for the line to have a starting point for each sensor to keep track of the previous x and y values and draw from there to new x and y positions; therefore, corresponding to line(startX,startY,sensorValues[0],sensorValues[1]).
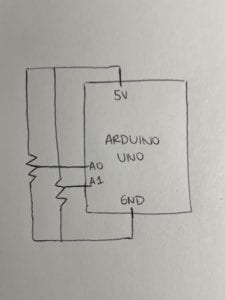
Ellipse Drawing

Line Drawing 

Arduino Code:

// IMA NYU Shanghai
// Interaction Lab
// For sending multiple values from Arduino to Processing

void setup() {
Serial.begin(9600);
}

void loop() {
int sensor1 = analogRead(A0);
sensor1 = map(sensor1,0,1023,0,500);

int sensor2 = analogRead(A1);
sensor2 = map(sensor2,0,1023,0,500);

// keep this format
Serial.print(sensor1);
Serial.print(“,”); // put comma between sensor values
Serial.print(sensor2);
Serial.println(); // add linefeed after sending the last sensor value

// too fast communication might cause some latency in Processing
// this delay resolves the issue.
delay(100);
}

Processing Code:

// IMA NYU Shanghai
// Interaction Lab
// For receiving multiple values from Arduino to Processing

/*
 * Based on the readStringUntil() example by Tom Igoe
 * https://processing.org/reference/libraries/serial/Serial_readStringUntil_.html
 */

import processing.serial.*;

String myString = null;
Serial myPort;


int NUM_OF_VALUES = 2;   /** YOU MUST CHANGE THIS ACCORDING TO YOUR PROJECT **/
int[] sensorValues;      /** this array stores values from Arduino **/


float startX ;
float startY ;


void setup() {
  size(500, 500);
  background(255);
  setupSerial();
}


void draw() {
  updateSerial();
  printArray(sensorValues);

  //ellipse(sensorValues[0], sensorValues[1], 100,100);
 
  line(startX, startY,sensorValues[0],sensorValues[1]);
   
  startX = sensorValues[0];
  startY = sensorValues[1];
  
}


void setupSerial() {
  printArray(Serial.list());
  myPort = new Serial(this, Serial.list()[ 4 ], 9600);
  // WARNING!
  // You will definitely get an error here.
  // Change the PORT_INDEX to 0 and try running it again.
  // And then, check the list of the ports,
  // find the port "/dev/cu.usbmodem----" or "/dev/tty.usbmodem----" 
  // and replace PORT_INDEX above with the index number of the port.

  myPort.clear();
  // Throw out the first reading,
  // in case we started reading in the middle of a string from the sender.
  myString = myPort.readStringUntil( 10 );  // 10 = '\n'  Linefeed in ASCII
  myString = null;

  sensorValues = new int[NUM_OF_VALUES];
}


void updateSerial() {
  while (myPort.available() > 0) {
    myString = myPort.readStringUntil( 10 ); // 10 = '\n'  Linefeed in ASCII
    if (myString != null) {
      String[] serialInArray = split(trim(myString), ",");
      if (serialInArray.length == NUM_OF_VALUES) {
        for (int i=0; i<serialInArray.length; i++) {
          sensorValues[i] = int(serialInArray[i]);
        }
      }
    }
  }
}

Exercise 2: Making a musical instrument with Arduino

In this exercise I had to create a musical device on Processing and have its values play through Arduino. I used the sample code for sending multiple values from Processing to Arduino, however adapting it to the exercises needs. For the Processing code, I added variables through mouseX pressed and mouseY pressed functions, so that a sound would play depending on the x and y coordinates of the computers mouse position. For the Arduino code, I added a new tab based on the pitches example in order to arrange which tones would be played through the buzzer in Arduino when the mouse was pressed. 
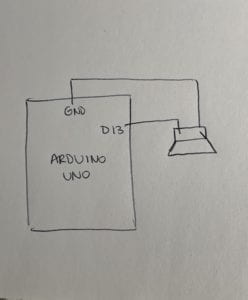
Arduino Code:

int tempValue = 0;
int valueIndex = 0;

/* This is the array of values storing the data from Processing. */
int values[NUM_OF_VALUES];

void setup() {
Serial.begin(9600);
pinMode(13, OUTPUT);

}

void loop() {
getSerialData();

tone(13, values[0],values[1]*10);

// add your code here
// use elements in the values array
// values[0] // values[1] }

//recieve serial data from Processing
void getSerialData() {
if (Serial.available()) {
char c = Serial.read();
//switch ā€“ case checks the value of the variable in the switch function
//in this case, the char c, then runs one of the cases that fit the value of the variable
//for more information, visit the reference page: https://www.arduino.cc/en/Reference/SwitchCase
switch (c) {
//if the char c from Processing is a number between 0 and 9
case ā€˜0ā€™ā€¦ā€™9ā€²:
//save the value of char c to tempValue
//but simultaneously rearrange the existing values saved in tempValue
//for the digits received through char c to remain coherent
//if this does not make sense and would like to know more, send an email to me!
tempValue = tempValue * 10 + c ā€“ ā€˜0ā€™;
break;
//if the char c from Processing is a comma
//indicating that the following values of char c is for the next element in the values array
case ā€˜,ā€™:
values[valueIndex] = tempValue;
//reset tempValue value
tempValue = 0;
//increment valuesIndex by 1
valueIndex++;
break;
//if the char c from Processing is character ā€˜nā€™
//which signals that it is the end of data
case ā€˜nā€™:
//save the tempValue
//this will b the last element in the values array
values[valueIndex] = tempValue;
//reset tempValue and valueIndex values
//to clear out the values array for the next round of readings from Processing
tempValue = 0;
valueIndex = 0;
break;
//if the char c from Processing is character ā€˜eā€™
//it is signalling for the Arduino to send Processing the elements saved in the values array
//this case is triggered and processed by the echoSerialData function in the Processing sketch
case ā€˜eā€™: // to echo
for (int i = 0; i < NUM_OF_VALUES; i++) {
Serial.print(values[i]);
if (i < NUM_OF_VALUES ā€“ 1) {
Serial.print(ā€˜,ā€™);
}
else {
Serial.println();
}
}
break;
}
}
}

Processing Code:

// IMA NYU Shanghai
// Interaction Lab


/**
 * This example is to send multiple values from Processing to Arduino.
 * You can find the arduino example file in the same folder which works with this Processing file.
 * Please note that the echoSerialData function asks Arduino to send the data saved in the values array
 * to check if it is receiving the correct bytes.
 **/


import processing.serial.*;

int NUM_OF_VALUES = 2;  /** YOU MUST CHANGE THIS ACCORDING TO YOUR PROJECT **/


Serial myPort;
String myString;

// This is the array of values you might want to send to Arduino.
int values[] = new int[NUM_OF_VALUES];

void setup() {
  size(500, 500);
  background(0);
 
  printArray(Serial.list());
  myPort = new Serial(this, Serial.list()[4], 9600);
  // check the list of the ports,
  // find the port "/dev/cu.usbmodem----" or "/dev/tty.usbmodem----" 
  // and replace PORT_INDEX above with the index of the port

  myPort.clear();
  // Throw out the first reading,
  // in case we started reading in the middle of a string from the sender.
  myString = myPort.readStringUntil( 10 );  // 10 = '\n'  Linefeed in ASCII
  myString = null;
}


void draw() {
  background(0);
    
  values[0]=mouseX;
  values[1]=mouseY;

  // changes the values
  // sends the values to Arduino.
  sendSerialData();

  // This causess the communication to become slow and unstable.
  // You might want to comment this out when everything is ready.
  // The parameter 200 is the frequency of echoing. 
  // The higher this number, the slower the program will be
  // but the higher this number, the more stable it will be.
  echoSerialData(200);
}

void sendSerialData() {
  String data = "";
  for (int i=0; i<values.length; i++) {
    data += values[i];
    //if i is less than the index number of the last element in the values array
    if (i < values.length-1) {
      data += ","; // add splitter character "," between each values element
    } 
    //if it is the last element in the values array
    else {
      data += "n"; // add the end of data character "n"
    }
  }
  //write to Arduino
  myPort.write(data);
}


void echoSerialData(int frequency) {
  //write character 'e' at the given frequency
  //to request Arduino to send back the values array
  if (frameCount % frequency == 0) myPort.write('e');

  String incomingBytes = "";
  while (myPort.available() > 0) {
    //add on all the characters received from the Arduino to the incomingBytes string
    incomingBytes += char(myPort.read());
  }
  //print what Arduino sent back to Processing
  print( incomingBytes );
}