Week 12 : Response to “A History of Net.Art” – Abdullah Zameek

I would have never expected “art” to be a thing of the Internet as early as December 1995. I know that sounds strange, but my previous background knowledge on anything Internet related would support my claim. JavaScript, the language that backs the functionality of the internet’s UI/UX came out on December 4th 1995. This was almost at the exact same time that Vuk Cosic received that spam email with the phrase net.art. Secondly, my understanding was that the very early internet was primarily used by governments,  intelligence agencies (Hi ARPANET) and by a select number of universities for academic reasons. 
However, it seems that I couldn’t have been any more wrong. But then again, my perception of what constitutes to “art” might have been restricted to a very narrow domain of content. 

One of the most striking features of internet art (and the internet in a broader sense) is its ability to bring people together from different backgrounds and cultures to collaborate and create new and exciting pieces of work that would have otherwise not been possible. Once such example was the “Net.Art Per Se” conference in Italy in 1996 where  a group of net.artists met up. Another important feature of the internet is the fact that it gave underrepresented groups and minor artists a platform to share their work and make their voice heard. Many female artists such as Rachel Baker, Beth Stryker, Josephine Bosma, amongst many others, were able to garner a commendable audience through the work that they published on the Internet. But, above all, the key feature of the Internet is the fact that it is ungoverned and there is no central entity that controls what goes on it. The democratization of a medium is what allows individual freedom and autonomy, and this is a  feature of the World Wide Web that every single individual should fight to protect. 

Week 11 : Internet Art Project – Abdullah Zameek

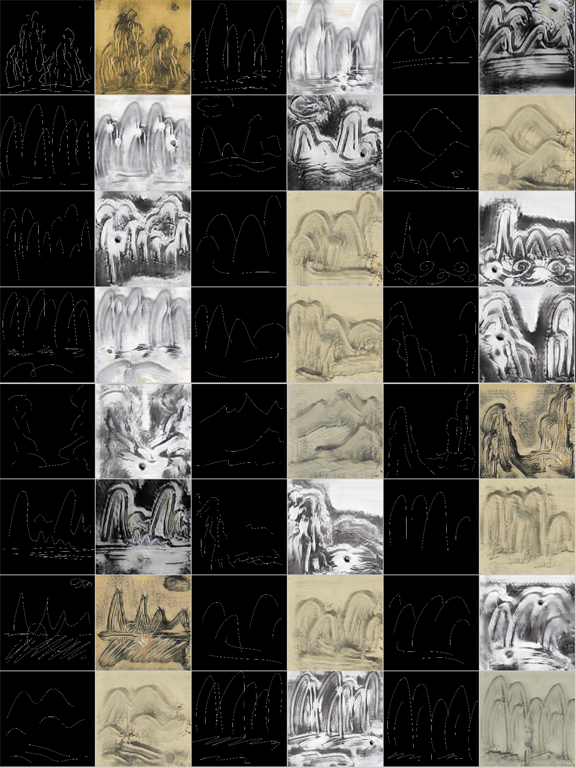
After thinking a bit about what it means for something to count as internet or digital art, I remembered one of the projects that Aven Le Zhou (who is faculty at NYUSH and teaches Interactive Machine Learning) did sometime ago called “Shanshui DaDA” 

As Aven describes it, “Shanshui-DaDA” is an interactive installation based on artificial intelligence. When participants scribble lines and sketch the landscape, the AI will help to create a Chinese Shanshui painting.”
The literal meaning of “Shan Shui” is “Mountain Water” and it depicts scenery using brushes and inks and often has mountains, rivers and waterfalls as prominent elements of the project.

What Shanshui DaDa allows you to do is create your own Shanshui style paintings. You draw on an interface and the machine learning mechanisms translate the sketches into a Shanshui sketch.

Here’s a video demo of the interaction:

And, here’s some of the Shanshui paintings that were generated by the model.

The reason why I think that this is a really interesting project is because of the fact that it is sort of  a fusion of traditional practice meets cutting-edge contemporary techniques and it empowers those as users to generate new and seemingly unpredictable designs. Furthermore, it also enables those with zero or very little art experience to delve into art creation in some sense.

Week 11 : Interactive Video Documentation – Abdullah Zameek

Project Concept:

Sam came up with the idea of creating a sort of fun, thought-provoking documentary whereby we go around campus and record peoples’ responses to a particular question. The question we posed was inspired by a popular album by Billy Eilish, “When you fall asleep, where do you go?”
Some of the respondents linked it immediately to Billy, while others were quite perplexed by such a random, strange question. The respondents first gave their initial thoughts on the question and then tried to recall an interesting dream of theirs, if they remembered any.

The link to the project can be found here  and the code can be found in this repository. (Note : the assets are not available on the repo)

Implementation

Sam, Kyra and I were able to divide the work up among the three of us reasonably evenly. Initially, all three of us went around campus to collect the audio and video for the project. Afterwards, Kyra and I did  a bit of sound editing on Audacity to remove the background noise from the audio clips before synchronising it with the video. The initial results were reasonably satisfactory so we went along with it. However, after the initial feedback, Kyra re-shot more video and put together a second rough cut, while Sam worked on the first rough cut. 
Deciding the interaction was quite a challenge, and the three of us finally decided to go with a simple concept whereby we present two videos, a regular one, and one with a “dream” filter. The user can then swap between the two videos in real time by clicking a button.  The dream filter was meant to have an effect that is very reminiscent of what it means to be in an actual dream. A common response was that people often forgot their dreams, or it was very hazy and they couldn’t really distinguish the faces and voices that they saw, and that is precisely what Sam implemented in the Premiere Pro filter. 

Since Sam was already well-acquainted with Adobe Premiere Pro, she handled the bulk of the final edits and adding of effects, while Kyra focused on creating the rough cut storyboard that Sam would then polish. Meanwhile, I gathered a couple of image assets that would be used in the final video.
In addition to that, since the concept revolved around dreams and the ethereal, I created a short intro clip using DeepDream, which is a machine learning technique developed by a Google Researcher. It is essentially a  computer vision model that takes an image and amplifies certain features present depending on the parameters that were set. 
Here’s a clip that shows the raw, unedited DeepDream video:

Sam and I put together a simple website for the rough cut, where I provided a basic HTML skeleton to work with and Sam worked more on improving the visual front of the site through styling with CSS. Afterwards, I worked on more of the Javascript functionality of creating the toggle between the reality and dream modes. 

An additional feature I wanted to add was a  basic p5js particle sketch that would run in the background of the video in dream mode. But, because of a few last minute, technical issues, I removed the sketch since it was interfering with the functionality of the rest of the site. 
Here’s a quick demo of what the sketch would have looked like:

The actual website, however, was quite straightforward. We went with a  very simple layout to make it as intuitive and as easy as possible to navigate while retaining the video as the center of attention. 

Final Thoughts:

We took a bit of time to decide on a concept and means of execution for this project since we changed our project idea completely from the initial proposal. The actual question itself sparked a myriad of responses which was great because we wanted to see how people would react to such an “odd” question. 
Once we decided on the concept, we were able to expedite most of the technical tasks reasonably quickly. However, once again, the matter of interactivity was a huge question to address and we couldn’t necessarily come up with more ways to make the video more interactive without distorting the overarching theme of the project. I feel that if we had more time  to conceptualize and think about how we could approach the question in a more engaging manner, we might have done  things differently. But, given the time frame and the scope with which we were working, I think I’m reasonably satisfied with the outcome. 
Week10 – Deep Dream

For this assignment, I chose to explore deep dream further and observe what sort of effects I could create. I was really inspired by the Memo Atkan video and wanted to create something similar to that.  
After going through a bunch of tutorials, I came across this guide to creating multiple deep dream images and then chaining them into a video using openCV. 

The concept I used for this project was a picture of Billie Eilish from her album titled, “When We Fall Asleep, Where Do We Go?” It seemed very appropriate to use Deep Dream here because of the recurring theme of ethereal elements in the songs in her album.

The tutorial explained which tensor layer, account for which effects, which I’ve replicated below for reference.

layer 1: wavy
layer 2: lines
layer 3: boxes
layer 4: circles?
layer 6: dogs, bears, cute animals.
layer 7: faces, buildings
layer 8: fish begin to appear, frogs/reptilian eyes.

layer 10: Monkies, lizards, snakes, duck

I thought it would be cool to control the different layers that go into the video, so I added a chunk of code to control which tensor layers are considered for a given image frame. 

Here are some reference images:

First Image
Base Image
tenth
10th Image
Twenty
20th Image
100
100th Image

Week 09 – Train and Inference a ml5js Style Transfer model

The setup for this project took much longer than expected – mostly because the 14GB Coco dataset took around ~4.5 hours and three retries to actually download properly. Once that was done, the rest was pretty straightforward. 
For this project, I went with a Pokemon theme again (why not?). My idea was to train the network with one of my favorite wallpapers and then, when it transfers the style onto the video feed, it plays back the Pokemon theme song. 
This is the image. 
pokemon

The only bottleneck in the entire process was the actual training process which took something between 15-20 hours on the cluster. I didn’t encounter any trouble with the actual training, but the qstat command on the cluster would return very weird running times which I’ve attached below for reference.

Train time

According to qstat, I had been training the model for 324 hours which was completely off. In any case, I attached it above just in case someone else had the same observation.

Once the weights were set, the p5js implementation was straightforward since we did the code in class. 
Here’s a video of the model in action. 

For a basic style transfer example, I was quite satisfied with the result, considering the fact that the model trained in a relatively short time compared to more advanced GAN models. Neural Style Transfer is something I’m definitely going to explore a bit more in-depth after this project. 

The code can be found in this repo here.