Cup Climate – Aishya Elysia – Eric Parren

CONTEXT AND SIGNIFICANCE

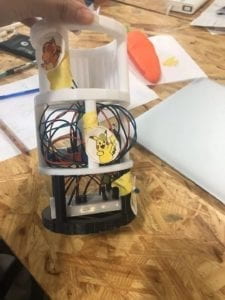
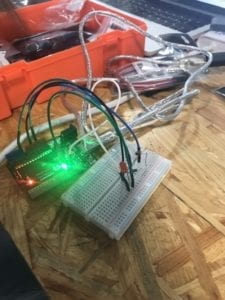
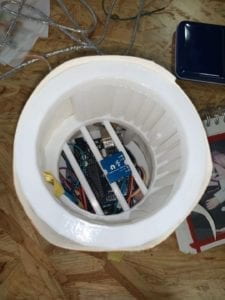
It is worth noting that I believe all of our own definitions of interaction have evolved significantly alongside the duration of the course.  When I was researching for my group project, I thought my understanding of the word “interaction” was enough. It turns out, finding an interactive project that actually works required more work than I expected. In the process of hit and miss trying out different ideas, we found ourselves questioning our own definition of interaction. I believe that interaction is a two-way process that involves “input, process, output”. To elaborate more, I implemented those three parts into our project, “//”. It is an interactive coaster that would tell the current temperature of the drink inside the cup. People would interact with the project by putting a cup inside the coaster (input), then the Arduino would sense the temperature of the liquid (process), and finally light up the corresponding LED to signify if the drink is hot, cold, or lukewarm (output). This project perfectly suits my definition of interaction, but I acknowledge that similar projects have been made before. Thus, to distinctive our coaster, we made it PokĂ©mon themed, to better fit our targeted audience—children. We made it with the purpose of letting them know when it is safe to drink their drink when it’s not too hot or not too cold.

CONCEPTION AND DESIGN:

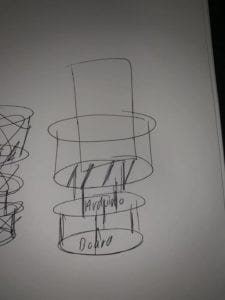
We made our project while taking into account that people would want something more than just a coaster. We knew we wanted to incorporate a temperature sensor into the project. As a first step, we made sketches of the coaster. It was a three-layer 3D design. The top layer is for the cup, the middle for the Arduino, and the bottom layer is for the breadboard. We used three LEDs that correspond with the temperatures—red is hot, green is lukewarm, and yellow is cold.  We weren’t thinking of making it a specific theme, we just want to make sure that the project works for the user testing. We decided to 3D print the structure instead of laser cut it because we need to make a cylinder structure that is not possible to be achieved using laser cutting.
FABRICATION AND PRODUCTION:

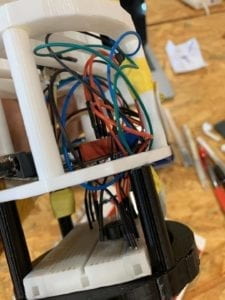
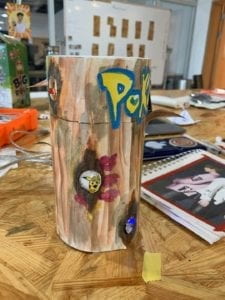
The user testing session was probably the most crucial part in terms of improving our project. We listened to other people’s feedbacks and reactions when they use our product. Some of the notable examples that we took into account were the use of yellow LED for cold temperature, all of the users thought that it would be better to use blue LED since it represents ice cold. One user also thought it would be better to make the interaction more satisfying and to neatly contain the cables inside the structure. By the end of the user testing session, we gained a lot of extremely useful suggestions and critics that we use to further develop our project. This is the part when we finally incorporated the Pokémon theme into our project and use sound effects to signify the changing of temperatures. When we were writing the code for the buzzer, we had trouble to make it only rings once. We ended up using the if statement with the state of the LED as a condition. After the whole structure was made, we covered it up with paper and paint it to look like a tree. This whole design was made to signify the importance of nature and promoting the use of metal cups. The coaster works satisfyingly for both of us.
CONCLUSIONS:

 This project was made with the purpose of entertaining and helping others—particularly children—in their daily task of drinking beverages. Our project definitely aligns with our definition of interaction as it has processed the input made by the user and provides the appropriate output in the interaction. I would improve the design of our project if we have more time. A more compact and portable structure is undoubtedly better for the user. Another function that I might add is a servo fan and a heating element to regulate the temperature, making it a more advanced and useful product. 

The “Cup Climate’ might not be the most aesthetically pleasing project that has been made, but this interactivity happening between the user and the product itself is crucial and very important to our learning. We made a project that tackles what might seem a minor issue that bothers our daily lives by implementing what we learned in class into real-world applications.  We are very satisfied with what we learned from actualizing an idea and taking user feedback to make it better.
 

Recitation 5: Processing Basics – Aishya Elysia

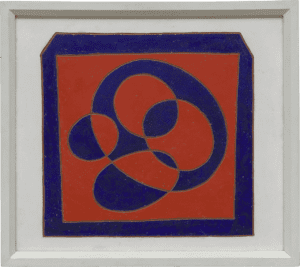
I found myself drawn to the image by Josef Albers titled “Together”

I believe the striking contrast of the colors and how it is carefully styled are what made it so eye-catching. I love how he made the outer square to make it seem like the drawing had its own frame. the five circles inside are painted with different colors to make it seem like it is overlapping. Albers only used red and blue paint to draw squares and circled in the picture. Despite the simplicity, the artist managed to transform the two colors and two shapes into a unique and fascinating work of art. 

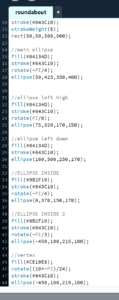
In order to reconstruct this picture with Processing, I first made sketches and calculate important points that will be useful for the coordinates. During the process, I struggled a lot with the rotation of the circles. It took me a long while to finally manage to rotate all the circles into its proper place, and then I add the stroke to provide outline for the shapes. I tried to fill the overlapping parts of the circles with the vertex function, but I failed to get the right points. Below is the code i used to make my interpretation of the picture. 

This is the image i ended up with. Overall, it is still had some essential parts of the original drawing. I successfully incorporated the rotation and color scheme of Albers’s drawing into the processing code. However, it still lacks the depth because I did not add the overlapping colors in the circles. But i like the way it turned out even if it’s not identical. I think processing is a great way to draw pictures. Because we are required to understand the basic shapes that make up the big picture, and in the process we can better appreciate the details that the artist put in the painting. 

RECITATION 4: Drawing Machine by Aishya Elysia

STEP 1: Build the Circuit

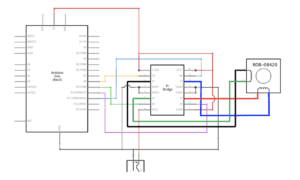
In this recitation, we are working with a stepper motor. Each of us has to make a circuit that would facilitate the stepper motor to make one revolution. We used the H-Bridge or IC inside the circuit. It was pretty complicated because there is a lot of cable and connections involved. We also used a 12V power supply, so we have to be really meticulous to avoid burning our Arduino.

IMG_7373

STEP 2: Control Rotation with a Potentiometer

After successfully making the first circuit, we were told to include a potentiometer and utilize the analog read function. I changed the number of steps from 100 to 200 in order to match the stepper motor. It is important to note that the potentiometer have to be completely separated from the IC circuit. In the Arduino, I also put the map function to change the value so that the computer could read it. The result was that the rotation of the stepper motor would match the rotation of the potentiometer.

STEP 3: Build a Drawing Machine

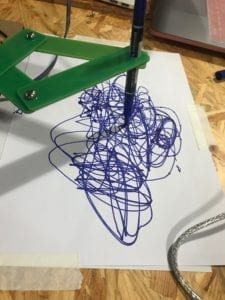
For the last part, I partnered up with my friend to make a drawing machine. We used 3D printed materials that would make up the arms and body of the machine. It was a really fun and interesting experience to build the machine because it feels like an art and craft activity. We were really satisfied that the machine worked and produced this masterpiece.

QUESTIONS

Q1: I believe the kind of machine that I am interested in making would be something that relates to each individual personally. One example could be an interactive robot painting machine that could sense your heartbeat and your moisture as the base of their paintings. They would make a painting based on your state of mind. And I think that’s very intriguing to see how the machine interprets each person’s condition. The implementation of actuators and sensors is crucial for the machine to be able to provide input data and then process it to make the desired output.  This machine perfectly illustrates how I will implement the lessons I learned in this class in the future. 

Q2: Based on the text, I am particularly interested in the project Chico MacMurtue/Amorphic Robot Works, The Drumming and Drawing subhuman, made in 2000. The artist had to use motors that could replicate human movement. It is pretty similar to the work that we do in our recitation in many ways; first, it involved hand oriented movement. We made a drawing machine to make drawings that were usually done with human hands. While the artist made a robot that would beat drums. Both actions were normally done with the use of the human hand, but with the use of computer programming those were not necessary.

Individual Reflection – Elysia

INTERACTION

Interaction by itself is hard to define, it involves a broad range of interpretations. Everyone seems to have their own perception of what “interactivity” is. Not to mention the inconsistencies that rose from people’s misinterpretation of it. Even though a precise and concrete interpretation is still a little bit vague, I settled with Crawford’s definition when he said interaction is like a conversation. It needs two people that requires a reciprocal process in its simplest form. According to Crawford, there are three steps of interaction; listen, think, and speech. It applies to a myriad of projects with varying degrees of interaction.

Take an example of the project Emotion Capture exhibited interactivity perfectly. It is a new technology that turns humans into a 3D avatar with very human emotion. This project collaborates with Expressive AI and utilizes computer programming to capture genuine human expression. People can have conversations with the robot and the robot will respond back. Therefore, the interactions are more straightforward and meaningful.

On the other hand, the article Reed + Rader Turn A Fashion Spread Into A Moving Flower Utopia, exhibit very minimum interactivity. It is a very beautiful video that transported a real life model into a world of CGI. Despite it using a high level of computer programming, there is no interaction involved. People can only watch and enjoy the performance. This only involves the “listen” and “think” part of the definition.

GROUP PROJECT

For my group project, we took each of our definitions of interaction and mix them together. We finally agree to make Magic Mirror. It is an interactive mirror that is made to tackle environmental issues. More specifically, excessive clothing waste issue. We wasted so much money and space for pieces of fabrics that we will throw out in the next 3 years. This mirror operates in a common fitting room and recommends us our outfit for the day. The clothing are either made new from recycled fabrics or have been worn by other community members. Therefore, people will not store or throw out clothing anymore.

The Magic Mirror aligns with our definition of interactivity in all three parts of the definition. It is basically a conversation with the mirror. It had a significant degree of interaction, because not only we are physically interacting with it, we are also doing computer programming in the background. They “listened” to our personal schedule, preference, and took note of the weather reports, and “process” it so that it would create an “output” in the form of the perfect clothing for each person.

References:

https://www.vice.com/en_us/article/wjnmmn/i-got-turned-into-a-3d-avatar-immersive-emotion-capture

https://www.vice.com/en_us/article/gvwb5x/reed-and-rader-turn-a-fashion-spread-into-a-moving-3d-garden-utopia

Crawford, “What Exactly is Interactivity,” The Art of Interactive Design,  pp. 1-5.

RECITATION 3: Sensors by Rannan Elysia

Circuit 

At first, my partner and I planned to make a circuit using a Force Sensitive Resistor (FSR) or “pressure sensor”. Unfortunately, after a few tries, the sensor failed to work properly because of a flaw in the soldering. We had to switch the sensor into a Photoresistor. We followed the said instruction and attached an LED as an output.

We wrote the code with the “if” statement just like how the professor taught us in class. First, we map out the output value from 0-255. If the output value exceeds 50, the LED will light up. The scheme is pretty simple.

The circuit worked perfectly.

QUESTIONS

Q1: I made a circuit with a photoresistor that sense the intensity of the light and used an LED as a form of output. This could be applied in many different ways. One example would be an automatic lamp that would light up when the sensor senses that the surrounding environment is getting dark, and turn off when the sun comes back. This would save up a lot of energy because the lamp would only be used if necessary.

Q2: Because code is our form of speaking with the machine. The machine only understands a series of orders that are precise and organized. The same form can be found in recipe and tutorial because it is like teaching someone who doesn’t know anything. That’s why the order has to be clear.  

Q3: Computer influence human behavior in the sense of accelerating everything. It simplifies our daily tasks and assists in the completion of difficult problems. However, it also negatively influence human interaction. It could help connect people who are miles away but disconnect those who are a meter away.