Final Project Individual Reflection by Amy DeCillis

Line Riders – Amy DeCillis – Marcela 

CONCEPTION AND DESIGN

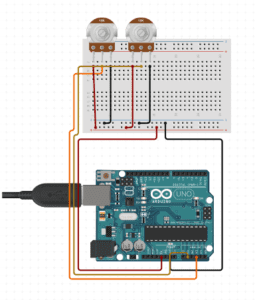
From the start, I really wanted to stress interactivity via multiple inputs. To do this, I reinvented Line Rider, a one player game I used to watch my brothers play growing up, and made it multiplayer. Another key goal of mine was to include multiple sensors and tools that would force users to move their bodies and coordinate with each other rather than just sitting still looking at a computer screen alone. In order to achieve this goal, I used a motion sensor, a distance sensor, a joystick, and a potentiometer. Some of these made perfect sense in terms of the actual game while others were used purely to make users move their bodies. For instance, the potentiometer and joystick made sense for the users actually drawing the line and moving the rider’s position on the line. The motion sensor and distance sensor were less intuitive for the rider and were included to make people move and for added fun.

 FABRICATION AND PRODUCTION

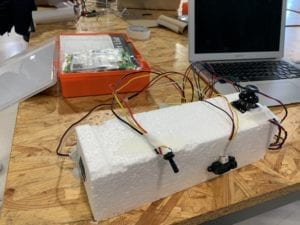
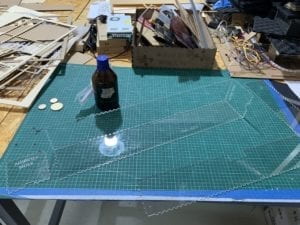
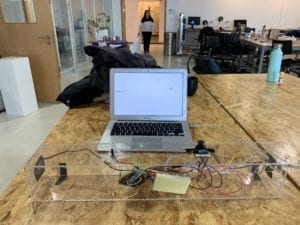
Because I wanted to emphasize collaboration between users, I designed a single box that held all of the inputs. I could have had separate boxes and increased distance between users, but I wanted the users to be physically close. In order to not make it too crowded for the players who had to physically move around, I put the motion and distance sensors on the end of the box/control panel to give them more room.

During our final presentations, someone suggested that I design the box in a way that connects to the project more, which I agree with. Someone else suggested that I create separate boxes for each input. I disagree not only because I wanted the users to be physically close, but also in discussion with the lab assistants during laser cutting, that would have actually wasted more material than creating a single big box.

One failure I noticed after laser cutting was my design for the labels on the sides. Instead of having them at the top of the box, they were written sideways which was a little inconvenient for users to read. During user testing some of the feedback I got suggested that I should decrease the number of inputs and that not all users have equally important roles. I disagree, however, because without each input, the users are not able to ultimately reach the target and the users must coordinate with each other and collaborate because of the unique roles at the very end.

CONCLUSIONS

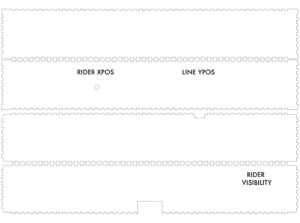
I ultimately wanted to recreate a game I played growing up but with multiple players and a high level of interactivity. In this game, users not only had to interact in various ways with the game itself, but also with each other. From the line’s y position, the riders x position/speed, the rider’s size, and the visibility of the rider, there were many ways that the users influenced the game. Additionally, each user had to communicate and collaborate with the other users to reach a goal. In this sense, the interaction was a true conversation that was constantly changing and adapting. 

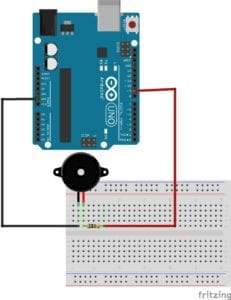
During user testing, before I had laser cut the final box/control panel, users seemed to genuinely enjoy playing with my project. Unfortunately, during final presentations, users seemed less enthused. I definitely should have added a sound component and designed it so hitting the target was more obvious and there was more of a reward. I also think that different difficulty levels would have made it more appealing to different skill levels. I do think that even if users did not necessarily enjoy playing it the way I had hoped, they still nevertheless had to collaborate with each other and that to me is a success.

There are of course many multiplayer games out there in the world, but Line Rider is part of my childhood. In talking with other Americans my age, it also was a big part of theirs. I am happy that I was able to recreate this game and make it multiplayer because as someone who is the youngest of five children, I think the best times are spent with others. Had my siblings and I had this version of Line Rider when we were younger, maybe our relationship would be even closer. In an age where everyone is on their cellphone and becoming more isolated in many ways, I hope there are more collaborative games that get people moving and talking with each other. 

Final Project Essay by Amy DeCillis

Statement of Purpose

Title: Line RiderS

With this project I hope to bring Line Rider to life and create an even more interactive experience for players. I want to get people on their feet, away from their personal laptops, and engaging with others. 

Project Plan

I hope to not only create a multiplayer version of Line Rider, but also one that incorporates two teams with an objective. The original online experience only requires one user to draw a line, or course, for the rider with no real goal. My version will include four players on each team. Each player will influence a different aspect of the game: the line, the speed of the rider, the size of the rider, and the x position of the rider. Each team will work together to place the rider on a target spot in the middle of the screen before the other team. 

I plan on using the following sensors:

    • joystick to draw the line
    • potentiometer for the speed of the rider
    • distance sensor for the size of the rider
    • a crank tool (need to find the specific name for this but essentially a potentiometer that rotates 360degrees) for the x value of the rider

Initially I will work on connecting different sensors to my Arduino and fleshing out the foundational code for the game like drawing the line, creating a target, etc. Then I will move on to designing the cases or covers for the different sensors and potentially a control board for each team. Finally, once everything is working smoothly and everything is put together, I’ll hopefully get some feedback from user testing and adjust accordingly. 

Project’s Context & Significance

I grew up watching my two older brothers take turns playing this game while I waited not so patiently beside them. I think that while online games are very engaging and fun, this is a unique experience to bring that game into the physical world and bring it to a new level of interaction. I still lean on Crawford’s understanding of analysis of interaction and its focus on the listening, thinking, and speaking aspects. In this experience, each user is not simply acting and reacting in one way, but rather collaborating with one another and engaging in thoughtful, continuous conversation.

Recitation 9: Media Controller by Amy DeCillis

Media Controller

Arduino Code

void setup() {
  Serial.begin(9600);
}

void loop() {
  int sensor1 = analogRead(A0);
  int sensor2 = analogRead(A1);
  int sensor3 = analogRead(A2);

//  sensor1 = map(sensor1,0,1023,0,100);
  sensor1 = map(sensor1,0,1023,0,255);
  sensor2 = map(sensor2,0,1023,0,255);
  sensor3 = map(sensor3,0,1023,0,255);

  // keep this format
  Serial.print(sensor1);
  Serial.print(",");  // put comma between sensor values
  Serial.print(sensor2);
  Serial.print(",");  // put comma between sensor values
  Serial.print(sensor3);
  Serial.println(); // add linefeed after last value

  delay(100);
}

Processing Code

import processing.serial.*;

String myString = null;
Serial myPort;

int NUM_OF_VALUES = 3;   
int[] sensorValues;      

PImage photo;
void setup() {
  size(1100, 700);
  background(0);
  setupSerial();
  photo = loadImage("door.jpg");
}

void draw() {
  updateSerial();
  printArray(sensorValues);
  imageMode(CENTER);
  image(photo, width/2, height/2);
  tint(sensorValues[0],sensorValues[1],sensorValues[2]);
}

void setupSerial() {
  printArray(Serial.list());
  myPort = new Serial(this, Serial.list()[1], 9600);

  myPort.clear();

  myString = myPort.readStringUntil( 10 ); 
  myString = null;

  sensorValues = new int[NUM_OF_VALUES];
}

void updateSerial() {
  while (myPort.available() > 0) {
    myString = myPort.readStringUntil( 10 ); 
    if (myString != null) {
      String[] serialInArray = split(trim(myString), ",");
      if (serialInArray.length == NUM_OF_VALUES) {
        for (int i=0; i<serialInArray.length; i++) {
          sensorValues[i] = int(serialInArray[i]);
        }
      }
    }
  }
}

Reflection

Recitation 8: Serial Communication by Amy DeCillis

Exercise 1: Make a Processing Etch A Sketch

In this exercise, we used two potentiometers to recreate a childhood toy. Taking input values from Arduino and sending them to Processing, this small project allows users to create artwork of their own.

Arduino Code

void setup() {
  Serial.begin(9600);
}

void loop() {
  int sensor1 = analogRead(A0);
  int sensor2 = analogRead(A1);

  // keep this format
  Serial.print(sensor1);
  Serial.print(",");  // put comma between sensor values
  Serial.print(sensor2);
  Serial.println(); // add linefeed after last value

  delay(100);
}

Processing Code

import processing.serial.*;

String myString = null;
Serial myPort;


int NUM_OF_VALUES = 2;   
int[] sensorValues;     

float preX;
float preY;

void setup() {
  size(500, 500);
  background(0);
  setupSerial();
}

void draw() {
  updateSerial();
  printArray(sensorValues);

  float posX = map(sensorValues[0],0,1023,0,500);
  float posY = map(sensorValues[1],0,1023,0,500);
  
  stroke(255);
  line(preX,preY,posX,posY);
  //this tells the code that the new line becomes the previous line
  preX = posX;
  preY = posY;
}

void setupSerial() {
  printArray(Serial.list());
  myPort = new Serial(this, Serial.list()[1], 9600);

  myPort.clear();
  myString = myPort.readStringUntil( 10 );  
  myString = null;

  sensorValues = new int[NUM_OF_VALUES];
}

void updateSerial() {
  while (myPort.available() > 0) {
    myString = myPort.readStringUntil( 10 ); 
    if (myString != null) {
      String[] serialInArray = split(trim(myString), ",");
      if (serialInArray.length == NUM_OF_VALUES) {
        for (int i=0; i<serialInArray.length; i++) {
          sensorValues[i] = int(serialInArray[i]);
        }
      }
    }
  }
}

Exercise 2: Make a Musical Instrument With Arduino

This exercise differs from the first in that it takes input values from Processing and sends them to Arduino. The user is able to move the mouse to different areas of the screen to trigger different tones on the Arduino buzzer. 

Arduino Code

char valueFromProcessing;
int ledPin = 13;


void setup() {
  Serial.begin(9600);
  pinMode(ledPin, OUTPUT);
}


void loop() {
  // to receive a value from Processing
  while (Serial.available()) {
    valueFromProcessing = Serial.read();
  }
  
  if (valueFromProcessing == 'H') {
    tone(13, 440, 3000);
  } else if (valueFromProcessing == 'L') {
    tone(13, 400, 3000);
  } else if (valueFromProcessing == 'A') {
    tone(13, 340, 3000);
  } else if (valueFromProcessing == 'B') {
    tone(13, 300, 3000);
  } else {
    // something esle
  }
  delay(10);
}

Processing Code

import processing.serial.*;

Serial myPort;
int valueFromArduino;


void setup() {
  size(500, 500);
  background(0);

  printArray(Serial.list());
  
  myPort = new Serial(this, Serial.list()[1], 9600);
}


void draw() {
  // to send a value to the Arduino
  if (mouseX<250 && mouseY<250) {
    myPort.write('H');
  } else if (mouseX>250 && mouseY>250) {
    myPort.write('L');
  } else if (mouseX>250 && mouseY<250) {
    myPort.write('A');
  } else if (mouseX<250 && mouseY>250) {
    myPort.write('B');
  }
}