Components:
Voltage Regulator- A system/component which regulates the amount of voltage it lets pass through. This is often used if your power source is greater than the component which you need to power. The regulator acts like a diffuser of energy. This component was included in all of the circuits as the components we needed to power (speaker, LEDs) required a smaller amount of voltage as given by our power supply.
Capacitor – A two-terminal electronic component which is used to store energy in an electric field. Like the voltage regulator, the capacitor was used in all the circuits to help regulate the flow of energy and to store extra energy that may have been flowing through the circuit.
Switch – the switch is used to make or break the electric flow through a circuit, or allow things to flow to a certain element when the switch is on. This was used in all the circuits as there were components (speaker, LED) that we only wanted to be powered when the switch was on.
Speaker – Emits a sound
220 Ohm Resistor – Two-terminal electronic component used to control the flow of a current. This was used in all circuits to help regulate the flow of currents.
Light-Emitting Diode (LED)- A type of diode (a two-terminal component with a polarized direction of energy) which emits light when energy flows through it.
Variable Resistor: A resistor (component that controls flow of electricity), which allows you to resist a variable amount of electricity flow through (eg., more or less energy can flow based on position). This was used in circuit 3 as we wanted to create a dimmable lamp, and hence needed a component that could let a variable amount of energy through at a given time based on analog input.
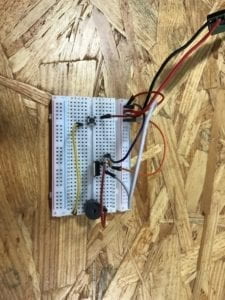
Circuit 1 – Door Bell
At first, my partner and I didn’t know exactly how to set up the circuit on the breadboard, and while we thought we had everything connected, we did not. My main confusion was trying to figure out how to create the ground, along with being able to translate the diagram of the circuit onto the breadboard. Another struggle we faced was connecting the voltage regulator as we did not at first understand that the three different pins had to be connected to different components, but after Eric told us this, we were able to complete the circuit (and we were very excited when we heard the speaker).
Circuit 2 – Lamp
After assembling the first circuit, my partner and I had a better understanding of how things should be connected. However, we did not figure out at first that the LED was polarized, but then I figured that the different wire lengths could mean something. As with the first circuit, it took us some time and tinkering to get everything in the right place, and because the breadboard is so small, we couldn’t see that one of our wires was a row away from being able to connect with the voltage regulator. Also, in the image you can see that we forgot to add the capacitor into our circuit, but our circuit was still powered without it. Though I could imagine that if we left the circuit powered for an extensive period of time that something would go wrong.

Circuit 3 – Dimmable Lamp
This circuit was the most challenging, and because of that, I decided to first build it with the smaller switch (instead of the arcade button). Like the voltage regulator in the first circuit, my partner and I struggled with the variable resistor at first, due to the different pins (and trying to see which row the pins were in amongst our tangle of jumper wires).
IMG_5696 <– video of the completed circuit
Question 1:
I believe that all the circuits we built today can be considered as interactive, but I would argue to say that the “Dimmable Lamp” was the most interactive circuit. As mentioned in The Art of Interactive Design, certain things contain certain degrees of interactivity. Due to the fact that the variable resistor not only allowed us to power an LED but to also change the brightness of the LED, this circuit contains more potential for interaction. Along with this, all the circuits are interactive because they require more than one actor. One of the actors is the circuit itself, and the other actor is the thing which pushes the button. If the circuits did not have the switch/button, they would not be interactive because the LEDs and speaker would constantly be powered without any other actor helping them to do so.
Question 2:
Interaction design and physical computing work together to make innovative forms of art that are more accessible, and are completely different than types of traditional art. With interaction design, we see art forms that rely on a user input to be made, and hence gives them another dimension. As we see with Daniel Rozin’s mirrors, his art comes alive once it is interacted with. While his art was based on principles of interaction design, the software and wiring behind the art is a type of physical computing. Therefore, I believe that art is now moving to include more digital and electronic components compared to it’s past definitions.