The first task by myself:
Materials:
For Steps 1 and 2
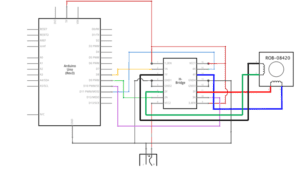
1 * 42STH33-0404AC stepper motor needs more power than the Arduino provides (5v). -1 * power jack and 1 * 12 VDC power supply- the extra power the stepper motor needs to do its turning. 1 * SN754410NE ic chip which is the H-Bridge (the one that looks like a millipede) that can change the direction of rotation by not needing to change the circuit to change the rotation. 1 * Arduino kit and its contents (connecting wire jacks).
BreadBoard:
I began with connecting all the little legs of the H-Bridge to the Arduino and to the motor. After I thought I connected everything in correctly I asked one of the helpers to check if I connected everything properly (I did not want to hurt my computer). Once they checked through they showed me that when it came to power and ground I could just connect the power and ground of the Arduino into the power and ground of the breadboard. That made connecting the 4 grounds much easier! I then added the potentiometer so I could make the motor twist and turn. Once I was good to go it was coding time.
Coding:
After copying and pasting
/*
* MotorKnob
*
* A stepper motor follows the turns of a potentiometer
* (or other sensor) on analog input 0.
*
* http://www.arduino.cc/en/Reference/Stepper
* This example code is in the public domain.
*/
#include <Stepper.h>
// change this to the number of steps on your motor
#define STEPS 100
// create an instance of the stepper class, specifying
// the number of steps of the motor and the pins it’s
// attached to
Stepper stepper(STEPS, 8, 9, 10, 11);
// the previous reading from the analog input
int previous = 0;
void setup() {
// set the speed of the motor to 30 RPMs
stepper.setSpeed(30);
}
void loop() {
// get the sensor value
int val = analogRead(0);
val = map(val, 0, 1023, 0, 200);
// move a number of steps equal to the change in the
// sensor reading
stepper.step(val – previous);
// remember the previous value of the sensor
previous = val;
}
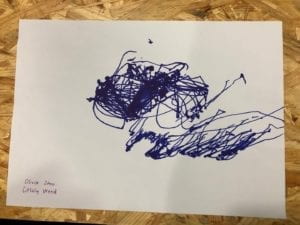
I learned what a map function was I learned that it helped match the movement of the knob with the rotation of the motor because the motor is a 200 and the original was 1023 (very out of sync). The bolded thing above is the map function. After that, it was time to find a partner so we could put our motors together and make a great piece of art (scribbles).
https://www.youtube.com/watch?v=6qDtbvoKVoQ
For Step 3
2 * Laser-cut short arms
2 * Laser-cut long arms
1* Laser-cut motor holder
2 * 3D printed motor coupling
5 * Paper Fasteners
1 * Pen that fits the laser-cut mechanisms
Paper
The assembling of the arms to hold the marker was pretty easy. when it came to putting in the paper fasteners to hold the arms together one had had to press the arms together (so they were not loose) while the other folded up the paper fasteners legs into place. Once they were put together my partner and I rotated our motors into a pattern that was scribbly, but we liked.
https://www.youtube.com/watch?v=anM7HbU1arg
Result!
Question One:
What kind of machines would you be interested in building? Add a reflection about the use of actuators, the digital manipulation of art, and the creative process to your blog post.
Answer One:
I have really been missing my microwave from home so the kind of machine I would want to make is a customizable microwave. I would add instead of a popcorn option I would choose a ramen option so that the microwave processor tells the actuator to stop heating leaving the perfect temperature for my ramen cup. Now, the ramen option started as an idea which after testing needs person testing. The feedback and the things I can learn from people like if it is suggested that there be a 30-second button and or that the microwave when the time is done the door opens automatically. Then I can use this information and incorporate it into not only my personal microwave but into the microwave of other people.
Question two:
Choose an art installation mentioned in the reading ART + Science NOW, Stephen Wilson (Kinetics chapter). Post your thoughts about it and make a comparison with the work you did during this recitation. How do you think that the artist selected those specific actuators for his project?
Answer two:
I found Ashok Sukumaran project interesting, “In Park View Hotel, the Indian artist Ashok Sukumaran invited viewers to use a special scope situated in a public park to view hotel windows across a street. If the window belonged to a room Sukumaran had chosen to be activated, a light would appear to move across the hotel‘s façade, tracing a path down to the lights in the park” (108). It somehow makes the distance closed between the person and the particular window through the connection of lights. The obvious contrast is the scale that Sukumaran was able to use to make this connection, but there was a smaller scale connection made during the recitation. The connection was between my partner and I motors and the rhythm we developed to make what we did. so no matter if it is a connection of a hotel room to a person in the park or two motors next to each other the connection is still there and makes an impact. I think maybe Sukumaran went about choosing lights as actuators because light, for me, has a big impact. It is contrasting to the dark and the overall feeling is positive when it comes to light. I want to assume the goal was to light the viewers from a lonely hotel room to a connection to a park of people.