Recitation1 Report
Sharon Xu
Instruction:
For your documentation, create a blog post and that includes the following information based on your experience in this recitation. For each component in the circuits, write down what it does and why it is included in this circuit. In addition, please include pictures and or videos of the completed circuit working, as well as a diagram of how the components are connected. Describe the process of building the circuit: Did the circuit work? Were there any moments where something failed? How did you solve the problem? Write down what worked and what didn’t. Take time to reflect on this week’s readings and the recitation exercise. Publish your answers to the following questions along with your documentation.
Question 1:
After reading The Art of Interactive Design, in what way do you think that the circuits you built today include interactivity? Please explain your answer.
Question 2:
How can Interaction Design and Physical Computing be used to create Interactive Art? You can reference Zack Lieberman’s video or any other artist that you know .
Partner: Isaac
Circuit 1: Door Bell
Components:
- 1 * 12 volt power supply
- 1 * LM7805 Voltage Regulator
- Jumper Cables (Hook-up Wires)
- 1 * Buzzer
- 1 * Push-Button Switch
- 1 * 100 nF (0.1uF) Capacitor
- 1 * Barrel Jack
Circuit 2: Lamp
Components:
- 1 * 12 volt power supply
- 1 * LM7805 Voltage Regulator
- 1 * 220 ohm Resistor
- 1 * LED
- 1 * Push-Button Switch
- 1 * 100 nF (0.1uF) Capacitor
- Jumper Cables (Hook-up Wires)
- 1 * Barrel Jack
- 1 * Arcade Button
Circuit3:Dimmable Lamp
Components:
- 1 * 12 volt power supply
- 1 * LM7805 Voltage Regulator
- 1 * 220 ohm Resistor
- 1 * 10K ohm Variable Resistor (Potentiometer)
- 1 * LED
- 1 * Push-Button Switch
- 1 * 100 nF (0.1uF) Capacitor
- Jumper Cables (Hook-up Wires)
- 1 * Barrel Jack
- 1 * Arcade Button
Function of the components(what they do & why they are in the circuit):
- Breadboard: provide the base for making electronic connections
- LM7805 Voltage Regulator: control the amount of voltage in a circuit,to stable the voltage in a circuit
- Buzzer: act as a speaker, make sound
- Push-Button Switch: control the connection,or the current flow of the circuit, to control the work or stop of the circuit
- Arcade Button: control the connection,or the current flow of the circuit,to control the work or stop of the circuit
- 220 ohm Resistor: to resist the flow of electricity, control the current from being too intense
- LED: serve as a light source
- 100 nF (0.1uF) Capacitor: wave filtering
- 10K ohm Variable Resistor (Potentiometer): resist the flow of electricity and can be controlled how strong is the resistance, so to control the current size of the circuit, so to control the brightness of the LED
- 12 volt power supply: supply power, giving a 12 volt voltage to form the current and run the circuit.
- Barrel Jack: to connect the circuit to the power
- Jumper Cables (Hook-up Wires): to carry electricity in the circuit from on point to another, to connect the electronic components in the circuit
- Multimeter: An instrument that can measures voltage, current, and resistance
Process of building the circuit:
Circuit 1: Door Bell
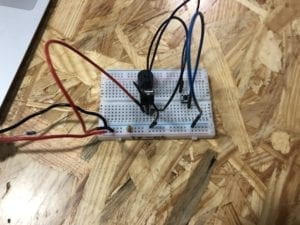
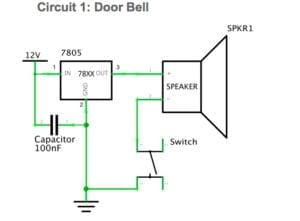
What I learned from building the circuit & moments where something failed:
- First, we analysed the circuit diagram carefully and put all the components depending on where the current goes from + to -. At first, we connect the wire to the negative pole to do earthing. But soon we realized and corrected it. After building and checking the circuit, we connected power supply. But nothing happened. So we checked the circuit again and again and seeked help from instructors. We changed the components in case that one of them is broken. But we failed to find the problem. Finally, it turned out that our two voltage regulators are both broken and there are only two regulators in the case that couldn’t work. We are so LUCKY 🙂 After changing the third voltage regulator, I finally heard the most wonderful buzz I have ever heard.
. We learnt that it’s better for us to reduce the amount of wires because too many wires will make the circuit to look confusing. For me, I think next time we can put all the important components on the breadboard and then connect them with wires so that it would be more clear to know the structure of the circuit. And when facing failure, don’t be anxious and discouraged. Using the multimeter to do tests is a good way to find the problem.
Result: The circuit runs successfully.
Circuit 2: Lamp
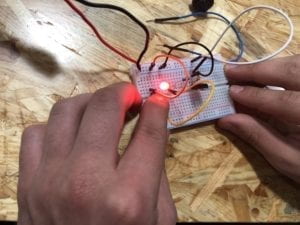
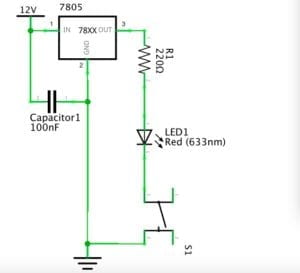
What I learned from building the circuit & moments where something failed:
- The LED light is dim at first and we asked the professor, and realized that we used the wrong resistor. And then we changed it and had another try, but we still failed. Making lots of efforts, we couldn’t find the problem, which made us confused. Finally, with the help of Eric, we found that we put a wire in the wrong hole which is not in the horizontal line so the circuit was disconnected.
Result: The circuit runs successfully
Circuit3:Dimmable Lamp
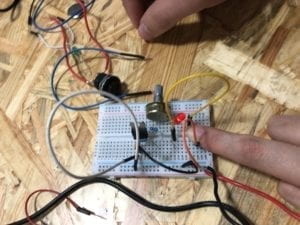
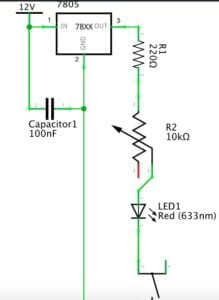
What I learned from building the circuit & moments where something failed:
- We built the circuit based on the circuit 2, just adding the variable resistor. It went smoothly.
Result: The circuit runs successfully.
Question 1:
First, according to the author, here’s a the a point about the interactive process: there are two “actor”s(The Art of Interactive Design, 5)– the circuit and I. I push the switch, or I told the circuit to be connected and run; then the circuit gets fully connected as a closed loop, or it processed; after that, the speaker buzzed or the LED lighted, as a respond to my pushing the button telling it to work. The circuit I built includes steps of a conversation, and the process cycles back and forth as I loose the button or push it again. So according to the definition the author gave in the text, interaction is “a cyclic process in which two actors alternately listen, think, and speak.”( The Art of Interactive Design,5), the circuit I built includes interactivity.
Question 2:
Zack Lieberman introduced three artistic projects: Drawn, IQ Font, and the EyeWriter. On the base of Physical Computing, people can make their artworks move by touching, make a drawing by a car driving, or even paint with a pair of glasses that can catch the movement of one’s pupil.
As is mentioned in the video, artistic practice is a form of research and development for humanity. People can use interaction design to think of a way an art piece be designed, and realize the design by physical computing.