Intro
During this recitation, my partner and I worked on creating circuits that would work in conjunction with the example Arduino codes. This exercise not only helped us become more accustomed to the different functions of the Arduino, but it also helped us understand how we can use coding in conjunction with the physical circuit to achieve various outputs.
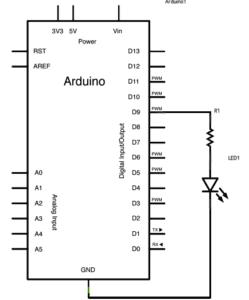
Circuit 1: Fade
Components:
1 * Arduino Uno
1 * USB A to B cable
1 * breadboard
1 * LED
1 * 220-ohm resistor
Jumper cables
For circuit 1, we created a full circuit by connecting a digital input to a resistor, which then connected to the LED, which then connected back to ground. This allowed a full current to flow through the desired output, the LED, and also allowed whatever code we typed to alter the LED’s activity due to the input leading to it. This circuit was extremely simple to construct so we had no difficulties. The code taken from the Arduino example codes that we then sent to the Arduino board made the LED’s brightness repeatedly fade in and out.
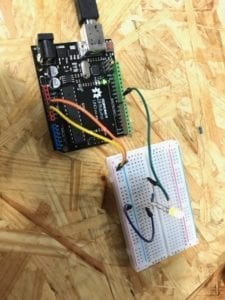
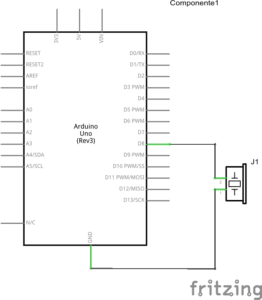
Circuit 2: toneMelody
Components:
1 * Arduino Uno
1 * USB A to B cable
1 * breadboard
1 * buzzer
Jumper Cables
For the second circuit, we created a full circuit by connecting the digital input to a buzzer and then connecting the buzzer back to ground. The example Arduino code, toneMelody, that we sent to the Arduino board made the buzzer sound a small tune. This circuit was so simple that we didn’t even need to utilize the breadboard, however, in order to keep things neat, we decided to use it. Once again, due to the circuit’s simplicity, we had no issues completing the circuit. The only new element in these constructions was the process of uploading the Arduino code to the circuit. Because the diagrams given were so simple to understand, there was no question as to the circuit’s construction, however, it took a while to fully comprehend the function of each part of the Arduino board.

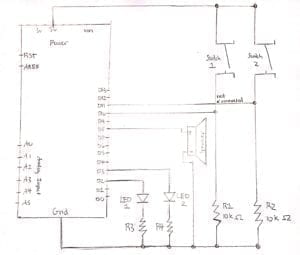
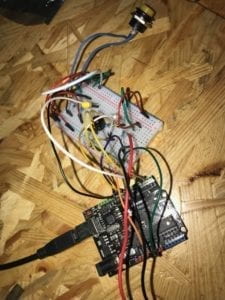
Circuit 3: Speed Game
1 * Arduino Uno
1 * USB A to B cable
1 * breadboard
2 * LED
2 * 220-ohm resistor
2 * 10K ohm resistors
2 * pushbuttons
1 * buzzer
Jumper Cables
This is the most complex circuit that we have constructed so far. Thankfully, the diagram provided made it very easy to construct despite this. The circuit plus the code provided create a speed game involving 2 players where each player is trying to click their button more times than the other player within 10 seconds. While the circuit was easy to construct, it was, in fact, a lot harder to actually understand. The circuit is comprised of the two switches which the players are attempting to press as many times as possible. There is an input back to the Arduino board going from each switch in order to record the number of times each switch is pressed. There is also a 10k ohm resistor connected to each of the two circuits which are to tone down the 5V charge. There are also two LED’s, which are connected to an output coming from the Arduino and are to light up according to which player pressed their button the most amount of times. There are also two more resistors connected to each LED in order to tone down the voltage. Finally, there is a speaker connected to an output coming from the Arduino which sounds when the ten seconds are over and the winner is declared. This circuit proved to be extremely rewarding to complete as its outcome was a very tangible and interactive experience.
Question 1:
Interaction, as expressed both in what I have learned so far in class and the text, Physical Computing, is an exchange of information that goes in both directions. Interaction is when a person outputs information to their friend who then inputs this information. Their friend will then process this information and then output new information which, the original person will then input, and process themselves. Interactivity is a dynamic process that involves each component doing both the inputting and the outputting. In my daily life, I interact with my computer and my cellphone. I am interacting with my computer this very second when I type on the keyboard. The computer then senses this input and then outputs these words onto the display monitor. I interact with my cellphone every time I go onto social media. I send my friends text messages which are inputted by my fingers pressing onto the display. The phone then responds by displaying the message that I have typed. I then press send in which the message is outputted to my friend who is then given the opportunity to process that output and type their own input which can then be outputted to my cellphone. In each of these circuits, there is also the essence of interaction. The first circuit is interactive because it uses the code to output the LED display. The second circuit shows interactivity because it also uses the Arduino code, except to output a musical experience rather than a physical experience. The third circuit shows the greatest degree of interactivity as it influences the players of the speed game to press the button as many times as possible in order to make their corresponding LED light up, signaling that they have won the game.
Question 2:
If I had 100,000 LEDs of any brightness and color at my disposal I would create an installation at an art museum. In this installation, I would create a room with mirrors on every single face of the room. On top of every mirror would be all of the LEDs lined up, and on top of the LEDs would be glass in order to protect the LEDs and mirrors from disturbance. Around the room would also be sensors that alert the LEDs to light up when there is a movement. Each person would be encouraged to enter the room and move around, triggering the lighting up of the LEDs. If my thought process is correct, because each LED is triggered by the person’s movement, their silhouette would light up in each direction, and would then be reflected infinitely by each of the mirrors.