Partner: Zhiqiu Wang
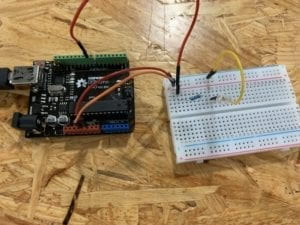
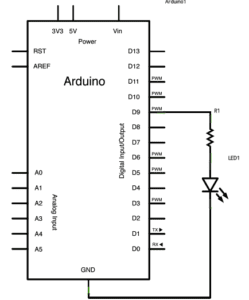
Circuit 1: Fade
Components:
1 * Arduino Uno
1 * USB A to B cable
1 * breadboard
1 * LED
1 * 220-ohm resistor
Hook-up Wires
Process:
The process of building up the circuit went well since we had already done this practice in class. However, we still rely on the diagram provided at a great degree to help connect each component. During the process, we found two jumper cables that connect both sides of the breadboard and were not sure what they are for. To solve the puzzle, we asked another pair and got the answer that they served as the connection between two sides thus no matter which side the component was connecting, it was included in the circuit. In this circuit, these two jumper cables can be omitted because one side’s ports were enough for connecting.
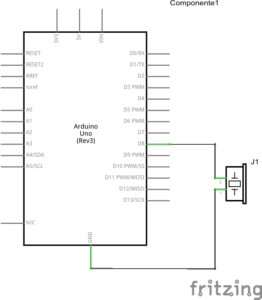
Circuit 2: Tone Melody
Components:
1 * Arduino Uno
1 * USB A to B cable
1 * breadboard (optional)
1 * buzzer
Hook-up Wires
Process:
The process went smoothly because this circuit itself is a simple one. Even the breadboard can be omitted. Yet we still chose to include the breadboard into our circuit because it provided more stable connection and the hook-up wires and the buzzer were more easily to be connected.
Circuit 3: Speed Game
Components:
1 * Arduino Uno
1 * USB A to B cable
1 * breadboard
2 * LED
2 * 220-ohm resistor
Hook-up Wires
2 * 10K ohm resistors
2 * pushbuttons
1 * buzzer
Process:
Before building up the circuit, we met some problems with distinguishing resistors with different ohm. We tried to find a way to simply tell the differences without using multimeters. We had a vague memory about what the professor said before about the different color on the resistors but was not sure which color represented the resistors with lower ohm. Essentially, through some search, we found out that resistors that have two orange lines out of five while the 10k ohm resistor only have one.
We also met some difficulties while trying to place all the components in the right position and also connect them properly. It took us several minutes to figure out how the current flowed in the circuit. Also when connecting jumper cables, we lost several times when placing wires into ports. Finally, we successfully built the circuit and played two times with the device.
Question 1
Reflect how you use technology in your daily life and on the circuits you just built. Use the text Physical Computing and your own observations to define the interaction.
It seems impossible nowadays to live without technology. The technology that most familiar to me is my communication tool——my phone, as well as computers since I use it to help me record notes from classes and finish homework. Before taking IMA classes, I only enjoy the benefit from technology development but haven’t truly engaged in creating any technological device. While building the circuits, my partner and I also relied on the guidance and diagram, which are also the accomplishment of others, to a great degree. However, it’s a different approach from just using technology. In my opinion, there are three ways to approach technology, using it, combining and understanding it, and creating it. In the process of building the circuits, we moved on to the second level of approaching technology and utilize the principles to engage in the technology rendered us first-hand experience upon exploring this area.
According to Physical Computing, interaction is “an iterative process of listening, thinking, and speaking between two or more actors” (“facts”). When putting in the context of physical computing, the three stages——listening, thinking, and computing of interaction are just like input processing and output of computers. In my opinion, computers serve as tools for people to interact with each other rather than being an object itself. Computers enable interaction to take place without the limitations of time and distance.
Question 2
If you have 100,000 LEDs of any brightness and color at your disposal, what would you make and where would you put it?
I would install them in the theater. Each part of these LEDs are connected to a specific pitch and when Musicals are playing, the corresponding LEDs will light up and their color can change according to the music, to give the audience a better experience.