Circuit 1: Fade

Components:
- Breadboard: site to make connections between components
- LED: glows with flow of current
- Aduino Uno: processes code, acts as source of current
- USB Cable: connects arduino to computer
- Jumper cables: allows current to flow
- 220 Ohm Resistor: controls flow of current to LED
Process:
My partner and I completed this circuit fairly easily. Building circuits has gotten much easier since the first recitation, and finding the sample code to run for the fade did not take much time either.
Circuit 2: toneMelody

Components:
- Speaker/Buzzer: creates sound with flow of current
Process:
While the building of the circuit was fairly easy (even more simple than the first circuit with the elimination of a resistor!), the coding gave us some minor trouble in this circuit. We found the sample code for toneMelody fine, but the inclusion of the file to save the “pitches” in gave us some confusion, as we thought we would have to redo a file that was already included in the code. After figuring this out, the circuit worked fine.
Circuit 3: Speed Game

Components:
- 220 Ohm Resistor: controls flow of current
- 10K Ohm Resistor: controls flow of current
- Multimeter: Used to measure and discriminate between resistors
- Switch/button: When pressed, completes circuit and allows current to flow
- LED: lights when current flows through it
Process:
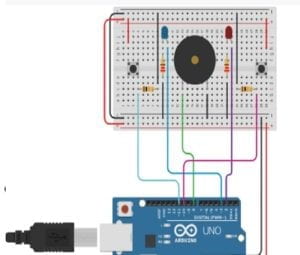
Building this circuit was actually quite fun. I enjoyed carefully measuring out how much space each element could take, as well as tinkering with new (and more efficient) ways to distinguish between ground and power. We did have some difficulty where it seemed that only one button was working, but this was not due to the setup of the circuit but rather that one of the resistors was simply not pushed in enough.
The code gave us some minor trouble in that we could not figure out how to actually play the game until it was pointed out to us that the game would register in the analog section of the arduino program. We also had to figure out where the button was which would reset the code, allowing us to play again. After these bugs were figured out we could play with no problem.
Optional Circuit 4: Four-Player
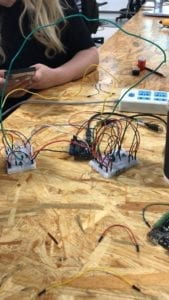
We had only a small amount of time left, but we still gave this circuit a go. We were not successful…rather than adjusting the setup of the two breadboards and removing parts (for example using only one buzzer or having buttons separate from the lights), we decided to simply use longer cables to connect each breadboard to ground, power, and the arduino port.
We also had some trouble getting the code together: there was some confusion about labeling each component (the switches and LEDs) with the correct number and port. Regardless of whether we had managed to complete our circuit correctly, I believe the coding would have given us more troubles.
The final product is a bit of a half-complete mess and looks quite odd (very much the “spaghetti” look), but I think for the small amount of time it was an interesting attempt:

Final Questions:
Question 1: The reading about physical computing has left me with thoughts about the different buffers between humans and the technology we use in our daily lives. In the circuits we built in recitation, it feels very hands-on to use them and has a sense of being built from the ground-up. However, much of the technology we use in our daily lives has more computing and levels of abstraction to them. It makes me wonder about the amount of computing that goes into, say, an elevator.
Question 2: If I had 100,000 LEDs I would definitely want to make a glowing floor of some kind — I am aware that this is a somewhat weird answer, but I love the idea of light coming from a place that we do not normal see it coming from. Most lights, after all, are mounted at our eye-level and above. Maybe a sort of floor that glows as you walk along it, or changes color with the temperature of the room (not a very useful idea, maybe, but definitely something I would want to see!).