Creative Motion – Yu Yan (Sonny) – Inmi
Conception and Design:
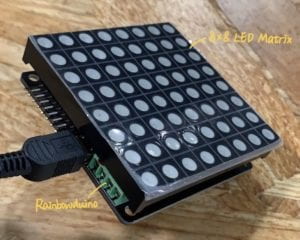
During the brainstorming phase, my partner Lillie and I tended to build an interactive project that allows users to create digital paintings only with their motions. The interaction of this project includes users’ movements as the input and the image displayed on the digital device as the output. Our enlightenment comes from Leap Motion interactive art exhibit. At this point, we thought about using multiple sensors on Arduino to catch the movements, and display the image on Processing. However, after we tried on several sensors and did some researches, we found that there is no sensor suitable for our needs and even if there is, it would take a huge amount of time to build the circuit and understand how to code. So we turned to our instructor for help and also did some further researches to see other alternative ways. Finally, we decided to use the webcam in Processing as our “sensor” to catch the input (users’ movements) and build an LED board on Arduino to display the output (painting). The reasons why we choose the webcam are that it’s easier to catch images from the camera than from the sensor, the color values detected from the camera are more accurate than from the sensor, and the code is not too difficult to learn with the help of other IMA fellows. However, when we were figuring out the Arduino part, we found it hard to build the circuit using single-colored LEDs and connect all of them on the breadboard. With our further researches, we managed to find that the 8*8 LED matrix can replace the single-colored LEDs and also generate more colors. But the first few pieces of LED matrix are not satisfactory because we don’t know how to connect them to the Arduino board and we were unable to find the solutions online (We found this video that we thought it would be helpful for us to understand how to connect the LED matrix to the Arduino, but it wasn’t). We also found a sample code to test the LED matrix, but since we were unable to connect it to the Arduino, this code became useless as well. Moreover, those pieces can only generate three colors that didn’t meet our needs.
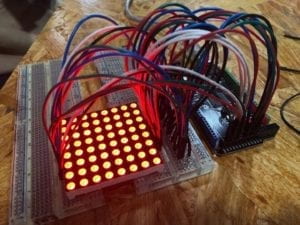
Since we want to allow users to create paintings with more diversity, we tried to find the LED matrix that can display in rainbow colors. After consulting with other IMA fellows, we found that the Rainbowduino can work with one kind of LED matrix and display in rainbow colors. The code for this is also easy to comprehend. So eventually, we decided to use the Rainbowduino and the LED matrix in Arduino as our output device, and the webcam in Processing as our input detector.
Fabrication and Production:
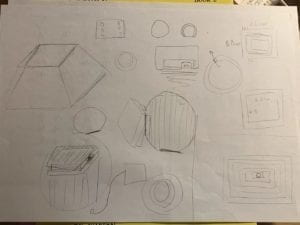
One of the most significant steps in our production process in terms of failures are the coding phase. Since when we chose materials for the output device, we tried quite a few kinds of LED matrix and also looked for their codes, we discovered that the code for previous LED matrix are too complex to comprehend. We needed to set different variables for different rows and columns of the LEDs, which is quite confusing sometimes. But after we decided to use the Rainbowduino, the code for Arduino became much easier because we can use the coordinate to code for each single LED. And with the help of IMA fellows, we managed to write the code that satisfied our needs. This experience tells us that choosing suitable equipment is very crucial to a project, for choosing a good one can bring great convenience to the progress and save us a lot of time. Another significant step is the feedback we received during the user testing session. The good things are that many users showed their interests to our project and thought it’s really cool when displaying different colors. They all thought the interaction with the piece is quite intriguing and they liked that their movements can light up the LEDs in different colors. This feedback meets our initial goal of providing users with opportunities to create their own art using their motions. However, there were still some problems we can still improve. First of all, one of the users said that the way the LEDs lighted up could be a little confusing because it cannot well illustrate where the user moves. It’s because we didn’t separate the x-axis and the y-axis for each section of LEDs at first. The following sketches and video help explain the situation.
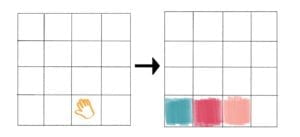
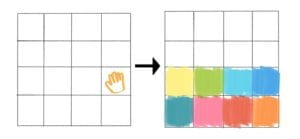
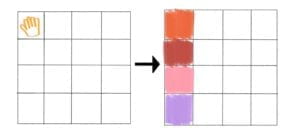
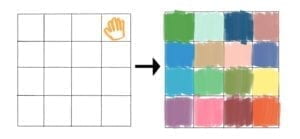
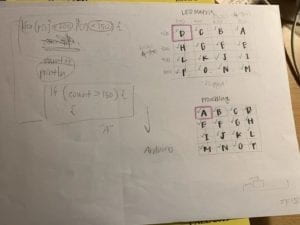
To solve this issue, we modified our code and separated the x-axis and the y-axis for each section so that it can light up without causing other sections of LEDs lighting up as well. After we showed our modified project to the user who gave us this comment, he said that the experience is better now and he can see himself moving in the LED matrix more clearly. Second, the experience of interaction could be too single and boring and it’s hard to convey our message to users through this experience. Since the interaction is only about moving their bodies and displaying different colors in the same position of their movements on the LED matrix, it might be too stuffless for an interactive project. Marcela and Inmi suggested that maybe adding some sounds to it can make it more attractive and more meaningful. So we took their advice. In addition to turning up a section of LEDs when moving to the relative area, we also added some sound files to each section of LEDs and made them play with the lighting up of the corresponding LEDs. The following sketches illustrate how we defined each section and different sound file.
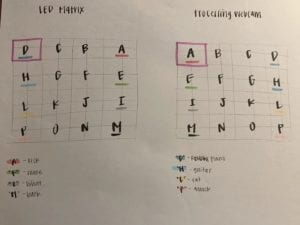
Initially, we used several random sounds such as “kick” and “snare” because we wanted to bring more diversity into our project. But during the presentation, some users commented that the sound is too random and sounded chaotic when they were all turned on. One of them also mentioned that the sound of “snapshot” made her feel uncomfortable. So for the final IMA show, we adjusted all the sound files to different key notes of the piano. This change made the sound more harmonious and comfortable to hear when users are interacting with the project. Third, some users mentioned that the LED matrix is too small and sometimes they might neglect the LED and pay more attention to the computer screen instead. At first, we thought about connecting more LED matrixes together and making a bigger screen, but we didn’t manage to do that. So instead of magnifying the LED matrix, we made the computer screen more invisible and the LED matrix more outstanding by putting it into our fabrication box. The result turned out to be much better than before and we caught users’ attention to our LED matrix instead of the computer screen.
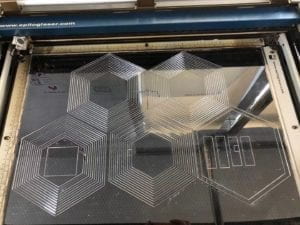
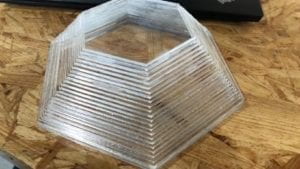
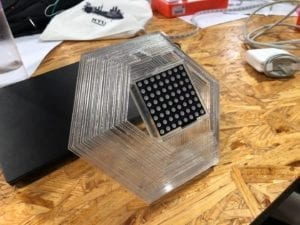
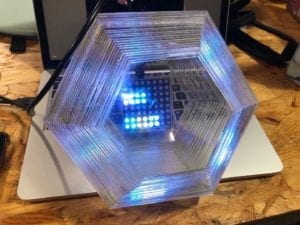
By contrast, the fabrication process is one of the most significant steps of our project in terms of success. Before we settled down the final polygon shape, we came up with a few other shapes as well. Similar to my midterm project, we also chose Laser-cut and glued each layer together to build the shape. Since we wanted to make something cool and make the most use of our material, we decided to choose transparent plastic board to make the shape. We also discovered that polygon can help build a sense of geometric beauty, so finally, we made our box into a polygon shape. At first, we tended to just put the LED matrix on the top of the polygon. But one of IMA fellows suggested that we can put the LED matrix at the bottom of the polygon so that the light can reflect through the plastic and make it prettier. Thanks to this advice, it turned out to be a really cool project!
Conclusions:
For our final project, our goal is always allowing people to create their own art using their motions and also encourage them to create art in different forms. Although we changed our single output (painting) to multiple outputs (painting and music), our goal of creating art with motions still remains the same. Initially, we defined interaction as a continuous communication between two or more corresponding elements, an iterative process which involves actions and feedbacks. Our project successfully aligned with our definition by creating a constant communication between the project and the users and providing immediate feedback to users’ motions. However, the experience of interacting with the piece is still not satisfactory enough because we could not magnify the LED matrix so that it’s too small to notice. We didn’t create the best experience to users. But fortunately, most of the users understood that they can change the image and create different sounds with their motions. They all thought that this is a really interesting and interactive project that they can play with for a long time. Some users even tried to play a full song after they discovered the location of each keynote. If we had more time, we would definitely build a bigger LED board to make it easier for users to experience the process of creating art with their motions. The setbacks and obstacles we’ve encountered are all seemed quite fair during the process of completing a project. But the most important thing is to learn some lessons from these setbacks and obstacles. What I learned from them are that we should humbly take people’s comments about our project and turn them into useful improvements and motivations. In addition, I noticed that I still didn’t pay enough attention to the experience of the project. Since experience is one of the most vital parts of an interactive project, it should always be the first consideration. However, I also learned that the reason why many people like our project is that it can display their existence and be controlled by them. Users are in charge of everything the project displays. This also shows that we have created a tight and effective communication between the project and users. Furthermore, making the most use of our materials is also very important. Sometimes it can make a big change to the whole project and turn it into a more complete version. Since nowadays many people still hold the concept that art can only be created in those limited forms, we want to break this concept by providing them with tools to create new forms of art and inspiring them to think outside of the box. Art is limitless and with great potential. By showing that motion can also create different forms of art, this project is not only a recreation but also an enlightenment to help people generate more creative ideas of new forms of art and free their imagination. It also helps make people be aware of their ability and their “power”, and let them control the creation of art. “Be bold, be creative, and be limitless.” This is the message we want to convey to our audience.
The code for Arduino is here. And the code for Processing is here.
Now, let’s have a look at how our users interact with our project!