For recitation 9, we were to use Processing to manipulate a form of media, either an image or a video, with a physical controller corresponding with Arduino. Using the given code from the examples, we modified the code from the 01_oneValue_arduino_to_processing to correctly communicate the code from Arduino to Processing’s media output.
Using the functions pushMatrix() and popMatrix() from this week’s classes, I was able to make the image move and interact with the potentiometer from Arduino. These two functions allowed the image to be transformed, with pushMatrix() saving the current coordinate system to the stack, while popMatrix() restored the prior coordinate system. This allowed the image to jump from one place to another, in conjunction with the media processing from Arduino.
Since I only used one potentiometer to control the input of the image, Arduino only reads one value to Processing. Ergo, I used the oneValue_arduino_to_processing example from our classes. I incorporated analog input via Arduino through the use of a potentiometer, then serially connected Arduino to Process to manipulate an image of my hamster. The potentiometer would adjust the image size by twisting it, reading the variables as an analog value and sending the input values as output values in Proccesing.
Code for Processing:
import processing.serial.*;

Serial myPort;
int valueFromArduino;
PImage img1;
color mouseColor;
float mouseR, mouseG, mouseB;

void setup() {
  size(600, 600);
  img1 = loadImage("hamster.jpg");
  background(126, 137, 155);

printArray(Serial.list());

  myPort = new Serial(this, Serial.list()[3], 9600);
}


void draw() {
  while ( myPort.available() > 0) {
    valueFromArduino = myPort.read();
  }
  println(valueFromArduino);
  pushMatrix();
  translate(0, 0);
  rotate(radians(map(valueFromArduino, 0, height, 0, 500)));

  image(img1, 100, 100, width/(valueFromArduino+1), height/(valueFromArduino+1));
  popMatrix();
  mouseColor = img1.get(mouseX, mouseY);
  mouseR = red(mouseColor);
  mouseG = green(mouseColor);
  mouseB = blue(mouseColor);
  println(mouseR+" "+mouseG+" "+mouseB);
  set(width/2, height/2,mouseColor);
}
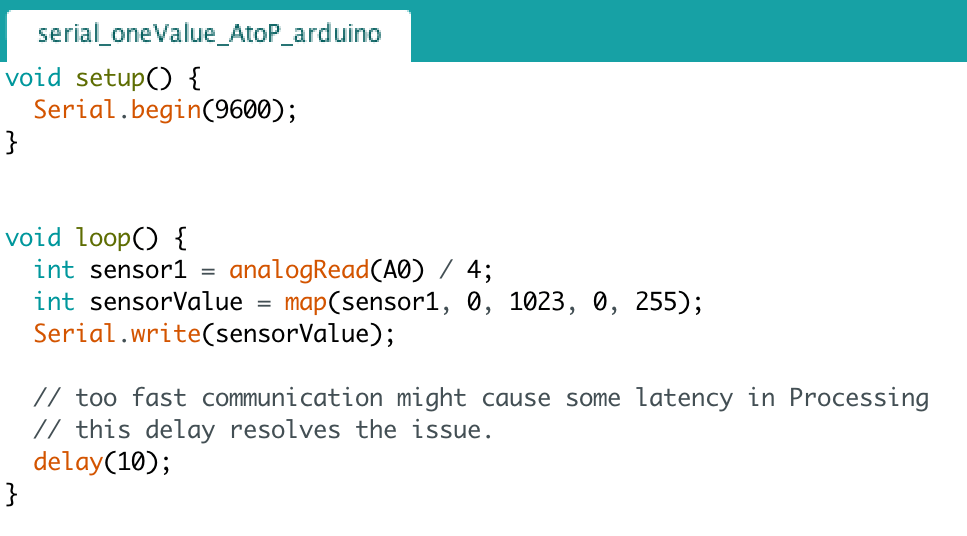
Code for Arduino:
This week’s reading, Computer Vision for Artist and Designers, discussed the scope of applications that modern computer vision technologies has, especially in the field of military and law enforcement. But in recent years, an increase in the use of non-traditional computer programming applications such as Processing has contributed to the rise of a visual focus in the electronic arts and visual design communities. By using Processing, we are able to focus more upon the visual elements within coding, and therefore able to explore a multitude of technologies in order to execute such projects. Particularly in this recitation’s project, we used technology to serially connect images within physical hardware. Processing allows us to execute machine vision techniques within a digital environment, as it is extremely well suited to the electronic arts and visual design communities (Golan et al., 7). This application can be expanded into much more expansive projects that similarly connect media input and output, with these tools commonly seen “to create art installations, performances, commercial kiosks, and interactive industrial design prototypes” (Golan et al., 7). TeamLab Borderless’ exhibit is one such example, in which technology allowed for a much more visually emphasized production rather than the coding behind it.