Exercise 1:
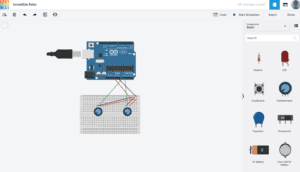
In this exercise, we had to make an Etch A Sketch with two potentiometers on the breadboard. We then had to connect Arduino and Processing so that they could speak to each other and tell one another what to do. For example, I stored arrays in Processing and then write a code in Arduino to communicate with each other.
This exercise was pretty straightforward but there was one part that really stumped me in the beginning was how to tell Processing to read and run the arrays through Arduino. I figured out that in order for sensorValues to run in Processing, I would have to embed it into the eclipse code as sensorValues[0] and sensorValues[1]. After running the code with sensorValues in both Arduino and Processing, my code was able to work.
After, we were told to make the circle into a line instead, to show a real Etch A Sketch. In this case, I just made added the command previousSensorValues so that the code would just keep repeating and repeating on top of each other, making a line continuous.
Circuit Schematic:
Documentation:
Circle
Line: Etch A Sketch
Exercise 2:
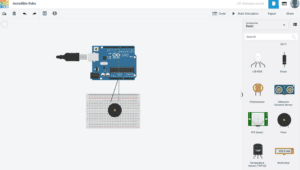
For this exercise, we were asked to create an instrument with a speaker using Arduino and Processing. I started out by making a separate tab for pitches, then I coded in Processing for mouse pressed. This exercise was also pretty challenging because I didn’t know how to tell Arduino to make the speaker sound. But in the end, I figured out that I needed to use tone and pin to tell Arduino and Processing to work together and make a sound. Making the circuit schematic was really fun and easy, but the exercise itself was pretty challenging for the sole reason because I didn’t know how to tell Arduino and Processing to communicate with each other.
Circuit Schematic:
Documentation:
Code:
Arduino-
#define NUM_OF_VALUES 2 /** YOU MUST CHANGE THIS ACCORDING TO YOUR PROJECT **/
#include “pitches.h”
// notes in the melody:
int melody[] = {
NOTE_C4, NOTE_G3, NOTE_G3, NOTE_A3, NOTE_G3, 0, NOTE_B3, NOTE_C4
};
// note durations: 4 = quarter note, 8 = eighth note, etc.:
int noteDurations[] = {
4, 4, 4, 4, 4, 4, 4, 4
};
/** DO NOT REMOVE THESE **/
int tempValue = 0;
int valueIndex = 0;
/* This is the array of values storing the data from Processing. */
int values[NUM_OF_VALUES];
void setup() {
Serial.begin(9600);
pinMode(8, OUTPUT);
}
void loop() {
getSerialData();
if (values[0] == 1) {
tone(8, values[1]);
} else {
noTone(8);
}
}
//recieve serial data from Processing
void getSerialData() {
if (Serial.available()) {
char c = Serial.read();
//switch – case checks the value of the variable in the switch function
//in this case, the char c, then runs one of the cases that fit the value of the variable
//for more information, visit the reference page: https://www.arduino.cc/en/Reference/SwitchCase
switch (c) {
//if the char c from Processing is a number between 0 and 9
case ‘0’…’9′:
//save the value of char c to tempValue
//but simultaneously rearrange the existing values saved in tempValue
//for the digits received through char c to remain coherent
//if this does not make sense and would like to know more, send an email to me!
tempValue = tempValue * 10 + c – ‘0’;
break;
//if the char c from Processing is a comma
//indicating that the following values of char c is for the next element in the values array
case ‘,’:
values[valueIndex] = tempValue;
//reset tempValue value
tempValue = 0;
//increment valuesIndex by 1
valueIndex++;
break;
//if the char c from Processing is character ‘n’
//which signals that it is the end of data
case ‘n’:
//save the tempValue
//this will b the last element in the values array
values[valueIndex] = tempValue;
//reset tempValue and valueIndex values
//to clear out the values array for the next round of readings from Processing
tempValue = 0;
valueIndex = 0;
break;
//if the char c from Processing is character ‘e’
//it is signalling for the Arduino to send Processing the elements saved in the values array
//this case is triggered and processed by the echoSerialData function in the Processing sketch
case ‘e’: // to echo
for (int i = 0; i < NUM_OF_VALUES; i++) {
Serial.print(values[i]);
if (i < NUM_OF_VALUES – 1) {
Serial.print(‘,’);
}
else {
Serial.println();
}
}
break;
}
}
}
Processing:
import processing.serial.*;
int NUM_OF_VALUES = 2; /** YOU MUST CHANGE THIS ACCORDING TO YOUR PROJECT **/
Serial myPort;
String myString;
// This is the array of values you might want to send to Arduino.
int values[] = new int[NUM_OF_VALUES];
void setup() {
size(500, 500);
background(0);
printArray(Serial.list());
myPort = new Serial(this, Serial.list()[ 2 ], 9600);
// check the list of the ports,
// find the port “/dev/cu.usbmodem—-” or “/dev/tty.usbmodem—-”
// and replace PORT_INDEX above with the index of the port
myPort.clear();
// Throw out the first reading,
// in case we started reading in the middle of a string from the sender.
myString = myPort.readStringUntil( 10 ); // 10 = ‘\n’ Linefeed in ASCII
myString = null;
}
void draw() {
background(random(0,255));
// changes the values
// for (int i=0; i<values.length; i++) {
// values[i] = i; /** Feel free to change this!! **/
//}
if (mousePressed){
values[0] = 1;
} else {
values[0]= 0;
}
values [1] = mouseX;
// sends the values to Arduino.
sendSerialData();
// This causess the communication to become slow and unstable.
// You might want to comment this out when everything is ready.
// The parameter 200 is the frequency of echoing.
// The higher this number, the slower the program will be
// but the higher this number, the more stable it will be.
echoSerialData(200);
}
void sendSerialData() {
String data = “”;
for (int i=0; i<values.length; i++) {
data += values[i];
//if i is less than the index number of the last element in the values array
if (i < values.length-1) {
data += “,”; // add splitter character “,” between each values element
}
//if it is the last element in the values array
else {
data += “n”; // add the end of data character “n”
}
}
//write to Arduino
myPort.write(data);
}
void echoSerialData(int frequency) {
//write character ‘e’ at the given frequency
//to request Arduino to send back the values array
if (frameCount % frequency == 0) myPort.write(‘e’);
String incomingBytes = “”;
while (myPort.available() > 0) {
//add on all the characters received from the Arduino to the incomingBytes string
incomingBytes += char(myPort.read());
}
//print what Arduino sent back to Processing
print( incomingBytes );
}