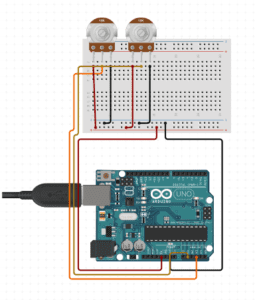
Exercise 1: Make a Processing Etch A Sketch
In this exercise, we used two potentiometers to recreate a childhood toy. Taking input values from Arduino and sending them to Processing, this small project allows users to create artwork of their own.

Arduino Code
void setup() {
  Serial.begin(9600);
}

void loop() {
  int sensor1 = analogRead(A0);
  int sensor2 = analogRead(A1);

  // keep this format
  Serial.print(sensor1);
  Serial.print(",");  // put comma between sensor values
  Serial.print(sensor2);
  Serial.println(); // add linefeed after last value

  delay(100);
}
Processing Code
import processing.serial.*;

String myString = null;
Serial myPort;


int NUM_OF_VALUES = 2;
int[] sensorValues;

float preX;
float preY;

void setup() {
  size(500, 500);
  background(0);
  setupSerial();
}

void draw() {
  updateSerial();
  printArray(sensorValues);

  float posX = map(sensorValues[0],0,1023,0,500);
  float posY = map(sensorValues[1],0,1023,0,500);

  stroke(255);
  line(preX,preY,posX,posY);
  //this tells the code that the new line becomes the previous line
  preX = posX;
  preY = posY;
}

void setupSerial() {
  printArray(Serial.list());
  myPort = new Serial(this, Serial.list()[1], 9600);

  myPort.clear();
  myString = myPort.readStringUntil( 10 );
  myString = null;

  sensorValues = new int[NUM_OF_VALUES];
}

void updateSerial() {
  while (myPort.available() > 0) {
    myString = myPort.readStringUntil( 10 );
    if (myString != null) {
      String[] serialInArray = split(trim(myString), ",");
      if (serialInArray.length == NUM_OF_VALUES) {
        for (int i=0; i<serialInArray.length; i++) {
          sensorValues[i] = int(serialInArray[i]);
        }
      }
    }
  }
}
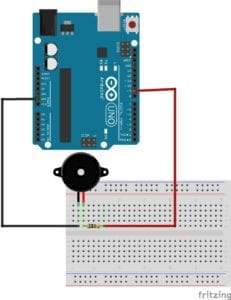
Exercise 2: Make a Musical Instrument With Arduino
This exercise differs from the first in that it takes input values from Processing and sends them to Arduino. The user is able to move the mouse to different areas of the screen to trigger different tones on the Arduino buzzer.

Arduino Code
char valueFromProcessing;
int ledPin = 13;


void setup() {
  Serial.begin(9600);
  pinMode(ledPin, OUTPUT);
}


void loop() {
  // to receive a value from Processing
  while (Serial.available()) {
    valueFromProcessing = Serial.read();
  }

  if (valueFromProcessing == 'H') {
    tone(13, 440, 3000);
  } else if (valueFromProcessing == 'L') {
    tone(13, 400, 3000);
  } else if (valueFromProcessing == 'A') {
    tone(13, 340, 3000);
  } else if (valueFromProcessing == 'B') {
    tone(13, 300, 3000);
  } else {
    // something esle
  }
  delay(10);
}
Processing Code
import processing.serial.*;

Serial myPort;
int valueFromArduino;


void setup() {
  size(500, 500);
  background(0);

  printArray(Serial.list());

  myPort = new Serial(this, Serial.list()[1], 9600);
}


void draw() {
  // to send a value to the Arduino
  if (mouseX<250 && mouseY<250) {
    myPort.write('H');
  } else if (mouseX>250 && mouseY>250) {
    myPort.write('L');
  } else if (mouseX>250 && mouseY<250) {
    myPort.write('A');
  } else if (mouseX<250 && mouseY>250) {
    myPort.write('B');
  }
}