Recitation exercise:
During the recitation, we were asked to use Processing to create an animation that has certain interactions with either keyboards or mouses. I was inspired by the rotation of windmills, therefore, I was hoping to create something with simple shapes that looks similar to windmills and when I click the “UP” key, it would rotate clockwise and when I click the “DOWN” key, it would rotate counterclockwise. In order to make the shapes in Processing start to rotate, I found that in the class slides, there is a function called “rotation”. I started to learn this function by myself. According to the slide, the code that is shown can only draw the same shape in a different angle. It’s more like a picture instead of an animation. So I did a further research about how to use this function in making an animation. I found out that I need to add other functions to achieve the effect that I want. For the purpose of making a rectangle pivoting on a certain point, I need to use the three functions mentioned below:
pushMatrix();
translate();
popMatrix();
This is the code of my work:
int x = 50;
int speed = 0;
int i = 0;
void setup(){
size(600,600);
colorMode(HSB);
}
void draw(){
int val = frameCount ;
background(0);
if(key==CODED){
if(keyCode==UP){
val=frameCount%360;
}
if(keyCode==DOWN){
val=-frameCount%360;
}
}
if (x == 50) {
speed = 1;
}
if(x == 100) {
speed = -1;
}
x=x+speed;
if(i<255){
i=i+1;
}
if(i>=255){
i=0;
}
fill(i,200,300);
noStroke();
pushMatrix();
translate(300, 300);
rotate(radians(val));
rect(50, 50, x, x);
popMatrix();
pushMatrix();
translate(250, 300);
rotate(radians(val));
rect(0, 50, x, x);
popMatrix();
pushMatrix();
translate(250, 250);
rotate(radians(val));
rect(0, 0, x, x);
popMatrix();
pushMatrix();
translate(300,250);
rotate(radians(val));
rect(50, 0, x, x);
popMatrix();
pushMatrix();
translate(100, 100);
rotate(radians(val));
rect(50, 50, x, x);
popMatrix();
pushMatrix();
translate(50, 100);
rotate(radians(val));
rect(0, 50, x, x);
popMatrix();
pushMatrix();
translate(50, 50);
rotate(radians(val));
rect(0, 0, x, x);
popMatrix();
pushMatrix();
translate(100,50);
rotate(radians(val));
rect(50, 0, x, x);
popMatrix();
pushMatrix();
translate(500, 500);
rotate(radians(val));
rect(50, 50, x, x);
popMatrix();
pushMatrix();
translate(450, 500);
rotate(radians(val));
rect(0, 50, x, x);
popMatrix();
pushMatrix();
translate(450, 450);
rotate(radians(val));
rect(0, 0, x, x);
popMatrix();
pushMatrix();
translate(500,450);
rotate(radians(val));
rect(50, 0, x, x);
popMatrix();
}
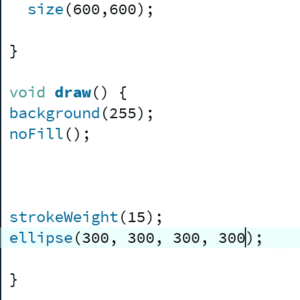
Here is the actual look of my work
Additional homework
We were asked to create an ellipse that its color of the stroke and its scale has to be periodically changing and its position is controlled by keyboard’s arrow key input.
Step 1
The first step is pretty simple, so I managed to do it smoothly.
Step 2
The second step is very similar to an in-class exercise that we did. “if” structure and a variable”x” that stands for the diameter of the ellipse are used in this step in order to make it periodically expand and contract.
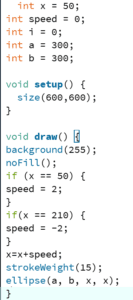
Step 3
I followed the instruction about the colorMode() function in Processing Website. I set the colorMode to HSB and set a variable that stands for the each color in HSB.
Step 4
It’s easy to figure out the fourth step because the only thing that we need to do is to follow the instruction in the class slide about the keyCode() function. We need only to code the keys with “UP”,”DOWN”,”RIGHT” and “LEFT” and another two variables that could control the x and y coordinates of the ellipse.

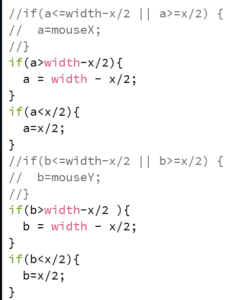
Added Bonus
When I first considered how to achieve this step, the first thing that came in my mind was that I had to constrain the x and y coordinates of the ellipse in a certain range. Whenever the coordinates are bigger than the width or length, the x coordinate would be width, the y coordinate would be length. Therefore, I used two “if” structures to achieve that. But after I did that, I realized that I omitted another situation which is the possibility that the coordinates of the ellipse would be smaller than 0. Then, I added another two “if” structure to constrain the range of the coordinates from 0 to 600. Due to the ellipse has its radius, and the radius is periodically changing, I set the range from x/2- 600-x/2. When I run this code, it did have the function of making your canvas’ edges a border, but when the ellipse is moving along the edge, it would not stick closely to the edge. Yet I haven’t come up with a solution to that.
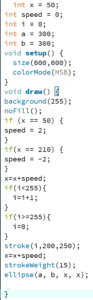
This is the complete code for the homework
int x = 50;
int speed = 0;
int i = 0;
int a = 300;
int b = 300;
void setup() {
size(600,600);
colorMode(HSB);
}
void draw() {
background(255);
noFill();
if (x == 50) {
speed = 2;
}
if(x == 210) {
speed = -2;
}
x=x+speed;
if(i<255){
i=i+1;
}
if(i>=255){
i=0;
}
stroke(i,200,250);
x=x+speed;
strokeWeight(15);
if(key == CODED){
if(keyCode==RIGHT){
a=a+3;
}
if(keyCode==LEFT){
a=a-3;
}
if(keyCode==UP){
b=b-3;
}
if(keyCode==DOWN){
b=b+3;
}
}
//if(a<=width-x/2 || a>=x/2) {
// a=mouseX;
//}
if(a>width-x/2){
a = width – x/2;
}
if(a<x/2){
a=x/2;
}
//if(b<=width-x/2 || b>=x/2) {
// b=mouseY;
//}
if(b>width-x/2 ){
b = width – x/2;
}
if(b<x/2){
b=x/2;
}
ellipse(a, b, x, x);
}
This is the final version of my homework
List of functions
Rotate();
pushMatrix();
translate();
popMatrix;
colorMode();
During this recitation, I’ve learned a lot of useful function to create an animation in Processing, such as rotate() and colorMode(). These functions would be very useful in my future designs. Also I learned how to use conditions like “if”structure to achieve certain effects and requirements for the animation.