Recitation Exercise:
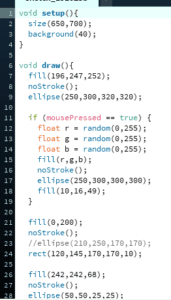
In this recitation, I modified my code for recitation 5 and created an interactive animation involving mouse pressing. I made some changes to my code so that one of the figures in my creation could change color continuously when I’m pressing my mouse and stop changing the color when I’m not pressing the mouse anymore. However, it didn’t reach my expectation. My initial thought is that the color changes when I press the mouse, and after I release the mouse, it stops changing but still appears on the surface in the last color that it turns to. The reality is that it disappeared after I released the mouse. This is what I should keep working on later.
As for the code, I only changed a small part by adding an “if” statement and three random variables to control the color change. I used the keyword “mousePressed” so that the color can change based on my mouse pressing. The rest of the code stays the same.
Additional Recitation Homework:
Step 1:
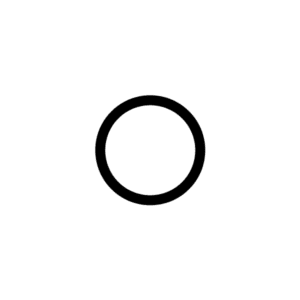
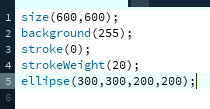
Following the instruction, I created a black hollow circle at the center of the 600*600 canvas.
Step 2:
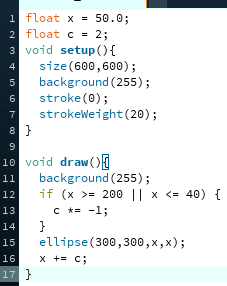
Then, I modified my code to make the circle expand and contract periodically. In order to do so, I introduced two variables — “x” and “c” — to control the size of the circle. I also used a “void setup” function, a “void draw” function and an “if” statement to control the size changing of the circle. I set “x” as the size of the circle and “c” as a variable to change “x”. In this way, the circle can expand and contract automatically and periodically.
Step 3:
For this step, I followed the instruction to use the keyword “colorMode” in the “void setup” function and set it to “HSB”. I also introduced three more variables outside of the functions to stand for each value in the “colorMode”. For these three variables, “h” stands for hue, “s” for saturation, and “b” for brightness. In order to reach the wanted result, the only variable that needs to change is the “h”. So I added “h++” and an “if” statement to turn “h” into 0 once its value reaches 360. It can make “h”‘s value change smoothly within the range from 0 to 360, which results in changing the hue correspondingly.

Step 4:
Finally, in order to make the circle move around on the canvas based on my keyboard’s arrow key input, I utilized the keyword “keyCode” in my code. I added four more variables, two(“x” and “y”) stand for the coordinates of the circle, the other two(“speedX” and “speedY”) for the speeds of the circle. To make the circle move corresponding to my keyboard input, I added “key == CODED” into an “if” statement. Then for the following “if” statements, I added four arrows as the input, one in each statement. In addition, I used two more “if” statements to set a border at the edge of the canvas for the circle so that the circle can only move around inside the canvas.
Interesting Functions:
-
- mousePressed
- colorMode (HSB)
- keyCode (UP, DOWN, LEFT, RIGHT)
- “if” statements (for changing the size, the hue and the coordinates of the circle, and setting up boarders at the edge of the canvas)
In this recitation, I learned to use “colorMode()” and made the most use of “if” statements and variables. In order to realize a continuous change of certain values, I need to use “if” statements in my code to change the values constantly. Also, “if” statements can be used to change the value periodically by setting a certain extremum so that the value would not turn bigger or smaller infinitely.