how our project works:
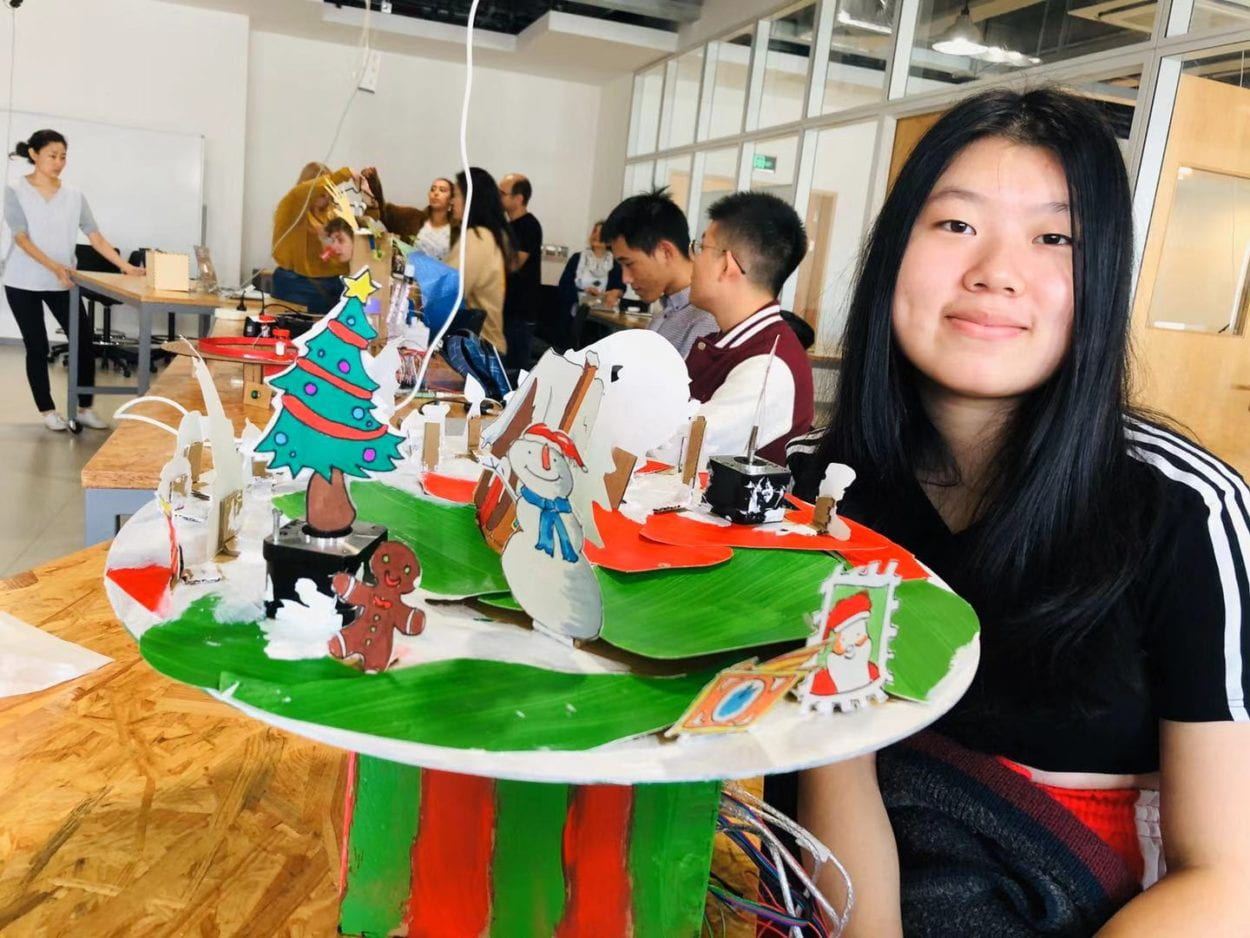
our final product:
Context and significance:
In my previous research about interaction, inspired by the definition of interaction given by Crawford (“a cyclic process in which two actors alternately listen, think, and speak” (1)), I define interaction as a kind of conversation where two or more actors are involved. They listen (receive the information), think (process the information) and speak (give out the processed information). There is one project that both shaped my definition of actors and let me rethink the process of “thinking”. The project is two computers play rock paper scissors together. In this case, the interaction has no human involvement but only two machines. But I see almost no cyclic process within the project: each computer runs its own random algorithm, choosing one of the three possible items. So, as we were designing our project, we kept in mind how can we enhance the process of “thinking” between two or more actors.
This summer I took a course called creative learning design. In that course we mainly focused on designing children’s music learning experience which has a very big market and lots of needs. So, I decided to make a project targeted to children and the goal is to in some extent help them be interested in learning music. That’s the starting point and we decided to think about how to enhance the music box experience of kids. In that course, one thing I remembered most is that children need instant response to their action, or they will lose interests sooner or later. The first thing we were going to design is of course the instant response to children’s action (for example, our first thought was to design several buttons and you press different buttons different songs will come out). But back to my research, we are not only making a responsive project but an interactive one. So, we are thinking about how children can “think” after receiving this response from our project, and how they react to the feedback they received which then forms a circle of the clinic process of interaction. There are many kinds of music box and the most common kind is the one that you wind up the spring and the music will come out itself.
CONCEPTION AND DESIGN:
The action of “winding up the spring” gets the feedback of “hearing music” but it’s not interactive enough. Inspired by the winding up spring movement, I came to the idea of what if you turn the knob one step and one note will come out? the rhythm of the music is totally controlled by users. The user received the response from the music box and depending on the response one receives, he/she will then decide what to do next.
FABRICATION AND PRODUCTION:
Me and my partner cooperate very well. I took the responsibility of making the turning knob works, laser cutting the box as well as decoration. My partner took the responsibility of the two step motors and the potentiometers to control them. So, I will write some steps that I think is really challenging and important in this documentation.
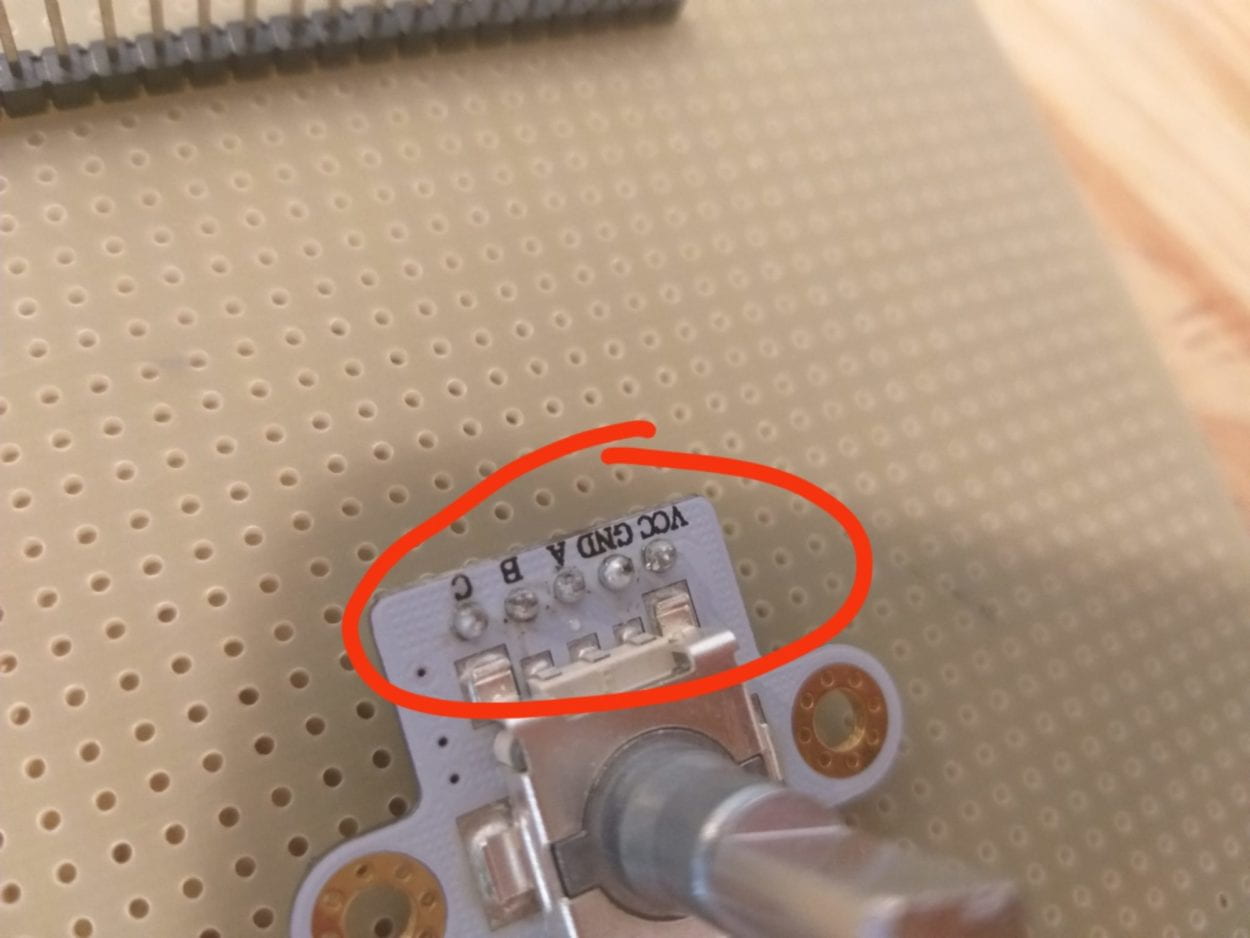
Hook up the rotary encoder:
The first step and the most significant step is to find out and hook up the right component that can achieve my goal: easy to turn. The potentiometer is not the ideal one, so I search online and found one called Rotary Encoder. Our equipment room have this kind of rotary encoder but not the exact same type as the one I found on YouTube. The biggest challenge I think for me is to hook up the Rotary Encoder. The type in our equipment room is called “df robot ec11 rotary encoder”. So, I searched it on google and wanted to find out the tutorial of how this works. But I did not find tutorial of how to hook up this, the only useful information I found was “The module has three signal terminals: terminals A & B are encoder output; terminal C is the button signal output.” (from the official df robot website https://www.dfrobot.com/product-1611.html ). But I found a YouTube video of how the similar rotary encoder works ( https://howtomechatronics.com/tutorials/arduino/rotary-encoder-works-use-arduino/). The names of the pins are different between the two: the one I got have five pins called: VCC, GND, A, B, C and the one I found online have the five pins called: CLK, DT, SW, +, GND. I then did some further research about the difference and hooked it up according to the YouTube video. (I forgot to take a picture of the wires L). I then hooked up the buzzer with the help of one of our recitation notes.
Problems I faced when writing the code:
The next thing is the code, as we have done one making notes exercise in the recitation, it’s not that difficult compared to hooking up the encoder. In writing this code we need to define the output A and B first. I think the most important part is to define the two state (the current state of the encoder and the latest state. If the two states are not equal, then play notes. So, I will not explain in detail but only to note some problems I encounters. The first problem is that the rotary encoder kind of works after I uploaded the code: the music sometimes goes when I turned, sometimes there’s no music when I turned and sometimes there’s music even if I am not turning it. I asked for help from Dave, he thinks there’s no problem with my code and the wires. So, he writes a println to only show the output of the encoder from serial monitor. It turns out that the value is not stable and changing itself without turning. So, he thinks is the connection problem of the encoder. By asking Tristan, I decided to solder it. After soldering it, it was totally worked by our movement of turning the knobs. But then another problem occurs, it always plays two notes in one turn. Tristan suggested me to start a new Arduino document (see the picture below) to only monitor the encoder. It seems to work very well because both the output A and B changes between 0 to 1 when I turn. I told him I’m going to double the notes in my code to solve the problem. But he suggests me not to do that but really think about how this algorithm works. I have no idea at that moment, but he suddenly knows what goes wrong: in each turn, the output changes from 0 to 1 then back to 0. In this case, every single turn makes the state of the output changes twice. In order to solve this, we add another statement in the if statement. (see the picture below).
soldering.

the new document to monitor the output of the encoder
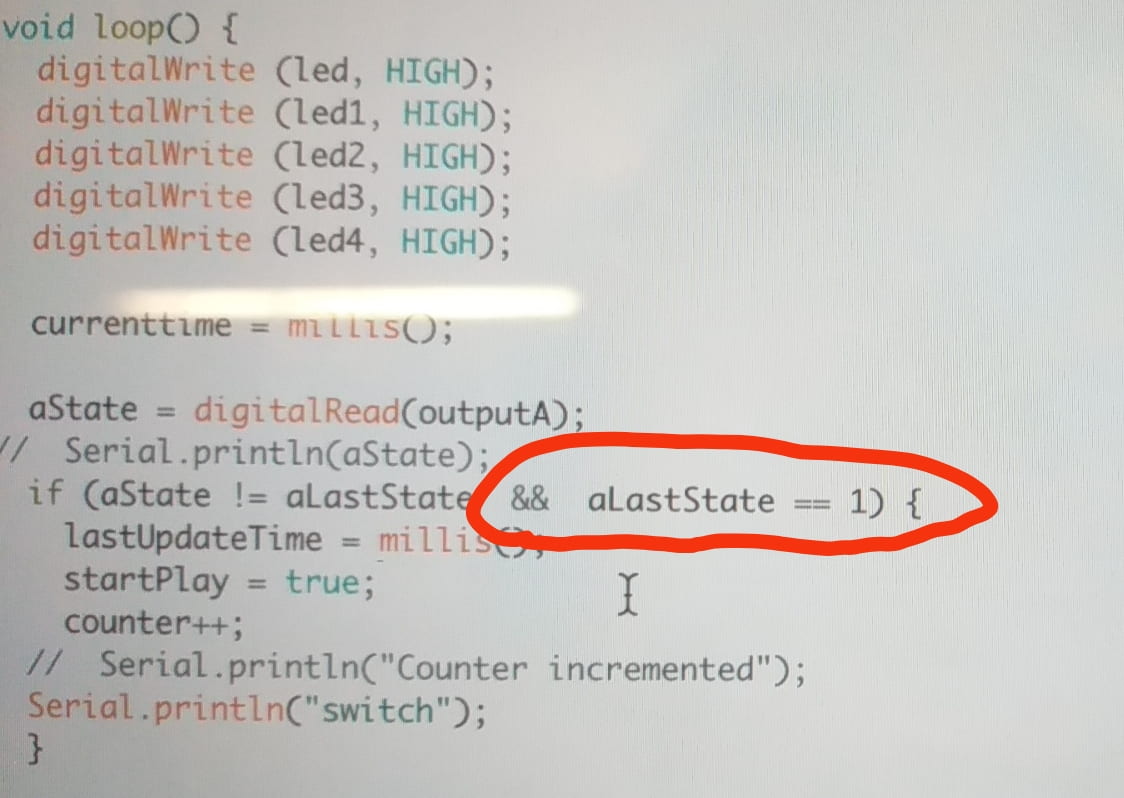
add a statement: only if the last state equal to 1, the note will come out.
And there’s also some small problems like how to make the music loop: adding note count. How to make the note stop playing when there’s no turning in more than 5 seconds: adding a timer (millis). How to make the note only start playing when someone turns it first rather than giving out sound as soon as it’s hood up to the computer: add a boolin. Jingtian really helps me a lot in these small problems. She writes down the structure of those code on a sheet of paper to let me figure it out first. If I have some problems, she will explain very patiently to me.
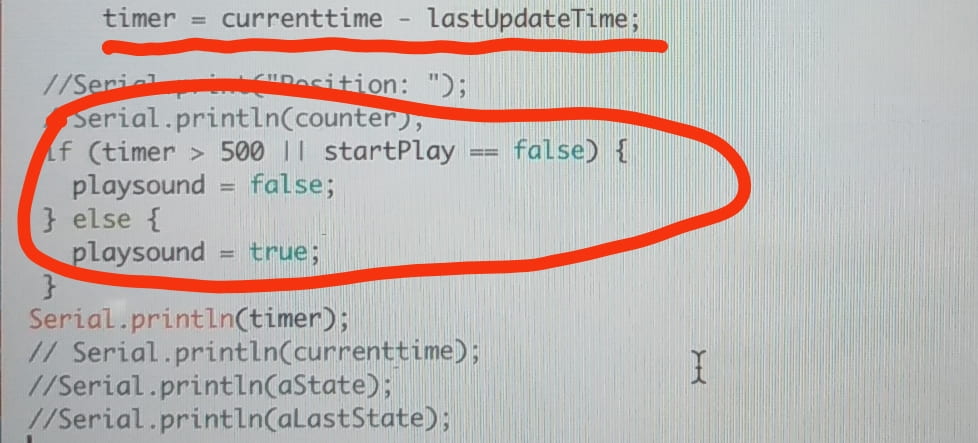
how the timer works.
Our biggest improvement comes from Inmi’s user test. She told us the users would just randomly turn the knob. We first came up with the solution that to write down an instruction but Inmi suggested that this is the last choice if we could not come up with a better one. She also said that she would made it a big plane to turn which is more difficult and involves more body movements. From that point, we started to rethink about our design and then directly led to the final product.
For the laser cutting process, we cut twice. The first time I used cardboard to test the size whole of the whole since the size can be changed by hand if we use cardboard.
Conclusion:
I think our final project align well with our definition of interaction the two actors (user and the music box) listen (receive the information: the music box listen to the instruction which is the turning of the knob and the user, and the user listen to the notes the music box made), think (process the information: after hearing the notes, the user decided what to act next to respond to the notes, different speed in turning results in different rhythm of the song ) and speak (give out the processed information: the action of the user then results in another action of the music box). In this way, the circle of interaction has completed.
For the audience, I think they act the way we expect: they turn a few notes and later figured out the melody and then enjoy the changing of rhythm by turning in different speed (they could not go crazily fast since the plane is quite big and we add a lot of weight on the plane so it’s not so easy to turn. One response we got is that a user said he gets the since of control of the melody which makes him very happy because he never manages to play an instrument. For some users who only turns in one direction, it makes me think of the long play CD player where you can see the CD is turning all the time while the music is playing. Some other users turn it in both ways which
Improvement: The first thing is that we haven’t figured out is that as there are two step motors turning along with the big plate, the wires connecting the two motors get mass up when turning. So, we might come up with a solution to solve this if we have more time. Second, instead of randomly stick our decorations on to the plate, we could make three or four different scenes so that it might be more surprising when users are turning the plate. Also, if possible, we could allow the users to control the movement of the characters on the plate.
Learn from setbacks: when the rotary encoder doesn’t work very well, I almost want to change it to the potentiometer we’ve used in class and one learning assistant even asked me, why don’t you use the potentiometer? But I stick to the rotary encoder (part of the reason is that is takes me a long time to hook it up) and try to solve the problem. What I learn from this is whenever encounter a failure, try to define the problem and solve it first rather than to run away from it and bring up plan B (which is not as ideal as plan A).
Our project provides an interesting and playful way that kids can interact with music. Since the demands for cultivate children’s interests in music is really large and many parents really worried about this, our projects in some extent help solve part of the problem.