Step 1: Choose an image to be your motif

image from http://content.time.com/time/specials/packages/article/0,28804,1855948_1863352_1863353,00.html
I decided to use this image because I would be able to try several of the shapes that we were given in the packet. I thought it would be straight forward but still allow me to try some of everything.
Step 2: Draw your image in Processing
My Interpretation
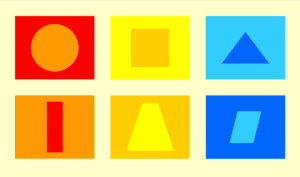
(sorry it’s a bit fuzzy from the screenshot)
I decided not to draw it on paper first because I thought the 6 rectangles would be easy enough to divide between the space. I wound up regretting it and wishing that I had done some more exact calculations with the spacing for the parts in between each of the rectangles and the sides. My spacing looked too big but if I changed it I would have had to change the coordinates for every other shape.
I also had a hard time getting a few of the shapes over the rectangles centered. for example, in the eclipse, I couldn’t figure out why it was staying in the top left corner of the rectangle, but it was because the starting point for one was a corner and the starting point for the other was the center of the eclipse which I did not have the exact coordinate for. Because of that, I had to do a lot of guess and check. when trying out points for my other shapes over the rectangles.
It became clear when I finally finished the shapes and getting them centered that it would take way too long to add the lines all over the images since I would have to find every start and ending coordinate for each line every few pixes, and have some going in different directions. Maybe if I had done better calculations in the beginning it would have been easier to figure out where I needed to add the other components.
Even though I had drawbacks, I do think that I did create an image that is very similar. I still used the colors that opposed each other in the rectangles below the top ones. The idea is very much the same, but the colors do look a little more childish, and without the lines it makes it look less complicated.
I think that processing was a good way to realize my design and helped me appreciate how much work it is to truly create something so tedious like that in an application such as processing.
Code
size(950,600);
background(255, 255, 204);
//rect1
fill(255, 0, 0);
noStroke();
rect(50,50, 250, 200);
//rect2
fill(255, 153, 0);
noStroke();
rect(50,300, 250, 200);
//rect3
fill(255, 255, 0);
noStroke();
rect(350,50, 250, 200);
//rect4
fill(255, 204, 0);
noStroke();
rect(350,300, 250, 200);
//rect5
fill(51, 204, 255);
noStroke();
rect(650,50, 250, 200);
//rect6
fill(0, 102, 255);
noStroke();
rect(650,300, 250, 200);
fill(255, 153, 0);
ellipse(175, 150, 150, 150);
fill(255, 0, 0);
rect(150,320, 50, 160);
fill(255, 204, 0);
rect(415, 90, 120, 120);
fill(255, 255, 0);
quad(450,325, 500, 325, 550, 475, 400, 475);
fill(0, 102, 255);
triangle(775, 100, 850 ,200, 700, 200);
fill(51, 204, 255);
quad(750, 350, 825, 350, 800, 450, 725, 450);