Introduction
Part 1
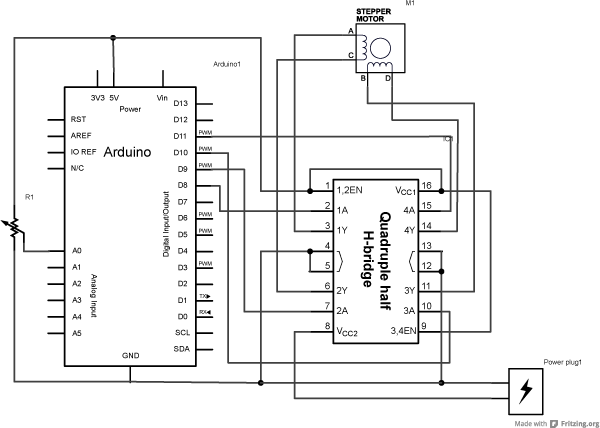
The goal of the project was to get a stepper motor to turn using an Arduino Uno board to control its movement
Part 2
In this step, the goal was to build on the previous step and control the stepper motor direction with a potentiometer
Part 3
This step built on steps 1 and 2, to develop a drawing machine that was controlled by the combination of step 2 and someone else’s step 2.
Process
Part 1

Code:
#include <Stepper.h>
const int stepsPerRevolution = 200; // change this to fit the number of steps per revolution
// for your motor
// initialize the stepper library on pins 8 through 11:
Stepper myStepper(stepsPerRevolution, 8, 9, 10, 11);
void setup() {
// set the speed at 60 rpm:
myStepper.setSpeed(60);
// initialize the serial port:
Serial.begin(9600);
}
void loop() {
// step one revolution in one direction:
Serial.println(“clockwise”);
myStepper.step(stepsPerRevolution);
delay(500);
// step one revolution in the other direction:
Serial.println(“counterclockwise”);
myStepper.step(–stepsPerRevolution);
delay(500);
}
Part 2
Code:
#include <Stepper.h>
// change this to the number of steps on your motor
#define STEPS 100
// create an instance of the stepper class, specifying
// the number of steps of the motor and the pins it’s
// attached to
Stepper stepper(STEPS, 8, 9, 10, 11);
// the previous reading from the analog input
int previous = 0;
void setup() {
// set the speed of the motor to 30 RPMs
stepper.setSpeed(30);
}
void loop() {
// get the sensor value
int val = analogRead(0);
// move a number of steps equal to the change in the
// sensor reading
stepper.step(val – previous);
// remember the previous value of the sensor
previous = val;
}
Part 3

Reflection
The process went well up until the very last step. When putting the two machines together, the long arms were not lining up and the blue rings only fit on the motor if put on the correct way. Originally, I forced it on and I thought it was wrong because it took elbow grease to put it on and then take it off to try the other way. However, I couldn’t get the blue ring to fit on the motor after flipping it.
Questions
- I would like to build some sort of walking robot with these motors because as I was looking at the drawing machine, I could only think of legs instead of arms. The potentiometers can be used to control the movement of the legs. I haven’t really thought of a purpose for the robot besides walking.
2) I think Shawn Deckers’s Scratch Series is very interesting. I don’t think I would be able to be in the room with that installation because I am uncomfortable with that kind of sound, and I know other people are. I think this installation is pretty similar to the project we made in the end because they both record movements. The difference between these two projects is that Deckers’s installation records natural movement, while the project I made was created through fixed movement controlled by two users. The actuators of Scratch Series are the controllers that bring the scratchers across the surfaces. I think Deckers chose to use these actuators because the focus should be on the surfaces, not the actuators themselves since it’s meant to be natural scratches, so the scratches should be similar. The actuators adjust to each other, therefore creating complex, natural rhythms.