Partner: Mimi(Cai Shuyang)
Circuit 1: Fade
Components: 1 * Arduino Uno
1 * USB A to B cable
1 * breadboard
1 * LED
1 * 220-ohm resistor
1 * Multimeter
A handful of jumper cables
Diagram: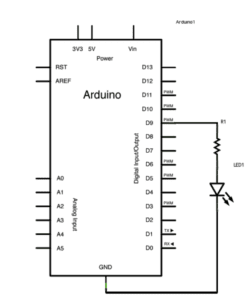
https://wp.nyu.edu/shanghai-ima-interaction-lab/category/recitations/
Process: 1. connect the Arduino with USB. 2. Plug in the LED and resistor in the right holes according to the given diagram and picture. 3. Double check the circuit and make sure there is nothing wrong. 4. Connect the Arduino to PC and run the procedure.
Problems encountered: nothing went wrong.
Picture:
Video:
Circuit 2: toneMelody
Components: 1 * Arduino Uno
1 * USB A to B cable
1 * breadboard
1 * buzzer
A handful of jumper cables
Diagram:
https://wp.nyu.edu/shanghai-ima-interaction-lab/category/recitations/
Process: 1. connect the Arduino with USB. 2. Connect the buzzer to the breadboard and connect the breadboard to Arduino with power and ground cables according to the given diagram and picture. 3. Double check the circuit and make sure there is nothing wrong. 4. Connect the Arduino to PC and run the procedure.
Problems encountered: on our first try, we connected the circuit right but failed to get the buzzer buzz when we tried to upload the codes. We asked Young for help and were told that we did not choose the right port. We fixed that and the circuit went well.
Picture: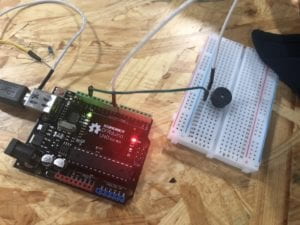
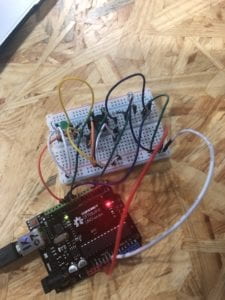
Circuit 3: Speed Game
Components: 1 * Arduino Uno
1 * USB A to B cable
1 * breadboard
1 * buzzer
2 * LEDs
2 * 220-ohm resistors
2 * 10K ohm resistors
2 * pushbuttons
A handful of jumper cables
1 * Multimeter
Diagram: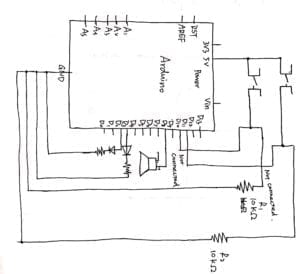
Process: 1. connect the Arduino with USB. 2. Connect all the necessary components to the breadboard according to the given diagram and picture. 3. Connect the Arduino with the breadboard with power and ground cables 4. Double check the circuit and make sure there is nothing wrong. 5. Connect the Arduino to PC and run the procedure.
Problems encountered: 1. On our first try, we found that the LED on Arduino was not shining as usual. We replace the USB and Arduino itself but could not figure out the problem. Then we reached Nick for help. With his presence, we connect it again and this time, the green LED gave out light. (but we still do not know why it would not shine. Maybe it was because we did not plug the USB tightly into the computer.) 2. After we fixed our first problem, another one popped up. We found that every time we push the button, the red LED on Arduino kept shining. Nick told us that it was because there is something wrong in the circuit that created a short circuit. We checked our circuit again and found that it was because we connected the button improperly, making two cables both connect to the power. We fixed that and it succeeded.
Picture:
Video:
Question 1: In our daily, we are surrounded by the interactions. For example, we press the bottom, the light would be on. Phones, one thing that we couldn’t live without, contain a lot of interactions. For example, Siri. If you shout to your phone,Hey Siri ! Then Siri would reply and interact with by answering your questions and executing the work you want it to do. In the circuit, interaction can be presented as you build up the circuit and input the code to it, then it will follow the instruction. In my opinion, interaction is a serious of reaction happened between human and human or human with other objects. Once a signal is set up at any side, the other side must have reactions to response to it. That is my opinion about interaction.
Question 2: Recently, I have been suffering from practicing piano and figuring out where I do wrong. So I think maybe using the LEDs to help me would be a great idea. First, it could serve as a reminder of where the player has got wrong. attach one LED to each key and use the sound sensor to see if the key is giving sound. Then program the music score into electric signals that could connect to each key. The program goes like this: if the sound is not the same as the music score, the circuit will be connected and the LED will give light to remind the player that he/she has made a mistake. Moreover, each LED could also be programmed with a chord when practicing accompaniment. Another possible use for these LEDs is that they could be used to make the process more interesting by assigning different colors of LEDs to different keys.