In this recitation, we created a drawing machine by using an H-bridge to control stepper motors attached to mechanical arms. We need to build the circuit and edit the code individually, and work with a partner to build the final drawing machine.
Materials:
For Steps 1 and 2
1 * 42STH33-0404AC stepper motor
1 * L293D ic chip
1 * power jack
1 * 12 VDC power supply
1 * Arduino kit and its contents
For Step 3
2 * Laser-cut short arms
2 * Laser-cut long arms
1* Laser-cut motor holder
2 * 3D printed motor coupling
5 * Paper Fasteners
1 * Pen that fits the laser-cut mechanisms
Paper
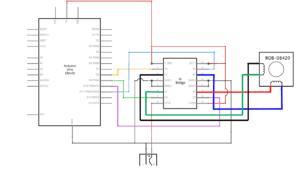
Step 1: Build the circuit
The circuit was quite complicated, and we had to be extremely careful when building it, since we were working with higher voltages compared with the past ones. It was a challenge for me to get the 5V into all the ports that needed to get it. I asked my partner about the connections between grounds and successfully worked them out. After finishing the circuit, I asked an IMA assistant for help. She helped me check the circuit again, and we found that I placed the H-Bridge upside down. Fortunately, I didn’t upload the code without the second check. After I corrected the mistake and upload the code, the motor rotate smoothly.
Step 2: Control rotation with a potentiometer
In step 2, I added a potentiometer from my kit to the circuit as the analog input. Then I uploaded the MotorKnob (Arduino>File>Examples>Stepper>MotorKnob) example to control the motor, and modified the number of steps within the code to 200, given that Stepper Motor is a 200 step motor. I met some problems when adding the function “map()”, because I am not familiar with the principle of this function. With my partner’s help, I successfully worked it out.


Step 3: Build a Drawing Machine
After my partner and I both finished Step 1 and Step 2, we started working together. We collected the materials needed and built the drawing machine successfully. It didn’t take much work. We then drew by spinning the potentiometers, which were controlling the movement of the motor.
Question 1: What kind of machines would you be interested in building? Add a reflection about the use of actuators, the digital manipulation of art, and the creative process to your blog post.
Answer: I am interested in building a tiny moving maze. It is actually a game machine and the player have to exit the maze within a specific time limit or the path of the maze will change. The actuator would be the stepper motor to allow the walls in the maze to move smoothly. The user will use potentiometers to control the movement of the player character. LEDs would be installed in the maze. They are supposed to serve as the marker to show the player’s location, thus enhancing the interactivity between the user and the machine.
Question 2: Choose an art installation mentioned in the reading ART + Science NOW, Stephen Wilson (Kinetics chapter). Post your thoughts about it and make a comparison with the work you did during this recitation. How do you think that the artist selected those specific actuators for his project?
Answer: In the reading ART + Science NOW, Stephen Wilson (Kinetics chapter), I found the art installation Open Burble quite interesting. In this recitation, we built a drawing machine that enables the users to create an art piece and express themselves through a third-party, which is similar to the Burble. The Burble is controlled by people via electronic handlebars, letting them to create something at an urban scale. Open Burble is made out of modular inflatable balloons with sensors, LEDs, accelerometers and microcontrollers, creating a highly interactive system. These actuators satisfy the artistic expectation while enabling the whole system to run smoothly.