For last week’s recitation, students were expected to build three different circuits and learn how to solder. Here is a list of components we used in the circuits.
Components :
Breadboard: it provides a base for making electronic connections
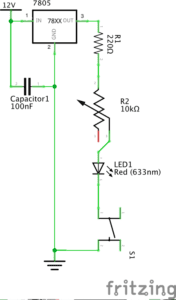
LM7805 Voltage Regulator: it is designed to automatically maintain a constant voltage level
Buzzer: when it is connected, it can make a buzzing noise
Button: it is used to interrupt or connect the flow of current through a circuit
220 ohm Resistor: it can add resistance to the circuit to decrease the voltage
LED: it lights when it is connected!
100 nF (0.1uF) Capacitor: used to stabilize and smooth the flow of electricity
Barrel Jack: it connects the power supply with the breadboard.
10K ohm Variable Resistor (Potentiometer): its resistance can change
Multimeter: it can measure electric current, voltage, and resistance. And we use it to measure the resistance.
Several Jumper Cables (Hook-up Wires): it is used to connect different electrical components.
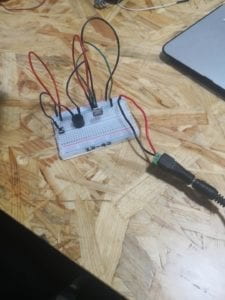
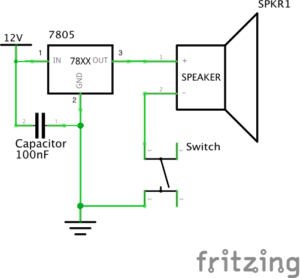
Circuit 1
I think it takes me a long time to figure out how to build the first circuit. The first part we get confused is how to use the breadboard. After being taught by instructors, this problem was soon solved, and my partner and I started to build the circuit.
For Circuit 1, we connected all the necessary components, but the bell did not ring. We guessed that there was something wrong with the capacitor since that is the last part we put on the breadboard. By examing the circuit again, we found out that we did not need so many wires to connect, just directly connect the capacitor on the left side of the breadboard, the problem is solved! Also, the lesson I learned from this failure is that do not use so many wires! It could make your work more complicated and much harder to find out what was wrong.
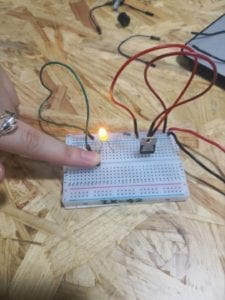
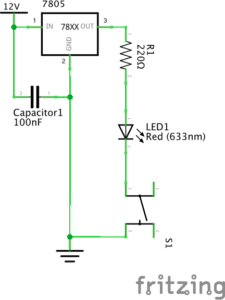
Circuit 2
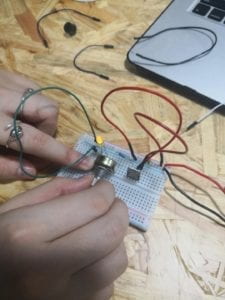
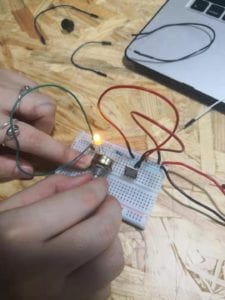
Making the second circuit is much smoother than the first one. However, when I pressed the button, the lamp did not light. We could not find the reason why. After checking the circuit again and again, we believed that we perfectly connected each component. Then, another instructor pointed out our problem, why don’t you guys check the LED again? And we just realized we connected the LED is an opposite direction. The longer leg should be connected to the resister, and the shorter leg should be connected to the switch.
Circuit 3
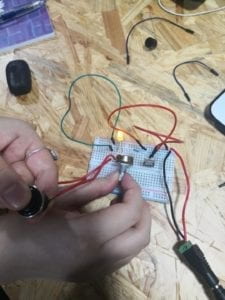
Based on the previous lessons we had, the third circuit is finished one time. We used the variable resistor to adjust the brightness of the light.
Then my partner and I went to soldering stations to learn how to solder. We need to connect two wires with the switch together. Tan the tip, then melt and put solder into the joint, the solar having a lower melting point than the adjoining metal. We waited for it to cool down, so the wires and switch could tightly connect. Overall, it is an easy task. However, it could be tricky at first to put the melting solar to the right position precisely at the joint.
Answers to Questions
Question 1:
After reading The Art of Interactive Design, the circuits we built all include interactivity. In my opinion, there are two actors in the interaction. The circuits are built to illustrate the interactivity between what we built and us. It acts like communication that we have. As I press the button or turn the variable resistor, the lamp and bell respond to me. The ringing of the bell and the lighting of the lamp both show the interactivity.
Question 2:
From Zack Lieberman’s video, I think that adding physical computing technologies to art can actually make drawing more interesting and interactive. Lieberman presents three examples in the video and shows us how interactive art is created by computing and design. I am particularly interested in the third example. He used the simple eye-tracking system and allowed disabled artists to draw graffiti using their eyes. And it all relied on the technology(physical computing), which makes it all happen.