Overview
Last Friday, we had our second recitation class. In this class, we were required to build three circuits based on Arduino. My partner Barry and I succeeded in building all the required circuits and finished the optional one which was adapted from the third circuit.
Matirials:
From Arduino Kit:
1 * Arduino Uno
1 * USB A to B cable
1 * breadboard
1 * buzzer
2 * LEDs
2 * 220 ohm resistors
2 * 10K ohm resistors
2 * pushbuttons
A handful of jumper cables
From cart:
2 * arcade buttons
1 * Multimeter (optional)
Circuit 1: Fade
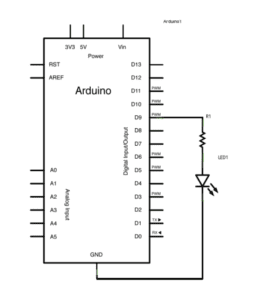
This is a very simple circuit, which is basically using the code to change the brightness of the LED. Maybe later we can add a sensor to make this circuit more interactive.
Circuit 2: toneMelody
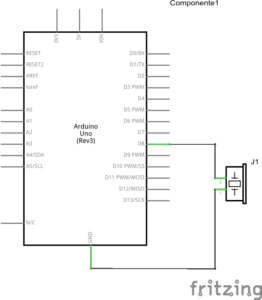
In this circuit, we can make the buzzer play a short melody by using Arduino. And every time we click the reset button on the Arduino board, the buzzer can replay the melody. Since the classroom was a little noisy when we first built the circuit, we didn’t record it right after we finished the circuit. Thus, we found a quiet place to take this video again. Furthermore, we found some example codes from the Internet which could make the buzzer play a real song and copied the code to test the codes. However, it’s a pity that the codes worked but we didn’t record it. Anyway, it’s pretty interesting to play some melodies by using Arduino.
Circuit 3: Speed Game
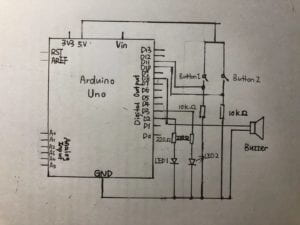
Basically, this circuit was for playing a simple interactive game, which involved two players who competed for which one can click the button faster. Compared with the previous two circuits, this one was more complicated. In this game, if you are the winner, the LED on your side would turn on and the buzzer would play a melody to show that the game is over. At first, we met with a problem that the circuit only worked for player one. Even though player two won, the light didn’t turn on. After checking both the codes and the circuit, we couldn’t solve the problem. Fortunately, after changing the LED on player 2’s side, it worked. The LED we used at first was broken due to some reasons. Solving the problem made both of us happy. Anyway, even though it’s just a simple game, my partner and I still enjoy playing it. And here is the video when we played the game.
Optional task:
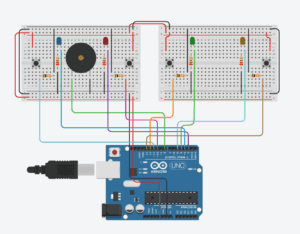
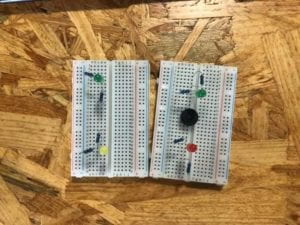
After finishing the third circuit, we followed the instruction and built the circuit for four players. Since the space of the breadboard was so limited, we connected two breadboards to build the final circuit. And the first image is the diagram of how all the components are connected. As for the codes for four players, I added two more variables for player 3 and player 4. Moreover, I also added two conditions to finish the game. By the way, the codes for the last circuit can be further improved since the codes always first read the input from the first button. In this case, every player has to click more than ten times to achieve the goal of clicking ten times to end the game. And here is the video about playing the game.
Questions:
- The definition of interaction contains three parts: input, processing, and output. The first two circuits seem not interactive. But they are still two interactive product. The output for the first circuit is the brightness of the LED. The codes are processing to change the brightness of the LED. And the input is the parameters that we enter in the codes. Such simple interactive technology can be seen so many places in our daily lives. For instance, there are some speakers with buttons to control the volume and a LED which can glow. When you click the button to turn down the volume, you can hear that the volume is getting lower and the brightness of the LED is getting darker. In my opinion, we are actually surrounded by a lot of interactive technology in our daily lives.
- The 10K resistor is used for protecting the button from a high voltage.
- If I have 100,000 LEDs of any brightness and color, I would like to decorate them in a big room. At the same time, I would code them to make them change their brightness and color dependent on the music I play in that room. If I hold a party and play some loud music inside the room, the LEDs can become colorful which are suitable for the atmosphere for a party. If I want to play some smooth music and stay alone inside the room, the LEDs can become soft so that I can really relax in the room.