Overview
During this recitation, my partner and I built three different circuits, this time with our own Arduino kits. The first circuit was called “Fade”, and consisted of an LED which was programmed to fade between high and low brightness at a regular interval. The second circuit was called “toneMelody”, which included a speaker that played a sound that my partner and I told it to play. The third circuit was called “Speed Game”, which was a two-player game in which players attempted to press the button the most times in a certain time interval. The first two circuits were fairly straightforward, but we needed help writing the code for the second circuit. The third circuit was both difficult to construct and difficult to program, but with assistance we were able to complete it.
Materials:
1 * Arduino Uno
1 * USB A to B cable
1 * breadboard
1 * buzzer
2 * LEDs
2 * 220 ohm resistors
2 * 10K ohm resistors
2 * pushbuttons
A handful of jumper cables
2 * arcade buttons
Circuit #1: Fade
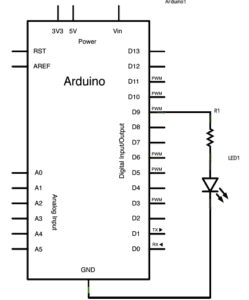
This circuit consisted of the Arduino, a breadboard, a 220 Ω resistor, an LED, and wires. We first connected the LED and the resistor in the breadboard, then we connected the resistor to power from digital pin 9, then lastly we connected the LED to ground. This circuit worked without issue.
Circuit #2: toneMelody
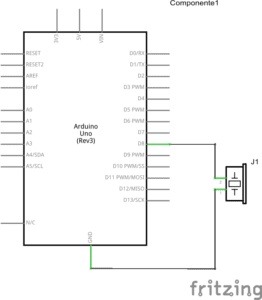
This circuit was similar to the first one, but there was no resistor. We connected the speaker to digital pin 8 and ground, and the circuit functioned properly.
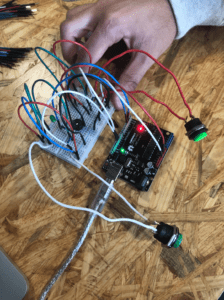
Circuit #3: Speed Game
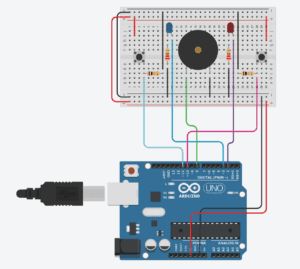
This circuit was difficult to build compared to the other two, as it consisted of many more parts. This circuit contained two arcade buttons, a speaker, two LEDs, two 220 Ω resistors, and two 10K resistors. After we finished building it, my partner and I uploaded the code and tested the circuit, which worked.
Question 1:
Based on my experiences in this class, including recitations and the readings, I would define interaction as a process of inputs and outputs exchanged between two actors. In this case, actors include humans and machines. Specifically, an interactive design is one in which the output of a machine is influenced directly by the input of a human actor, and a machine’s collection of input data is influenced by the labor output of a human. These actions are reciprocal, and each depends on the other for a design to function.
Question 2:
The 10K resistor controls the the current in the circuit. Since five volts are flowing through the circuit, and that voltage would overload the button, the resistor protects that component of the circuit.
Question 3:
If I had 100,000 LEDs, I would donate them to the IMA lab so that future students have the resources to learn how to build circuits.
Hi Jackson,
your answer about the 10K resistor is correct, but the button is just two pieces of metal, what it can happen is a shortcut. We use a 10K resistor because if we don’t use it we would be connecting 5V and ground directly every time we push the button.
check out this video: https://www.youtube.com/watch?v=RqI9MqVRB5A
I would also ask you to research more about what you can do with LEDs, maybe you will have more ideas for them by seeing what’s possible. You can check out this page: https://www.creativeapplications.net/