Overview:
In this recitation, we build four circuits (three required & one optional) in pairs. I worked with Jackson. The first two was quite easy, and it got harder when it came to the third one as the wires needed increasing, but we still dealt with them.
Materials:
From Arduino Kit:
1 * Arduino Uno
1 * USB A to B cable
1 * breadboard
1 * buzzer
2 * LEDs
2 * 220 ohm resistors
2 * 10K ohm resistors
2 * pushbuttons
A handful of jumper cables
From cart:
2 * arcade buttons
1 * Multimeter (optional)
Circuits 1: Fade

The first one was quite easy as we had already done it in class before, just connecting the wires with the digital output on the Arduino board, the 220 ohm resistor, the LED, and the ground.
 This was the circuit we made.
When we ran the Code: Arduino>File>Examples>03.Analog>Fading,the light started to fade.
Circuit 2: ToneMelody
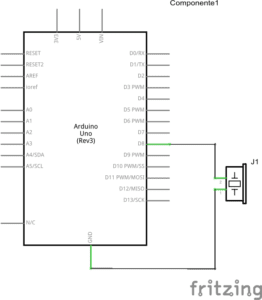
This one was also easy to build. The melody was really funny so I changed the code to loop part so that we could record it more easily.

This is the one with the original code. This is the one with the repeated melody.
Code: Arduino>File>Examples>02.Digital>toneMelody
Circuit 3: Speed Game
This one is harder because the connection of the circuit is much more complex than the other two. Also, at the first time, we could not recognize the 10K resistor because the diagram seemed to be different from the diagram on the package. We asked the LAs, and they told us that we could see the detailed information and illustrations on the tinkercad if we registered and logged in.
 This is the diagram on the Tinkercad.
We forgot to draw our own schematic at first.

But we still made it work.

This is the process of our work.

The monitor showing it working.
But we got a problem in the first run. We built the LED in the opposite way so that when the player one wins the game, the light won’t be on. We found the problem and fix it.
It was quite fun, and the code was provided by the Tinkercad so we did not need to worry about coding.
Circuit 4: Optional four-player Speed Game
We changed the code a little bit. It was not hard as the basics were provided. We only needed to add the definitions and running codes for the player 3 & player 4.


 These were the codes.
 These were the circuits we made.
It was a little bit complex as there were too many wires involved.
Question 1:
I have the same understanding as to the text Physical Computing, the interaction is something about “listening, thinking, and acting” for human, and “input, processing, and output” for machines.
Question 2:
The push button does not have resistance or only have little resistance. If we don’t want the circuit burn, we should add the resistor.
Question 3:
If we made those 100,000 LEDs together, and made it as a board, connecting with sensors, CPU, and other components, we can make a computer. I would like to use that to build a mirror, which can reflect the change of lights and shadows when the interactor moves. So it could be an interactive settings, as we have the suitable codes and circuits for it.
great documentation. Just don’t add *.mov videos, they usually don’t show well on wordpress. You can convert them to *.mp4 using a free online convertor like this one: https://www.onlinevideoconverter.com/