We first learned how to weld using the pen things. When doing this, we learned where to put the pen and what metal should we use to connect the two devices to make the button. The problem we face is the pen always not hot enough to melt down the metal. We polished it but it still not working so we change to another machine and it works well.
Components Used:
-
- 1 * Breadboard
- 1 * LM7805 Voltage Regulator
- 1 * Buzzer
- 1 * Push-Button Switch
- 1 * Arcade Button
- 1 * 220 ohm Resistor
- 1 * 10K ohm Resistor
- 1 * 10K ohm Variable Resistor (Potentiometer)
- 1 * LED
- 1 * 100 nF (0.1uF) Capacitor
- 1 * 12 volt power supply
- 1 * Barrel Jack
- 1 * Multimeter
- Several Jumper Cables (Hook-up Wires)
Then we work on the circuit 1: Door Bell. We first figure out what components we need to use. We picked out the Capacitor, the Voltage Regulator, the Push Button (Switch), the Speaker. The first problem I met is the structure of the Breadboard. I don’t know how it works and where should I put the cables. I turned to the assitant for help. She explained to me that the cables are insides the breadboard and we just need to put the components on it and use the cables to connect the components. I also learned that the long leg of the led is where electricity goes in. So we follow the pictures of the circuit and began working. After we finish connecting all the components, we found the switch didn’t work.
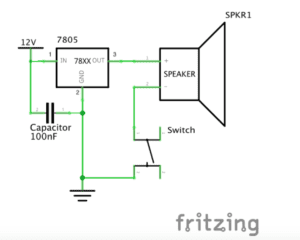
As soon as we connect the power, it began to ring. We doubled checked the circuit and didn’t noticed any mistakes.
Until we heard one of our classmates said the switch has direction. So we rotate the switch 90 degrees then put it on the breadboard. This time it’s working. From this, we learned that the switch has it’s direction and this helped me a lot for my future work.
Then we continued to the Circuit 2: Lamp. We only changed some components and add more cables to connect them. But during this process, I was confused by the structure of the breadboard. I forgot how the wires are connected insides. Then I seek help from the assistant. She showed us the back of the breadboard and I finally understand how it works. After we finish the circuit, we found that it is not working again.
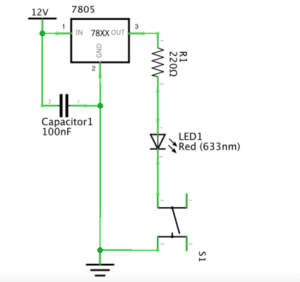
We checked the circuit and found that we missed on details. The cable connecting the power was loose.

We corrected the mistake and it works
For the third circuit, the only problem we met is the Variable Resistor. I really don’t know how it works so I peeked help again. Then I learned that it has three parts. One is the electricity go in. One is the changing of the level of the registration. One is where the electricity go out. After we figure out how it works, we did it successfully. ( We forgot to take the photo because at that time the class was ended).
The reading response:
Q1: I think the first thing include interactivity is the interaction with my partner when we made the circuits. We shared our opinions when we were working. I held a different opinion on how the breadboard works, then two of us started an argument on it. My partner interact with me by objecting my opinion then giving his own opinion oh how it works. He listened to me, then he thinks, then he offer his opinion. The second thing include interactivity is about the circuits and us. When the circuits were working, we were really happy and when they were not working, we felt bad. In this way(affecting our emotion), I think the circuits were directly interact with us. The third thing include interactivity is the process the assistant teaching us how some components work. Building the circuit is a process, during this process we had conversation with the assistant. I think this is also how the circuit include interactivity, letting us to learn how it works. The assistant explained how it works, then we think and tried to understand how it works. When we don’t understand, we asked again and interact with the assistant. I think this is also the interaction the circuit include.
Q2:
In Zack case, I think he made great combination of this two to make Interactive art. He first consider what the problem people have then makes the Interaction Design. To finally create the art work, he used the Physical Computing. I think the design is the main part and the physical computing is to support the design which is also an important part of the Interactive arts. The design provide the idea and the physical computing make the art existing. If the design is not good, the whole art piece lose this meaning. And without the computing, the artwork cannot conveying to its audience what the designer is thinking.