pesKey Bot- Key Reminder- Kathy Song- Rudi
Partner: Tiana Lui
Context and Significance
Our previous research project was a tablet that would display Braille characters for young children to learn Braille through different textures. The purpose of that project was to create something that would increase interactivity between children and the Braille language. I believe that the best representation of interactivity is when two objects respond to each other. However, a project like that would be quite difficult to implement in real life. I did not want to create something that would be limited by time constraints and the lack of proper materials. My partner and I wanted to create something fun and simple with the goal that it would respond to us and we would respond to it as well. For the projects that I have researched, such as the expressive tactile controls, the buttons have personalities such as “timid”, “lazy”, “stubborn”. Each sensor would respond to the person in a different way. “Timid” would avoid the person’s touch, “lazy” operates much slower compared to the average button, and “stubborn” would offer resistance when pressed. I took an interest in how the buttons had personalities and more importantly, how they reacted the users. This has been one of the projects that have truly shaped my understanding of interaction as a series of movements by at least two actors, both responding to one another. Our project is unique because it has a personality and is entertaining while useful. The robot design with a face allows you to think of it as a friend instead of a machine and its arms are quite realistic. Our project is intended for those who forget their keys frequently but is also created for those who want to have fun intrigue those who are looking for something different.
Conception and Design
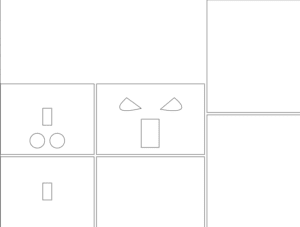
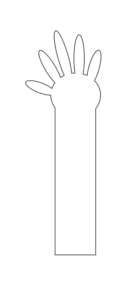
Our robot was created with the intention of reminding the user to bring their keys before leaving their home. Originally, we had placed the ultrasonic sensors at the side of the robot so that it would sense the person only when they were leaving the house. However, we received constructive feedback that it would not make sense to place the ultrasonic sensor on the side because, by the time the user has been notified to get their keys, they would already be out the door. I redesigned the robot so that it would sense the user while they were walking towards the door, this way there would be ample time for the user to remember to grab their keys. Furthermore, we wanted to keep the idea of an interactive robot that was more of a friend than a robot, so we gave it an angry face and hands that would rapidly wave if the keys were not taken. After the constructive feedback, we decided that it was best to use a light sensor because it would detect if the key was actually taken, instead of only depending on the ultrasonic sensor which would only detect if the person walked by or not. We also used laser cut acrylic instead of laser cut wood because we wanted the red LED to glow throughout the entire robot to demonstrate that it was angry. The criteria that we selected for our materials were done so to help humanize the robot and give it extra detailing. The materials that we used were best suited for our project because they were efficient and each part was able to play its role properly. Another option that would have better contributed to our project would be 3D printing instead of using laser cut acrylic. If we had 3D printed the box, then the LEDs would be able to illuminate throughout the whole face, whereas the laser cut acrylic did the bare minimum.
Prototype 1 (video size is too big, this was the only size that would convert)
Prototype 2/ User Testing
Fabrication and Production
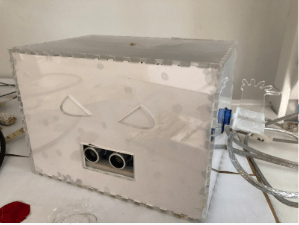
The most significant steps in our production process occurred during the User Testing Session. During our User Testing Session, we realized that we implemented the speaker function incorrectly due to wiring, which ended up frying the Arduino board. Furthermore, we realized that we had to implement a light sensor or else it would not be possible to detect if the key was taken. After the user testing process, we started rewiring and coding the new speakers and sensors. The light sensor works by detecting how much light the sensor receives. If there is less light, it meant the key is on the sensor, if there is more light then the key is off the sensor. We changed the speaker to a grove speaker to emit tones using sample code. If the ultrasonic sensor detects that the distance is less than 40cm, and if the key was present, then the speaker will ring, servo motor arms would go off, and the LED would blink, else nothing happens. This was a change from our previous design of just having ultrasonic sensors detecting the movement. At the beginning it was not effective because of minor coding issues, sometimes the sensors would not detect properly and other times the speakers or the LEDs would not go off. Ultimately, after a few minor changes, we decided to use two Arduino board and connecting the two together because the motors were not functioning properly otherwise. The production choices my partner and I made were based on how we would have sold this as a product. Each move was made based on how realistic we thought it would be to implement the new features.
Prototype 1
Prototype 2
Conclusions
The goals of our project were to create a product that would be user-friendly, entertaining, interactive, and useful. We wanted to create a robot that would remind the user to take their keys before they left the house, if they did not remember to take their keys, the robot would become angry and start making angry noises. Our project results align with the definition of interaction because there is a series of movements between at least two of the actors, with one responding to the other. However, it may not align with interaction because it is using technology to remind the user to complete a simple task which seems to remove the users’ interaction with his or her environment. Our audience was intrigued that our project had a personality because it is different from the traditional robot. During the user testing session, the audience wanted to engage with the robot but were unclear about what they were supposed to do. After explaining it to them, they were much more entertained by the robot. If we had more time, we would 3D print its entire structure rather than use laser cut acrylic for the LED to glow throughout the entire robot. We would also like to implement a speaker that would make the robot yell when it got angry instead of using a sample code of an alarm. We learned to be patient and double check every wire and any necessary resistors so the Arduino boards would not get fried again, we would have also avoided careless mistakes in the code. We felt so good after completing this project because it showed us how the intimate workings of the code worked and how every step is vital to the final project.
Code
//ultrasonic distance sensor
int trigger_pin = 3;
int echo_pin = 2;
long duration;
int distance;
//ldr
int ldrPin = A0;
//key not present value
int calibrationValue = 670;
//key on holder
int keyPresentValue = 270;
//current ldr value
int ldrValue = 0;
//grove speaker
#define SPEAKER 6
//int BassTab[] = {1911, 1702, 1516, 1431, 1275, 1136, 1012}; //bass 1~7
int BassTab[] = {1012, 1012, 1012, 1012, 1012, 1012, 1012}; //bass 1~7
//led
const int ledPin=7;
int ledState=LOW;
//store last time LED was blinking
unsigned long previousMillis=0;
//interval at which to blink
const long interval=10;
////////////////////////////////////////////////////////////////////////////////////////////
//FUNCTIONS
//distance
void measure() {
//measure current position from sensor
digitalWrite(trigger_pin, LOW);
delayMicroseconds(2);
digitalWrite (trigger_pin, HIGH);
delayMicroseconds (10);
digitalWrite (trigger_pin, LOW);
duration = pulseIn (echo_pin, HIGH);
//distance in cm
distance = (duration * 0.034) / 2;
}
//grove speaker
void pinInit() {
pinMode(SPEAKER, OUTPUT);
digitalWrite(SPEAKER, LOW);
}
void sound(uint8_t note_index) {
for (int i = 0; i < 100; i++) {
digitalWrite(SPEAKER, HIGH);
delayMicroseconds(BassTab[note_index]);
digitalWrite(SPEAKER, LOW);
delayMicroseconds(BassTab[note_index]);
}
}
//////////////////////////////////////////////////////////////////////////////////////////
void setup() {
// put your setup code here, to run once:
Serial.begin(9600);
//distance sensor
pinMode (trigger_pin, OUTPUT);
pinMode (echo_pin, INPUT);
//ldr
Serial.print(“Calibrating. Do not place your keys on sensor.”);
delay(10000);
calibrationValue = analogRead(ldrPin);
Serial.println(“Calibration value: ” + String(calibrationValue));
Serial.println(“Place your keys on the sensor.”);
delay(5000);
keyPresentValue = analogRead(ldrPin);
Serial.println(“Key present value: ” + String(keyPresentValue));
//grove speaker
pinInit();
//led
pinMode(7, OUTPUT);
}
void loop() {
// put your main code here, to run repeatedly:
//distance
measure();
//ldr
ldrValue = analogRead(ldrPin);
if (distance <= 40) {
Serial.println(“Distance: ” + distance);
//if key is on the holder, shout
if (keyPresentValue – 70 < ldrValue && keyPresentValue + 70 > ldrValue) {
Serial.println(“ldrValue: ” +String(ldrValue));
Serial.println(“TAKE YOUR KEYS”);
//grove speaker
for (int note_index = 0; note_index < 7; note_index++) {
sound(note_index);
delay(100);
}
//led
unsigned long currentMillis = millis();
if (currentMillis – previousMillis >= interval) {
//save last time you blinked LED
previousMillis = currentMillis;
//if LED is off, turn it on and vice versa
if (ledState == LOW) {
ledState = HIGH;
}
else {
ledState = LOW;
}
digitalWrite(ledPin, ledState);
}
//for debugging, and console readability
//delay(1000);
}
else {
Serial.println(“GOOD JOB FOOL.KEYS TAKEN.”);
//for debugging, and console readability
//delay(1000);
}
}
}