PROJECT TITLE
Ride with the Wave
DESCRIPTION AND CONCEPT OF THE PROJECT
The interactive garment serves as a conduit, allowing wearers and observers to intimately grasp the multifaceted experience of bipolar disorder. Through synchronized breathing, it mirrors the ever-shifting landscape of manic euphoria and depressive depths of bipolars. Within this intricate dance, the wearer’s longing for connection waxes and wanes, and the interactions are both solace and struggle. Would you be willing to give them an embrace of compassion?
这件互动服装邀请穿戴者和观众密切地感受双相情感障碍者的生活。在同步呼吸之间,它反映了躁郁症者不断处于变化的情绪曲线。穿戴者对于联系的渴望时断时续,互动时而产生慰藉,时而也是挣扎。你愿意拥抱他们,和他们同频呼吸吗?
RESEARCH & DEVELOPMENT
- The main idea
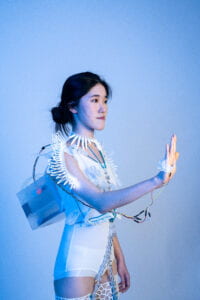
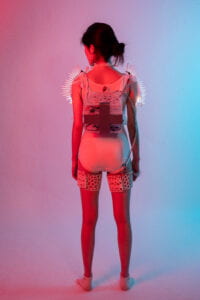
What does it feel like to engage in a social life as a person with bipolar disorder? The design of the clothes, with its pneumatic pumps, lights, and sensors, codes the bipolar emotional cycle into the interaction process. The pneumatic device sucks and pumps in air at a high pace during the mania episode, and the lights turn white and yellow when the wearer gets in touch with others, suggesting a high emotional need for companionship. When it goes to the depression episode, the lights turn sharp red when the sensor is pressed, and the pneumatics would stop working. However, if the wearer is given a hug, the presser sensor on their back would be activated, and the pneumatic device restarts working with the lights showing warm yellow. In a nutshell, the garment utilized multiple interactive devices to help foster a better understanding of bipolar disorder and call for love and care for bipolars with a simple hug.
- The research & Inspirations & experiments
Research on what BD is
The idea behind “BD” originated from Chanel’s interactions with a friend who has bipolar disorder. We’re generally aware of the basic conditions of this disorder and its two common emotions: mania and depression. Subsequently, we researched bipolar disorder’s emotional curve charts and delved into psychology books to understand the different social needs and desires of individuals with bipolar disorder during various emotional periods. Our concept is based on the evolving social needs of individuals with bipolar disorder during different emotional states.
Later on, we realized that categorizing these emotional changes solely as unique to bipolar disorder, or assuming that bipolar disorder’s emotional fluctuations perfectly align with emotional curve charts, is somewhat one-sided. The varying social needs resulting from emotional changes are actually shared by all humans, and each person’s emotional fluctuations are unique. This realization broadened our project into a larger, more universally meaningful concept, and it also respects the diversity of human experiences.
Research on other BD art works
Before starting our design work, we also conducted some research on artwork related to bipolar disorder, as well as surveys on fashion clothing representing BD. We noticed that these artworks tended to depict the inner anguish of BD through static poses, without addressing the varying and changing interaction needs of individuals with BD in dynamic external settings. However, we believe that understanding the emotional changes in BD and the different interactions needed is crucial in helping people better interact with those affected by BD. Therefore, the focus of our project is on the differences in emotional states and the required interactions, which we believe can be further explored through fashion based on previous works.
Research on mechanisms and experiments
Scissor Mechanism
The idea for the Scissor mechanism was inspired by a device we created in our first group work assignment using rubber bands and nails to demonstrate self-constraint, which we aimed to convey through this device along with the sensation of inflation like a pump. We were influenced by videos showcasing expandable mechanical arms and began experimenting with creating this type of scissor mechanism. In our project proposal documentation, you can see that we initially attempted to make this device using cardboard and toothpicks. Later on, we switched the materials from cardboard to acrylic sheets and replaced the toothpicks with bendable nails. We also experimented with fixing and pulling at different positions to achieve the desired expandable effect.
Pneumatics
For the pneumatic inflatables, we had the following attempts: Silicone ➡️ Rubber fingertips ➡️ Silicone 2nd trial ➡️ “Rubber fingertips Pro”.
We made a silicone mold together under the guidance of Marcela in her remaker space. The process was divided into two parts, preparing the silicone (mixing A & B) and pouring the silicone into the laser-cut mold.
Later, we tried out using the fingertips from the rubber gloves that we bought for previous assignments, and they worked very well in terms of imitating breaths, plus they were much easier to prepare and lighter to wear.
However, we didn’t want to give up on silicone that quickly because we thought the material could create a better and more exaggerated visual effect. The next day after the presentation, we had a second trial. Inspired by a project that made a breathing skin, we decided to laser cut a mold by ourselves and experiment with something similar. Chanel modeled and printed a few parts as the air layer, and I laser cut a square box as a silicone container. It turned out that, though the second layer was very thin, it was still very hard to get the 3D-modeled part out of it after it was done. We then switched to using baking paper as the air layer. Since the connecting parts were narrow and some were accidentally stuck together, it was a bit hard for the air to go through, and the visual effect at the end was not great.
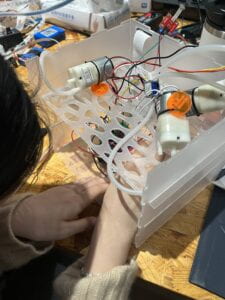
After two failed attempts, we went back to rubber fingertips. We tried to add more of them to test how many could two motors supply, and add variables like different textures and colors of rubber gloves. We also tried with the different hose connectors to see which worked better. We tried to build more with 3-hole hose connectors right after our failed attempts with silicone. It worked well. Later during the spring break, we bought the Y-shape hose connectors and 4-hole hose connectors. And we built a super big and long one with them. However, the effect is not that good. We then divided them into several parts. Then they worked better.
Thus, we realized that instead of building a very big one, we can build smaller ones and placing them on different parts of our bodies. (And we indeed followed this discovery in our final work!)
- The Process
3D printings:
-
- 3D Emotional waves:
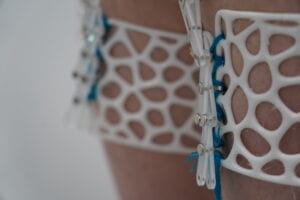
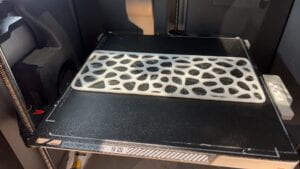
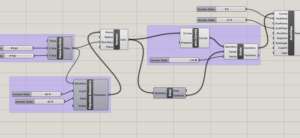
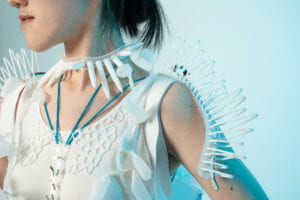
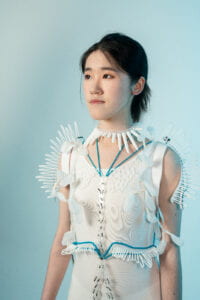
- Leg rings: We wanted to create something on the legs to echo with the pneumatics around the upper body. I generated the pattern using voronoi in Grasshopper to the alveoli in the lung. Some attracting points were added to create holes with different sizes. Eventually, the scissor mechanism and the leg rings were attached to each other. The leg rings also serve as two anchor points for the scissor mechanism to work when the wear walks.
-
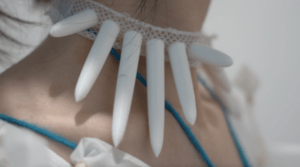
- Choker: The making of the choker follows last weekly assignment. I designed different heights of circular cones in a line using graph mapper in Grasshopper to represent the highs and lows of bipolars. The choker in a way is a defense mechanism of the wearer against danger from the outside, but it sometimes also suffocates the wearer, just like what their emotional cycle does. When the wearer is moving their head, the cones on the choker also wave with the move. Some magic stickers were used to adjust the radius of the choker.
-
- Decorations on Chest: The decoration on the chest is developed from Luna’s Voronoi exercise. The pattern also complements other patterns we created to evoke a sense of wave-like changes. It fills the empty space on the chest, and according to our friend Ting, she mentioned that she feels this decoration makes our creation look like a piece of clothing now (we’re not sure whether to cry or laugh 😬).
Laser cuttings:
-
- Scissor Mechanism: The Scissor Mechanism was developed based on the prototype we presented in the proposal presentation. We extended the mechanism, originally designed to hang around the neck, and connected it with a forked design to leg loops, altering its operation. We aim for this mechanism to simulate inflation when the model walks, giving a sense of pumping air, while also conveying a feeling of constraint. Initially, we intended for the model to extend and retract the mechanism by pulling a cord around the neck. However, due to the length of our scissor mechanism and its connection to both leg loops, this proved difficult and cumbersome to operate manually. Therefore, we transformed the structure into a mechanism that adjusts naturally based on body movement, eliminating the need for manual pulling. We ultimately secured the midpoint of the scissor mechanism onto two 3D wave decorations at the waist, leaving the upper part of the mechanism stationary for decoration purposes only, while the lower part connected to the legs extends and retracts as the person walks.
-
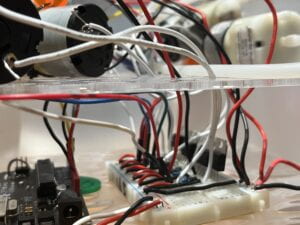
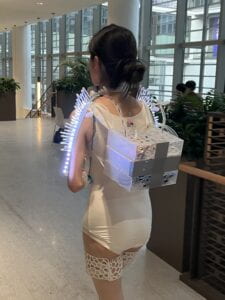
- Big funny box: Okay, regarding the criticism about the oversized “big funny box,” we have a few points to make. This box was meticulously designed and constructed by Chanel and Luna after carefully measuring all the electronic devices we needed to hide and store. Luna felt that Chanel’s Voronoi pattern on the legs was particularly suitable for adapting into decorative patterns on the front and top of the box, as well as for the patterns on the dividers between each layer. This served two purposes: it added decorative functionality and allowed us to layer and organize the interconnected electronic devices while allowing wires to pass through the hollowed-out holes to connect them. Additionally, the holes helped to some extent in keeping the wires organized and preventing significant shifts in their positions. We started by measuring the dimensions of the box—its length, width, and height. Then Luna used Makercase to create a model of the box we wanted. After importing it into Adobe Illustrator, we used the image tracing tool to turn Chanel’s Voronoi pattern into a pattern that could be combined with the boards inside the box. After going through a series of processes including laser cutting, assembly, and gluing, our big funny box was completed. Initially, we considered 3D printing the box, but it was too material and time-consuming, making it impractical. That’s why we decided to use laser cutting to construct the box. Please refrain from mocking it further. Although it’s big and funny, it carries a significant load. Without it, our efforts would be in vain.
Coding:
- The coding is built based on the different functions and effects we want to showcase in different emotional stages. How code is interconnected with our concept is commented on in the codings below:
#include <Adafruit_NeoPixel.h>
#define PIN0 3
#define PIN1 5
#define NUMPIXELS 18
Adafruit_NeoPixel pixels0(NUMPIXELS, PIN0);
Adafruit_NeoPixel pixels1(NUMPIXELS, PIN1);
// Motor Group 1
int motorPump1 = 9;
int valve1 = 10;
int motorSuck1 = 11;
// Motor Group 2
int motorPump2 = 6;
int valve2 = 7;
int motorSuck2 = 8;
// Pressure Sensor 1: sense hug or not in depression mode
const int pressurePin1 = A1;
int pressureValue1;
// Pressure Sensor 2: sense whether someone is approaching the model
const int pressurePin2 = A0;
int pressureValue2;
unsigned long previousMillis = 0;
long period1 = 1000;
long period3 = 2000;
bool breathing = false;
void setup() {
Serial.begin(9600);
pixels0.begin();
pixels1.begin();
pinMode(motorPump1, OUTPUT);
pinMode(valve1, OUTPUT);
pinMode(motorSuck1, OUTPUT);
pinMode(motorPump2, OUTPUT);
pinMode(valve2, OUTPUT);
pinMode(motorSuck2, OUTPUT);
}
void loop() {
// Measure pressure
pressureValue1 = analogRead(pressurePin1);
pressureValue2 = analogRead(pressurePin2);
float t = millis() % 40000;
if (t < 20000) {
behaviour1();
} else if (t > 20000 && t <= 40000) {
if (pressureValue1 < 400) {
behaviour2();
}
if (pressureValue1 >= 400) {
behaviour3();
}
}
}
void behaviour1() {
// Serial.println(“behaviour1”);
unsigned long currentMillis = millis();
if (currentMillis – previousMillis >= period1) {
previousMillis = currentMillis; // Remember the time
breathing = !breathing;
}
if (breathing) {
digitalWrite(motorPump1, HIGH);
digitalWrite(valve1, HIGH);
digitalWrite(motorSuck1, LOW);
digitalWrite(motorPump2, LOW);
digitalWrite(valve2, LOW);
digitalWrite(motorSuck2, HIGH);
} else {
digitalWrite(motorPump1, LOW);
digitalWrite(valve1, LOW);
digitalWrite(motorSuck1, HIGH);
digitalWrite(motorPump2, HIGH);
digitalWrite(valve2, HIGH);
digitalWrite(motorSuck2, LOW);
}
//nobody approaching in manic stage: all white
if (pressureValue2 <= 80) {
for (int i = 0; i < NUMPIXELS; i++) {
pixels0.setPixelColor(i, 255, 255, 255);
pixels1.setPixelColor(i, 255, 255, 255);
pixels0.show();
pixels1.show();
}
}
//somebody approaching: energetic color
if (pressureValue2 > 80) {
for (int i = 0; i < NUMPIXELS; i++) {
if (i % 2 == 0) {
pixels0.setPixelColor(i, 255, 255, 255);
pixels1.setPixelColor(i, 255, 255, 255);
} else {
pixels0.setPixelColor(i, 255, 165, 0);
pixels1.setPixelColor(i, 255, 165, 0);
}
pixels0.show();
pixels1.show();
}
}
}
void behaviour2() {
Serial.println(“behaviour2”);
digitalWrite(motorPump1, LOW);
digitalWrite(valve1, LOW);
digitalWrite(motorSuck1, LOW);
digitalWrite(motorPump2, LOW);
digitalWrite(valve2, LOW);
digitalWrite(motorSuck2, LOW);
//nobody approaching in depression stage: no light
if (pressureValue2 <= 80) {
//neopixel
pixels0.clear();
pixels1.clear();
pixels0.show();
pixels1.show();
}
//somebody approaching in depression stage: all red – alerting mode
if (pressureValue2 > 80) {
//neopixel
for(int i=0; i<NUMPIXELS; i++) {
pixels0.setPixelColor(i, pixels0.Color(255, 0, 0));
pixels1.setPixelColor(i, pixels1.Color(255, 0, 0));
pixels0.show();
pixels1.show();
}
}
}
//get activated when someone come to hug the model: pump start working again and the lights become yellow
void behaviour3() {
Serial.println(“behaviour3”);
unsigned long currentMillis = millis();
if (currentMillis – previousMillis >= period3) {
previousMillis = currentMillis; // Remember the time
breathing = !breathing;
}
if (breathing) {
digitalWrite(motorPump1, HIGH);
digitalWrite(valve1, HIGH);
digitalWrite(motorSuck1, LOW);
digitalWrite(motorPump2, LOW);
digitalWrite(valve2, LOW);
digitalWrite(motorSuck2, HIGH);
for (int i = 0; i < NUMPIXELS; i++) {
pixels0.setPixelColor(i, 255, 165, 0);
pixels1.setPixelColor(i, 255, 165, 0);
pixels0.show();
pixels1.show();
}
} else {
digitalWrite(motorPump1, LOW);
digitalWrite(valve1, LOW);
digitalWrite(motorSuck1, HIGH);
digitalWrite(motorPump2, HIGH);
digitalWrite(valve2, HIGH);
digitalWrite(motorSuck2, LOW);
pixels0.clear();
pixels1.clear();
pixels0.show();
pixels1.show();
}
}
Circuit building:
-
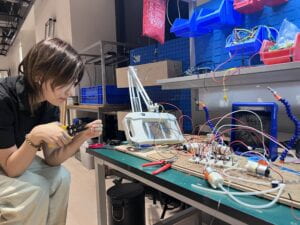
- We used two breadboards (later Marcela helped me put everything into one breadboard) and a few alligator clips for the first prototype, and later on we replaced all the alligator clips with soldering wires and soldered the pumps and the pressure sensors with the wires. The circuit can be mainly divided into three parts, the pumps (in total there are 6), the neopi
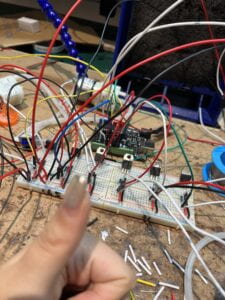 xels, and the two sensors. The two sensors go back to two pins on the arduino pad, and send signals to the lights and pumps. The circuits broke several times due to different reasons (didn’t use the right batteries; the arduino pad broke; the sensors broke…), and a lot of thanks to Marcela who helped us rebuild and debug along the way. The circuits were eventually moved to the box, with the wires going through the holes on the separators that we laser cut. The first layer contains the 6 pumps, the second the arduino pad and the bread board, and the third three batteries (one 12v battery for the pumps, and 2 5v batteries for the lights and the sensors)
- We used two breadboards (later Marcela helped me put everything into one breadboard) and a few alligator clips for the first prototype, and later on we replaced all the alligator clips with soldering wires and soldered the pumps and the pressure sensors with the wires. The circuit can be mainly divided into three parts, the pumps (in total there are 6), the neopi
Decoration:
-
- To echo with our theme, we purchased quite a few medical tubes to put the circuits in. Eventually, the box looks like a breathing machine with a lot of tubes coming out that are connected to different body parts of the wearer. In addition, we used a few leftover tubes to decorate the box.
Model & Rehearsal:
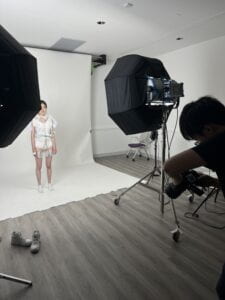
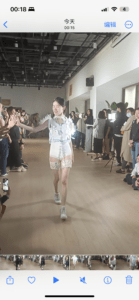
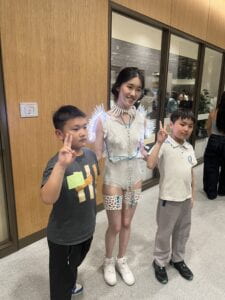
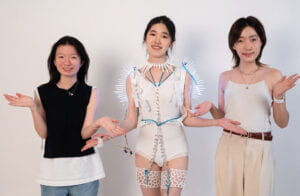
A few hours before the runway, we did the rehearsal with our model Claire, including when to clap hands with the audience, when to stop and pose, as well as when for us to hug her. Since our project was pretty much time-based (we set time
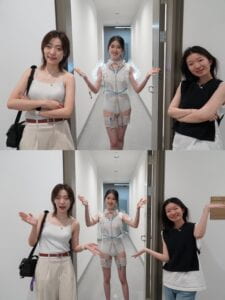
periods for each stage/episode), it was essential for us to rehearse ahead of time and let the model be aware of what she would be doing on the runway. It turned out very well and the audience enjoyed interacting with our model (event after the runway show haha).
Finished Work & Runway:
Division of work:
-
- Idea Generating & Plan Making: Chanel & Luna
- Coding: Luna, partially Chanel, helped by Marcela
- Circuit: Chanel, partially Luna, helped a lot by Marcela
- Scissor Mechanism: Luna
- Fingertip pump building: Chanel & Luna
- Leg ring: Chanel
- 3D wave on shoulders and ribs: Luna
- Decoration on chest: Luna
- Box making: Outer shape and layers designed by Chanel & Luna; patterns adapted from Chanel’s leg ring design, converted to patterns on the box by Luna with Adobe Illustrator & Makercase
- Choker: Chanel
- Bracelet for sensor: Chanel & Luna
- Countless measuring/3D printings/Sewing/Assembling: Chanel & Luna
- Stuff purchasing: Chanel & Luna
CONCLUSIONS
Chanel’s Conclusion:
The design and making process of the final project was overall great, though we’ve encountered quite a few struggles. We started from the pneumatics that we created for one of the weekly assignments, and we built upon it with ideas, concepts, and a more comprehensive circuit, which I feel proud of very much. I had the opportunity of utilizing what I have learned about arduino and circuits to build the final project and kept spotting what I might not have learned that well during the circuit building process. I also tried the TPU material and reticular fabrics in 3d printing, which helped me foster a better understanding of 3d printing wearables with suitable materials. The sewing part (sewing the 3d printed stuff and the fingertips to the clothes) only took up a small portion of the project, but it was definitely worth experimenting with.
The work utilized the kinetic prototype (the pneumatics), and was added with lights and sensors, plus 3d-printed and laser-cut decorations. It promotes a new way of understanding and communicating with people with bipolar disorder, helping them better understand the emotional cycle of bipolars and how they possibly handle their social life. The white and blue colors seem like a satire to the public view that treats bipolar disorders like patients who need to be hospitalized. Instead, they can feel the wave and ride the wave with bipolars with an open heart and a gentle hug. It has the social and cultural awareness in mind, but it might be better if it can discuss the relationship between the dress and the body a little more, since it mainly focuses on the interaction between the dress and the environment currently.
We started the project with a tight timeline, with the runway show in a couple of weeks, plus we had our individual projects going on at the same time. We settled down the concept, the style of the clothes, and materials needed early and tried to create a detailed timeline for us to cooperate as well as work individually to cater to our own schedules. Luna covered most of the coding, and I focused on building the circuit. When we had time together, we did the sewing, 3d printing and laser cutting. The most difficult part was working with the sensors because they were not very sensitive for most of the time and we spent a lot of time debugging the code and circuit. Sometimes it was because of the wrong circuit, sometimes the use of a wrong battery, and sometimes it was because the sensor itself was not soldered very well. The distance sensor eventually didn’t work very well, so we switched it to a pressure sensor last minute, which might be a little bit different from how we envisioned the idea to be, but still represented a gesture of socializing with the people and the environment. The main takeaway from our attempts is that we should not hesitate to make changes to the original plan. We started out with a plan almost one hundred percent aligned with our concept, but as we dug deeper into the project, we encountered quite a few practical problems that required us to simplify and make changes to the plan, and the final outcome had to be a compromise more or less. Another takeaway is to start early. We feel glad that we started early because we got to experiment more and look for a better solution, and eventually there was time left for adjustments and decoration.
If the project is given more time, I wouldn’t use a bodysuit like how we used it because I feel like we were not creating a garment but rather decorating the bodysuit with different materials. I would like to try experimenting more with fabrics and materials to create the clothes. For instance, instead of sewing the 3d printed models to the clothes, we can use them as the fabric. Our original design was a garment with its upper part full of rubber fingertips, while there were only a few in the final outcome. If we had more time, I would also try to look for more rubber materials and knit the clothes with them. In addition, though I felt the box idea was brilliant (it has three layers and carved dividers in the middle for the wires to go through), we could have designed it into part of the garment so that it didn’t look disconnected (decrease the size and give it a more unique shape).
In general, working with the project was a lot of pain but indeed worth it. I got a more nuanced understanding of fashion and society through coding the cultural and political into the garment, and I tried out different techniques in physical computing, including but not limited to 3d printing, arduino, soldering, laser cutting. Also I would like to thank my wonderful teammate Luna who has been working hard and supportive of our decisions and came up with a lot of brilliant design ideas.
Luna’s conclusion:
Chanel’s conclusion is so good in illustrating our work’s value to society and the cultural and societal metaphors embedded in our project. Mine might not be that professional and deep, but please take your time to read through the long text, and it will finally go back to our theme “Ride with the wave”, which is rooted in our initial concept of illustrating BD’s social life but ends up in a much broader concept that involves everyone’s emotion and interaction inside the society based on my feelings and interpretations.
The final result of this project truly satisfies us. We achieved all the effects we wanted, despite burning out circuits and electronic components multiple times.
We spent a lot of time on this project, anticipating a busy final period. We started feeling anxious about it right after spring break and continued refining, experimenting, and optimizing the project. Many things frustrated us during the process, like the easily damaged 3D modeling. Chanel and I often took turns monitoring the 3D printer, spending entire days because of numerous mishaps. We sought Dalin’s advice countless times and were guided by Andy’s enthusiasm. The coding aspect was unsettling; despite being an inter-lab student, I mainly handled circuitry, fabrication, and decoration in my inter-lab experiences. I started coding our project early on, knowing I wouldn’t get it right the first time, and without coding, we can’t test the circuit. I encountered “delays Vs millis” usage problems and all kinds of problems with the colors of neopixels. Fortunately, starting early and Prof. Marcela’s timely assistance helped us got through all these difficulties. The most daunting part was the circuit. Chanel initially tackled it, but it was challenging and prone to mistakes when done alone. Initially, I hesitated to modify a circuit I hadn’t built, fearing it would worsen things. However, I realized we needed two people to cross-check each other while building the circuit to avoid errors and pin misplacements. I lost count of how many times I sheepishly sought help from Marcela, Rudy, Andy, and others regarding circuitry correctness, battery use, borrowing batteries, and why our Arduino wouldn’t connect to the computer. One vivid memory was three Spanish-speaking professors watching our circuit and speaking in English (I don’t know why that struck me!). Each connection of circuitry and coding was nerve-wracking, facing it alone felt daunting, so we mostly worked in pairs, with two computers taking turns, often collapsing together. Luckily, everything eventually worked out.
We initially used a remote sensor on the hand, but before the final presentation, we switched to a pressure sensor for better sensitivity and stability in interactions. Here, I must commend and appreciate my teammate Chanel’s excellent soldering skills; she’s exceptionally skilled, and I deeply admire and appreciate her.
Throughout our work, there were countless moments of despair and breakdowns, but we also encountered many compliments from nice friends, classmates, and even strangers. I remember one night at the end of April; we had attached many 3D-printed decorations to the clothes. Chanel had to leave early, and as I was clearing the table, a classmate from another course asked what it was, saying it looked cool. That moment made me unexpectedly happy. When I stepped out of the storage room at the Fab Lab and saw the clothes on our makeshift mannequin, I thought, “Wow, it looks really good.” I immediately sent a photo to Chanel, and she agreed. We said to each other that this was indeed much better than our midterm work, but we had to stay humble until the end. We had to maintain modesty and caution in the face of questions about our decoration and mechanism. We rarely received positive feedback from external sources, but we motivated each other because we knew our own satisfaction mattered most.
In the end, everything worked. When Chanel wore the outfit for our Wednesday class, I took a picture of her. I said, “Seeing you standing there among the crowd gives me the feeling of suddenly spotting my favorite idol in an idol group.” Before the runway, Chanel and I speculated if Prof. Inmi, who once praised our work in ComLab, would come to see the runway. We were nervous; we didn’t want to embarrass ourselves. I felt like crying at that moment. We were the first to walk the runway, and although no one wanted to go first, I felt our team wanted to. It was a display of confidence, and we deserved to go first. After the runway, as soon as we stepped out, Yelena cried because there were minor glitches in her work right before the runway. We all gathered around her to console her, and we all ended up crying because we related so much — we had worked so hard, why were there still small mistakes? Not everything is perfect. One second I was taking photos of everyone consoling her, the next second, Chanel and I were crying too. Andy asked Xiangyi and Maelyn why we were crying, and they explained to Andy that it was tears of joy. Andy remarked, “Well, it doesn’t look like happy tears.” I find it hard to summarize if our tears were happy, sad, or simply a release; they encompassed so much — from being moved by our dedication to our work, and grateful for the help from many teachers, professors, and friends during our moments of breakdown, to acknowledging the sadness and hardship we faced throughout the course (honestly, though it’s hard to say, this has been the class where I’ve experienced the most pain, despair, and breakdowns so far). I was also excited because our work turned out really well, the effects were great, and we were especially satisfied. We felt like we had turned things around in our own world. The once pitiable Chanel and Luna had finally seen the light of day. In simple terms, to quote a friend’s summary: we were so awesome that we cried.
Such complex emotions and tears ran through our entire project and this class. We coexisted with different waves all the time, sometimes feeling like we were ridden by the waves, sometimes feeling like we were the ones riding the waves. I guess that’s what it means to “ride with the wave.” All of this has become past waves now, but they have definitely left deep marks in our hearts, creating our wavy heart rate as we look back. At this moment, a wave of emotions floods me, and I feel like crying again. I want to thank Prof. Marcela for her constant help and thank Chanel for sticking with me. I love you all, I love our effort, and I love “riding with the wave.”
