Night Angel – Angela and Nadine – Eric Parren
Conception and Design
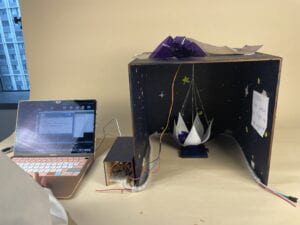
Our project the Night Angel is a device inspired by a night light that turns on when the light in the room is turned off. We were researching ways for the flower to open and these candles that would open up when you burned it influenced our design. The project was going to be triggered by a light sensor that would be placed outside of the box and we were trying to find ways to make the light sensor more noticeable to the user. During user testing, we didn’t have our box to hold up the flower so I was holding it up, and most of our feedback was about not having a good enough presentation. Other feedback included changing the song that we had playing cause it could be annoying and also the video was slightly creepy. In addition to that, users said that the servo we were using was loud and that it would be unpleasant to hear for the younger audience that we were targeting. Unfortunately, we couldn’t replace the servo with something quieter but we did change the visuals and the music to be less irritating. The new edits were a lot better and were more pleasant to users.
Fabrication and Production
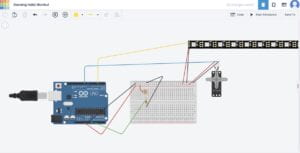
We started with the petals and what it was going to be made out of. We laser cut the petals but they didn’t look like a flower so instead we 3D printed them which came out a lot better. The flower was going to be on top of a rectangular box elevated with the strings inside would be pulled through and it’d be open when the servo released the strings, the problem that we encountered with that it wouldn’t 100% open successfully every time so we had the flower hanging from the top instead to make sure the flowers open every time. Since we changed the way the flower was going to open we needed a way to stabilize the petals and the strings so it doesn’t move everywhere. We 3D printed small cylinders and hot glued them onto the petals. Other than that we also shaped some wire into a flower shape to act as a base for the petals to connect and used hot glue on the sides for more stability. We were using the smaller servo that we got in our arduino kits but it wasn’t strong enough to pull the weight of the petals so we changed it to a larger one from the ER. As for the light sensor we were reccommeded by the professor to use a different one cause the one we were using wasn’t a good light sensor as the other one. We chose to use the servo because although it is loud its effective and we did think about using the stepper motor but it heats up and would’ve melted the hot glue we had everywhere. The arduino included the neopixal, light sensor, and the servo and in the code when the light sensed the loss of light it would trigger the servo and the neopixal to turn on and in processing it would trigger the music and the video to play.
Conclusion
Our project was a success! It came out a lot better than the way we were imganing it to be. The audience’s interaction was overall very good as well since the instructions are pretty clear. My project aligned with my definistion of interaction because when. the light sensor is covered or there is a loss of light it leads to the flower opening up with the whole presentation. If we had more time we would add another servo on the bottom to make the flower spin in either 180 or 360 degrees. Although the process of figuiring out how the flower was going to open was incredibily stressful, I’m very glad that we peresevered because the final presenation was very rewarding.
Appendix
Arduino Code
Processing Code
import processing.sound.*;
import processing.serial.*;

boolean firsttrig = true;
Serial serialPort;
SoundFile sound;

int NUM_OF_VALUES_FROM_ARDUINO = 1;  /* CHANGE THIS ACCORDING TO YOUR PROJECT */

/* This array stores values from Arduino */
int arduino_values[] = new int[NUM_OF_VALUES_FROM_ARDUINO];

Sound myMusic;

boolean Servo = false;

int numStars = 100; // number of stars
float[] xPos = new float[numStars]; // x positions of stars
float[] yPos = new float[numStars]; // y positions of stars
float[] sizes = new float[numStars]; // sizes of stars
color[] colors = new color[numStars]; // colors of stars

void setup() {
  background(0);
  size(1500, 1000);

  //myMusic = new Music(this, "star.mp3");
  //myMusic.loop();
  printArray(Serial.list());
  // put the name of the serial port your Arduino is connected
  // to in the line below - this should be the same as you're
  // using in the "Port" menu in the Arduino IDE
  serialPort = new Serial(this, "/dev/cu.usbmodem1101", 9600);

  println("Loading mp3...");
  sound = new SoundFile(this, "star.mp3");
  sound.loop();

  for (int i = 0; i < numStars; i++) {
    xPos[i] = random(width); // random x position
    yPos[i] = random(height); // random y position
    sizes[i] = random(5, 40); // random size
    colors[i] = color(random(255), random(255), random(255)); // random color
  }
}

void draw() {
  // receive the values from Arduino
  background(0); // black background
  getSerialData();
  float x = arduino_values[0];
  //if (myMusic.available()) {
  //  myMusic.read();
  //}
  if (x < 300) {
    Servo = true;
    if (!sound.isPlaying()) {
    sound.play();
    }

    // Draw the stars
    for (int i = 0; i < numStars; i++) {
      fill(colors[i]); // set the fill color
      ellipse(xPos[i], yPos[i], sizes[i], sizes[i]); // draw the star

      // Blinking effect
      if (frameCount % 50 == 0) { // change every 50 frames
        colors[i] = color(random(255), random(255), random(255)); // set a new random color
      }
    }
  } else {
    sound.stop();
  }
  //sound(myMusic, 0, 0);
  //  if (i < 35) {  // When 'i' is less than 35...
  //    myMovie.read();
  //  }
  //  else if line(30, i, 80, i);
  //}

  //mousePressed() {
  //    myMovie.stop();
  //}
}

void getSerialData() {
  while (serialPort.available() > 0) {
    String in = serialPort.readStringUntil( 10 );  // 10 = '\n'  Linefeed in ASCII
    if (in != null) {
      print("From Arduino: " + in);
      String[] serialInArray = split(trim(in), ",");
      if (serialInArray.length == NUM_OF_VALUES_FROM_ARDUINO) {
        for (int i=0; i<serialInArray.length; i++) {
          arduino_values[i] = int(serialInArray[i]);
        }
      }
    }
  }
}
Here’s the link to photos and videos for our project!
https://drive.google.com/drive/folders/1lQn5ptUx8-hTzJ6PGQjXd5Jh_YGzVDsJ?usp=sharing

