Midterm Project Individual Reflection
Midterm Project Individual Reflection
By Yinuo Chen(Amy) Date: 2021.10.20
A. Brief Introduction
Project Title: Green Music Path
Co-Designer: Amy Chen
Instructor: Rudi
B. Context and Significance
I remember that during the process of researching the interactive products for the group project, I found that there are musical stairs in Brussels. When people walk up and down through these stairs, the piano-like stairs will make the sound of a real piano: Do Re Mi Fa So La Si… So when someone is walking on it, the stairs will make beautiful sounds. This design fascinated me a lot and I had a great interest in stepping on the musical stairs.
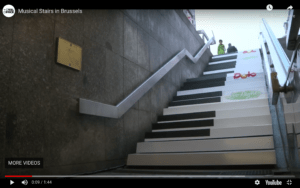
As a result, this idea became the main inspiration for our product. We decided to create a “piano stairs” prototype. Meanwhile, through the whole process of the group project, I realized that it is necessary to know whether the project is practical or not and whether the design is meaningful. In the previous project, our group designed a smart globe that was powered by people riding bicycles. But after presenting the product and receiving feedback from peers and instructors, I realized that our project isn’t practical enough to be used in real life. So in this midterm project, I focused more on practicality. As a result, to make our project more meaningful and more practical, my partner and I introduced the concept of environmental protection into our design–which is also the unique part of our project compared to the already-existed piano stairs. The application of environmental concepts allowed our design to be used wherever there is grass or lawn.
Regarding the environmental problems, Ella and I realized that nowadays stepping on the grass became a more and more frequent problem that occurred in parks. From the current fact, we found that putting a sign next to the lawn only has an insignificant effect even on adults and not to mention children. So our design is an environmentally friendly one and our targeted audience is mainly parents who care about the environment and want to educate their children. In our design, users are expected to step on the path designed instead of stepping on the lawn. Moreover, from the perspective of psychology, positive reinforcements are more effective than negative ones when regarding children. So rather than issuing serious and terrifying warnings to children after they step on the lawn, it is often more effective to educate them by giving them rewards for walking on the trails correctly. I believe that if successful, this prototype can be used in all parks for educating young kids to walk properly on the path intriguingly and efficiently. Therefore, the design can be applied to other projects that are conducted by environmentally friendly organizations.
The video of our project:
C. Conception and Design
Since the product we were going to make is the path that was designed to locate on the real lawn, we believed for sure that our users would step on both the path and the lawn, and this would be the major way that our users interact with our project. As a result, the focus of our project is on how to determine the feedback for users stepping on the lawn and paths. Because this is the major aspect of our project, we came across several questions. Firstly and most importantly, we tried to make the path play the sound of piano keys when someone is walking, which is “do re mi fa so la si”. So for the sound of the piano, we want to use buzzers to present different notes. In order to make the piano sound accurately follow the steps of the users, we decided to make a four-step trail instead of a whole road and each step represents one note.
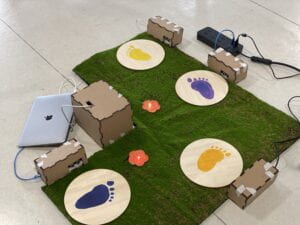
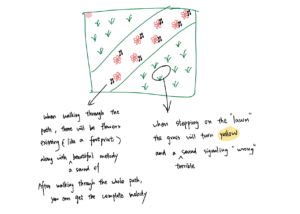
Meanwhile, we also wanted to light up the path with beautiful lights in different colors in return for walking right on the road to make the response of the path more significant. Also, to make a contradiction between the fact that walking on the path is encouraged and walking on the lawn is not allowed, we wanted to turn the grass into a yellow color to imitate the wilting scene of the grass, so as to remind users that stepping on the grass will endanger their lives. In the beginning, with the suggestion from our instructor, we decided to use the NeoPixel strips to light the path and the lawn. But we found that it was impossible to use the NeoPixel strips to cover the whole lawn both in our project and in reality, we decided to put the strips on the edge of the fake lawn that would be used in our project. The reason why we decided to use NeoPixel strips as the lighting equipment in our project instead of using LEDs was that we think the brightness of these NeoPixel strips is brighter and the effect is more obvious and more significant.
We believed that the beautiful light and sound response from the road and the warning light from the grass will positively and effectively influence users’ behavior. Moreover, to give our users a more immersive experience, we tried to find material that really assembled real grass. Luckily, we found a piece of artificial turf in the fabrication lab, which laid a solid foundation for our project. The material we tried to use to present the path was stones that could imitate the cobblestone roads. However, we thought that it’s hard for us to find stones that look like real ones. Also using gravel roads may cause users to slip and fall. so we find another material–wooden boards. We used it because we thought that the wood was closer to nature and would give people the feeling of walking on the real grass. We used software such as Tinkercad to laser cut wood boards. Finally, we got four wooden thin boards that could be stuck. to the artificial turf.
Another crucial problem that occurred in our design was the choice of sensors. Apparently, we needed sensors that could sensitively capture the movement of people’s steps. The first sensor that came to our mind was the force sensitive resistor (FSR). By measuring the force that is put on it, the FSR can control whether the NeoPixel strips and the buzzer are turned on or not. Also, since we had used the FSR in the previous recitation, my partner and I were more familiar with using the resistor. As a result, we decided to put FSR under each wooden step.
By connecting these two major parts, there comes the first design blueprint of our project.👇
D. Fabrication and Production
Since this is the first time that I finished such a complete project by myself, I encountered a lot of difficulties. From the blueprint painted on the iPad to the final physical project, I experienced a lot, suffered a lot, and learned a lot.
First of all, because our project seems to be a very large one, it was very difficult to find a large lawn that we could build our equipment on it. So in the beginning, we decided to cut a quarter part of the artificial lawn to use as a prototype only and we wanted to 3D print a small person model to step on the lawn. We initially decided to let our users hold the model by hand. By putting a force on the villain and letting it step on the grass or the road to make them react. But then we realized that this might not be so realistic and make people feel confused whether this is a toy or a piece of equipment that would be applied in the real world. So we then decided to allow real people to stand on the equipment.
Among all the problems I met, there are two most difficult parts. For the whole process, I worked together with my partner. We discussed the fabrication part of the product and the interactive design together. But in the process of connecting the sensors with the lights and the sound parts, I chose the light part. There exist many problems that pushed me to change my ideas again and again. Firstly, I tried a lot of times to connect the NeoPixels with the FSR, but almost every time I connected the breadboard with the right circuit and the Arduino board, the Arduino board started to heat itself rapidly and the temperature could almost make people hurt. And from the computer side, it always said that it couldn’t find the port of the Arduino board. I have prepared for the worst case that the Arduino board was burnt out due to a connection circuit error. But when I use the board to connect other things, the normal operation of the code showed that the Arduino board could still be used. I even tried my partner’s Arduino board to test whether it was my Arduino board’s problem or it was the NeoPixel’s problem. However, when I used Ella’s board, it turned out to be the same result. Even until now, I cannot understand why the NeoPixel strips couldn’t be successfully linked to FSR. As a result, I have to give up the idea of using NeoPixel strips in our project. The way that I figured out was to use LEDs to replace the NeoPixel. But in terms of practicality, it was impossible to use LEDs to circle the wooden circular board or cover the whole edge part of our artificial lawn. In order to maintain the idea that the grass would make warning responses to those who step on it, I decided to let the flowers that “grow” in the lawn spark lights instead of lighting up the whole lawn. When changing to the LEDs, everything went smoothly. I changed the code to a new one that connected the LEDs with the FSR successfully. To make the flowers, I used laser cutting again. This time, to make the flowers “shine”, instead of using wood, I chose acrylic board as the material.
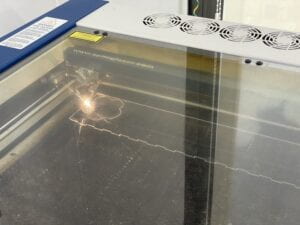
Another failure was the use of FSR. One problem that existed, in the beginning, was that there were not enough FSRs in the equipment room since we needed 8 resistors in total. But we could only receive seven pieces of FSRs. What’s more terrible was that when we were testing each FSR, we found one of the seven sensors was broken and two FSRs need to be welded by ourselves. After I welded the two FSRs, all the resistors could be applied to our circuits. Then, when testing the sensitivity of the FSRs after applying them to the wooden boards, we found that if we put the FSRs under the completely flat wooden board and the “acrylic” flowers, it was hard for it to sense the force given by people’s walking. And with the help of our instructor, we used a little paper tape to raise the FSR a little bit so that it could react when people step on it and it did make the sensor work.
However, after we connected all the seven available and usable FSRs to our project, we got the information that the force range of an FSR was only a few grams and it might be destroyed or hurt if human bodies step on it. But at the time it was about to have our user test session, and we reconsidered the sensors and rearranged them after user tests. Through recommendations from others and careful discussion with each other, we decided to try ultrasonic as the new sensors. We still kept two of the FSRs which were used on the flowers. But for the four steps, we all changed to ultrasonics since they had accurate and sensitive effects, making our project more interactive.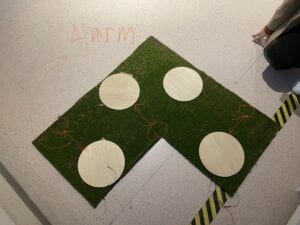
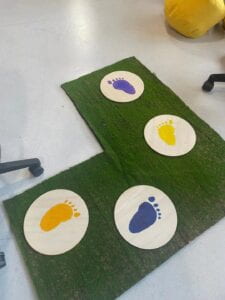
Except for the failures and difficulties we met, we were also improving at each stage. The most helpful and effective process was the user test session. After presenting our design to both peers and instructors, we received many useful feedbacks that could further improve our project. For example, we realized that if we put the LED under the flowers–even if the flowers were transparent, it was hard to recognize the faint yellow lights. To solve this issue, I changed the original yellow LEDs to the RGB LEDs. I decided to change the color of the flowers from yellow to red, which expresses a much more serious warning. Also, because we only put four wood boards on the artificial grass, it might seem confusing to our users what these boards were used for. So by adding colorful footprints, the equipment could tell people more clearly that this wooden board could be stepped on. Moreover, when we were testing our project, we found that if we connect all the FSRs and buzzers or LEDs on the same breadboard and Arduino board and when users step on two wooden boards at the same time, the buzzer cannot successfully emit the sound it should. This shows that our design does not allow users to step on two things at the same time. In actual use, this problem cannot be avoided so we try to solve this problem. As mentioned above, we realized that using FSR and stepping on it might damage it and replaced it with ultrasonic. After switching to the new sensor, we found that the problem was solved automatically and now the notes can be played at the same time!
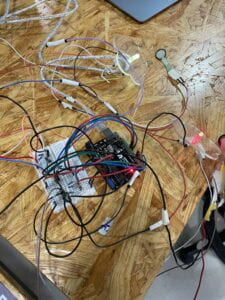
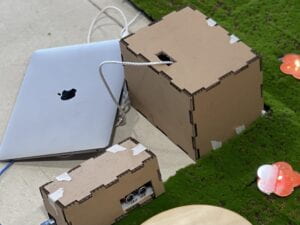
Finally, after completing a series of assemblies, I realized that our wires and various boards, and other parts were exposed, which made our product look messy and ugly, in order to enhance its viewing value and attract more people To experience it, I decided to decorate it. To achieve this goal, I did two things: I made cardboard boxes for all the circuit boards and wires that were exposed to sight. By digging a hole in the bottom of the box, I was able to let the wires pass through a small opening and connect to the parts on the grass. And everything else will be hidden in the box. This makes our device look more concise and clear. Although it was a lot neater, I found an unsolved problem in the final display: that is, we used paper tape to fix the cardboard, which looks very simple and not very beautiful. I think we can use glue guns to glue the various parts of the box in subsequent projects.
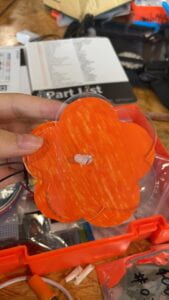
As for the floret, I found that if we stick the light below the transparent flower, the users will step on the whole flower directly, so they will not see the color change of the floret. In order to avoid letting them step on the whole flower directly, I decided to make a hole in the middle of the small flower and pass the LED through to form a three-dimensional flower, so that the color change will be obvious, and people can also notice this change. And to cover all the wires and the sensor, I painted an orange flower on the paper and stuck it to the acrylic board.
E. Conclusions
The goal of our project was to encourage people to walk on the path instead of stepping on the grass. We want to achieve the goal by providing rewards of beautiful music from the path and warnings from the flowers. I think this project is closely aligned with my definition of interaction. In my definition, interactive products include a feature that different people using the product will receive their unique responses from the equipment. In this project, when people walk differently, they will get different feedbacks. For instance, those who walk on the path correctly will get positive feedback–the music, and those who step on the flowers will get a warning. For people who walk on the trails, they can also come out of their own characteristics, everyone can compose their own unique music. In the final exhibition of our project, our audience tried our project. The audience walked through the path and tried to step on the flowers(after we reminded her that the flowers could also be stepped on). Fortunately, every part worked well and gave feedback accordingly–which was very good. But we also received valuable feedback that pointed out the shortcomings of our project that we could improve in the future. One problem was that the existence of flowers seemed a little bit weird. Because our concept is to prevent people from stepping on the flowers, but in our project, they will only find warnings when they step on the flowers. This design conflicts slightly with our concept. And before we remind the audience, they do not consciously step on the flowers, which may cause these flowers to lose their function in the project. So if we could further develop our prototype, I think the most important thing to do is to let the design of flowers be more integrated into the whole installation, and make their existence more reasonable. Secondly, we can try to make the response more significant, for example, we can add the NeoPixel strips(which we failed to use this time) to the path. When people step on the path, they will get both the light and the sound. What’s more, we can extend our path so that the path can include the whole seven notes “do re mi fa so la si”, letting users compose more complex and more beautiful music.
Throughout the whole process, I realized that failure isn’t as scary as I originally thought. What I learn from this experience is that if you fail, don’t give up and keep trying. There must be other ways that you can use to achieve your final goal. And when trying other methods, I will be able to learn more. I can get more information about things that I am not familiar with before. So accepting failure and keeping trying is a good way to learn new things by myself. There’s another process that helped me a lot in completing the project. I can always get useful and practical suggestions from my users.
At last, I believe that if the prototype can be changed to a real product successfully, it will be great if the product was applied in real parks or other green spaces in Shanghai. In my daily life, there are too many common scenes that children are running and stepping on the grass freely without noticing that after they leave, the grass was hurt. Some parents might believe that walking on the grass is an insignificant issue and they won’t pay great attention to educating their kids. However, the behavior does hurt the plants and will destroy our natural environment to some extent. We believed that instead of setting up a warning that may not be understood or seen by children, it will become more interesting to walk on the road and regulate children’s behavior more effectively.
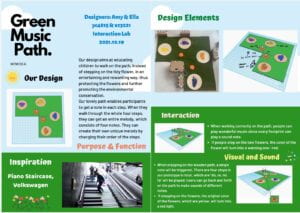
This is our poster 🙂
Codes:
RGB LED & Buzzer
#define fsrpin1 A0
#define fsrpin2 A1

// Define variables:
int fsrreading; // The current reading from the FSR

int red_light_pin1 = 6;
int green_light_pin1 = 5;
int blue_light_pin1 = 4;
int red_light_pin2 = 11;
int green_light_pin2 = 10;
int blue_light_pin2 = 9;

void setup() {
  pinMode(red_light_pin1, OUTPUT);
  pinMode(green_light_pin1, OUTPUT);
  pinMode(blue_light_pin1, OUTPUT);
  pinMode(red_light_pin2, OUTPUT);
  pinMode(green_light_pin2, OUTPUT);
  pinMode(blue_light_pin2, OUTPUT);
}
void loop() {
  int fsrreading1 = analogRead(fsrpin1);
  int fsrreading2 = analogRead(fsrpin2);

  if ((fsrreading1 >= 100) && (fsrreading < 100)) {
    RGB_color1(255, 0, 0); // Red
    RGB_color2(255, 70, 0); //yellow
    Serial.print("Sensor1:");
    Serial.print(fsrreading1);
    Serial.print("Sensor1:");
    Serial.println(fsrreading2);
  }

  else if ((fsrreading2 >= 100) && (fsrreading1 < 100)) {
    RGB_color2(255, 0, 0); //Red
    RGB_color1(255, 70, 0);// Yellow
    Serial.print("Sensor1:");
    Serial.println(fsrreading1);
    Serial.print("Sensor2:");
    Serial.println(fsrreading2);
  }


  else {
    RGB_color1(255, 70, 0);// Yellow
    RGB_color2(255, 70, 0);// Yellow
  }
}

void RGB_color1(int red_light_value1, int green_light_value1, int blue_light_value1)
{
  analogWrite(red_light_pin1, red_light_value1);
  analogWrite(green_light_pin1, green_light_value1);
  analogWrite(blue_light_pin1, blue_light_value1);
}
void RGB_color2(int red_light_value2, int green_light_value2, int blue_light_value2)
{
  analogWrite(red_light_pin2, red_light_value2);
  analogWrite(green_light_pin2, green_light_value2);
  analogWrite(blue_light_pin2, blue_light_value2);
}
// Arduino Ultrasoninc Sensor HC-SR04
// Re-writed by Arbi Abdul Jabbaar
// Using Arduino IDE 1.8.7
// Using HC-SR04 Module
// Tested on 17 September 2019
// ---------------------------------------------------------------- //

#define echoPin 3 // attach pin D2 Arduino to pin Echo of HC-SR04
#define trigPin 4 //attach pin D3 Arduino to pin Trig of HC-SR04

#define speakerpin 11
#define NOTE_C4  262

// defines variables
long duration; // variable for the duration of sound wave travel
int distance; // variable for the distance measurement
int melody =  NOTE_C4 ;

void setup() {
  pinMode(trigPin, OUTPUT); // Sets the trigPin as an OUTPUT
  pinMode(echoPin, INPUT); // Sets the echoPin as an INPUT
  pinMode(speakerpin, OUTPUT);

  Serial.begin(9600); // // Serial Communication is starting with 9600 of baudrate speed
  Serial.println("Ultrasonic Sensor HC-SR04 Test"); // print some text in Serial Monitor
  Serial.println("with Arduino UNO R3");

}
void loop() {
  // Clears the trigPin condition
  digitalWrite(trigPin, LOW);
  delayMicroseconds(2);
  // Sets the trigPin HIGH (ACTIVE) for 10 microseconds
  digitalWrite(trigPin, HIGH);
  delayMicroseconds(10);
  digitalWrite(trigPin, LOW);
  // Reads the echoPin, returns the sound wave travel time in microseconds
  duration = pulseIn(echoPin, HIGH);
  // Calculating the distance
  distance = duration * 0.034 / 2; // Speed of sound wave divided by 2 (go and back)
  // Displays the distance on the Serial Monitor
  Serial.print("Distance: ");
  Serial.print(distance);
  Serial.println(" cm");

  if (distance < 17){
   tone(speakerpin, melody);
  }
  else{
    noTone(speakerpin);
  }
}
