Recitation 8 Documentation–Blog 12
Exercise 1:
Video:
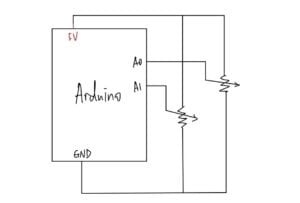
Since I did the exercise during the course, this exercise went well in most parts. But in one part I tried several times and couldn’t succeed. When I connected the circuit and printed the code for both Arduino and Processing, I found that one potentiometer couldn’t work to change the position of y of my line. But after the help from the learning assistant, I realized that if I didn’t print out the “Serial. print” correctly, Processing couldn’t understand how to read the figures accordingly. So by changing the “Serial. print” part of the code for Arduino, I successfully completed this exercise. I think interaction exists when we spin the potentiometer and there are lines appearing in Processing.
schematic for the circuit:

code for Arduino:
// IMA NYU Shanghai
// Interaction Lab
// For sending multiple values from Arduino to Processing


void setup() {
  Serial.begin(9600);
}

void loop() {
  // to send values to Processing assign the values you want to send
  //this is an example
  int sensor1 = map(analogRead(A0),0,1023,0,500);
  int sensor2 = map(analogRead(A1),0,1023,0,500);
  //int sensor3 = analogRead(A2);

  // send the values keeping this format
  Serial.print(sensor1);
  Serial.print(",");  // put comma between sensor values
  Serial.print(sensor2);
  //Serial.println(",");  // put comma between sensor values
//  Serial.print(sensor3);
Serial.println(); // add linefeed after sending the last sensor value

  // too fast communication might cause some latency in Processing
  // this delay resolves the issue.
  delay(100);

  // end of example sending values
}
code for Processing:
// IMA NYU Shanghai
// Interaction Lab
// For receiving multiple values from Arduino to Processing

/*
 * Based on the readStringUntil() example by Tom Igoe
 * https://processing.org/reference/libraries/serial/Serial_readStringUntil_.html
 */

import processing.serial.*;


int NUM_OF_VALUES_FROM_ARDUINO = 2;   /** YOU MUST CHANGE THIS ACCORDING TO YOUR PROJECT **/
int sensorValues[];      /** this array stores values from Arduino **/
int x;
int y;
int px;
int py;
String myString = null;
Serial myPort;

void setup() {
  size(500, 500);
  background(0);
  colorMode(HSB,360,100,100);
  setupSerial();
}

void draw() {
  fill(270,50,50);
  x = sensorValues[0];
  y =sensorValues[1];
  stroke(255);
  line(x,y,px,py);
  px = x;
  py = y;
  getSerialData();
  printArray(sensorValues);

  // use the values like this!
  // sensorValues[0]

  // add your code

  //
}

void setupSerial() {
  printArray(Serial.list());
  myPort = new Serial(this, Serial.list()[3], 9600);
  // WARNING!
  // You will definitely get an error here.
  // Change the PORT_INDEX to 0 and try running it again.
  // And then, check the list of the ports,
  // find the port "/dev/cu.usbmodem----" or "/dev/tty.usbmodem----"
  // and replace PORT_INDEX above with the index number of the port.

  myPort.clear();
  // Throw out the first reading,
  // in case we started reading in the middle of a string from the sender.
  myString = myPort.readStringUntil( 10 );  // 10 = '\n'  Linefeed in ASCII
  myString = null;

  sensorValues = new int[NUM_OF_VALUES_FROM_ARDUINO];
}

void getSerialData() {
  while (myPort.available() > 0) {
    myString = myPort.readStringUntil( 10 ); // 10 = '\n'  Linefeed in ASCII
    if (myString != null) {
      String[] serialInArray = split(trim(myString), ",");
      if (serialInArray.length == NUM_OF_VALUES_FROM_ARDUINO) {
        for (int i=0; i<serialInArray.length; i++) {
          sensorValues[i] = int(serialInArray[i]);
        }
      }
    }
  }
}
Exercise 2:
Video:
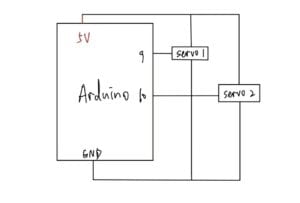
For this exercise, I think it is more difficult than the first one. The processing part is quite easy because we only need to figure out how to create a bouncing ball in a fullscreen black background. By using the example and by arranging the code according to our own needs, we successfully complete the processing part. But we met difficulties when sending figures to Arduino. We couldn’t make the servos move for a certain angle when the ellipse meets the border of the screen. But after asking for help from our instructor and by checking our code several times, we found that we set the figures of when the servo should move too accurately and too small. So by resetting the number and asking Arduino to print the figures after the loop, we succeed at last. I think in this exercise, the interaction doesn’t appear as much as the last exercise does. We don’t do anything that will make the servo move.
schematic for the circuit:

Code for Arduino:
// IMA NYU Shanghai
// Interaction Lab

/**
  This example is to send multiple values from Processing to Arduino.
  You can find the Processing example file in the same folder which works with this Arduino file.
 **/

#define NUM_OF_VALUES_FROM_PROCESSING 3    /** YOU MUST CHANGE THIS ACCORDING TO YOUR PROJECT **/
#include <Servo.h>

Servo myservo;  // create servo object to control a servo
Servo myservo1;
// twelve servo objects can be created on most boards

/** DO NOT REMOVE THESE **/
int tempValue = 0;
int valueIndex = 0;

/* This is the array of values storing the data from Processing. */
int processing_values[NUM_OF_VALUES_FROM_PROCESSING];


void setup() {
  Serial.begin(9600);
  //pinMode(13, OUTPUT);
  myservo.attach(9);
  myservo1.attach(10);
}

void loop() {
  getSerialData();

  //float angle = map(processing_values[1],0,1400,0,360);
  if (processing_values[1] == 100) {
    for (int pos = 0; pos <= 60; pos += 1) {
      myservo1.write(pos);
      delay(10);
    }
  }
  if (processing_values[1] == 1340) {
    for (int pos = 0; pos <= 60; pos += 1) {
      myservo.write(pos);
      delay(10);
    }

  }
  getSerialData();
}
//receive serial data from Processing
void getSerialData() {
  while (Serial.available()) {
    char c = Serial.read();
    //switch - case checks the value of the variable in the switch function
    //in this case, the char c, then runs one of the cases that fit the value of the variable
    //for more information, visit the reference page: https://www.arduino.cc/en/Reference/SwitchCase
    switch (c) {
      //if the char c from Processing is a number between 0 and 9
      case '0'...'9':
        //save the value of char c to tempValue
        //but simultaneously rearrange the existing values saved in tempValue
        //for the digits received through char c to remain coherent
        //if this does not make sense and would like to know more, send an email to me!
        tempValue = tempValue * 10 + c - '0';
        break;
      //if the char c from Processing is a comma
      //indicating that the following values of char c is for the next element in the values array
      case ',':
        processing_values[valueIndex] = tempValue;
        //reset tempValue value
        tempValue = 0;
        //increment valuesIndex by 1
        valueIndex++;
        break;
      //if the char c from Processing is character 'n'
      //which signals that it is the end of data
      case '\n':
        //save the tempValue
        //this will b the last element in the values array
        processing_values[valueIndex] = tempValue;
        //reset tempValue and valueIndex values
        //to clear out the values array for the next round of readings from Processing
        tempValue = 0;
        valueIndex = 0;
        break;
    }
  }
}
Code for Processing:
// IMA NYU Shanghai
// Interaction Lab

/**
 * This example is to send multiple values from Processing to Arduino.
 * You can find the arduino example file in the same folder which works with this Processing file.
 **/

import processing.serial.*;

int NUM_OF_VALUES_FROM_PROCESSING = 2;  /** YOU MUST CHANGE THIS ACCORDING TO YOUR PROJECT **/
int processing_values[] = new int[NUM_OF_VALUES_FROM_PROCESSING]; /** this array stores values you might want to send to Arduino **/
Serial myPort;
String myString;
int rad = 60;        // Width of the shape
int xpos;    // Starting position of shape

float xspeed = 10;  // Speed of the shape
float yspeed = 2.2;  // Speed of the shape

int xdirection = 1;  // Left or Right
int ydirection = 1;  // Top to Bottom


void setup() {
  fullScreen();
  println("screen:"+width);
  background(0);
  noStroke();
  frameRate(500);
  ellipseMode(RADIUS);
  // Set the starting position of the shape
  xpos = width/2;
  // ypos = height/2;
  setupSerial();
}

void draw() {
  background(0);

  // Update the position of the shape
  xpos = int(xpos + ( xspeed * xdirection ));
  //ypos = ypos + ( yspeed * ydirection );

  // Test to see if the shape exceeds the boundaries of the screen
  // If it does, reverse its direction by multiplying by -1
  if (xpos > width-rad || xpos < rad) {
    xdirection *= -1;
  }
  //if (ypos > height-rad || ypos < rad) {
  //  ydirection *= -1;
  //}

  // Draw the shape
  ellipse(xpos, height/2, rad, rad);

  //circle(mouseX,mouseY,200);
  //  // give values to the variables you want to send here
  //  //change the code according to your project
  //  //for example:

  //    if (mousePressed) {
  //      processing_values[0] = 1;
  //    } else {
  //      processing_values[0] = 0;
  //    }
  processing_values[1] = xpos;
  processing_values[0] = height/2;
  //end of example

  // send the values to Arduino.
  sendSerialData();
}

void setupSerial() {
  printArray(Serial.list());
  myPort = new Serial(this, Serial.list()[3], 9600);
  // WARNING!
  // You will definitely get an error here.
  // Change the PORT_INDEX to 0 and try running it again.
  // And then, check the list of the ports,
  // find the port "/dev/cu.usbmodem----" or "/dev/tty.usbmodem----"
  // and replace PORT_INDEX above with the index number of the port.

  myPort.clear();
  // Throw out the first reading,
  // in case we started reading in the middle of a string from the sender.
  myString = myPort.readStringUntil( 10 );  // 10 = '\n'  Linefeed in ASCII
  myString = null;
}

void sendSerialData() {
  String data = "";
  for (int i=0; i<processing_values.length; i++) {
    data += processing_values[i];
    //if i is less than the index number of the last element in the values array
    if (i < processing_values.length-1) {
      data += ","; // add splitter character "," between each values element
    }
    //if it is the last element in the values array
    else {
      data += "\n"; // add the end of data character linefeed "\n"
    }
  }
  //write to Arduino
  myPort.write(data);
  print(data); // this prints to the console the values going to arduino
}
Additional homework:
Video:
Code for Processing:
import processing.serial.*;

String myString = null;
Serial myPort;


int NUM_OF_VALUES = 2;   /** YOU MUST CHANGE THIS ACCORDING TO YOUR PROJECT **/
int[] sensorValues;      /** this array stores values from Arduino **/
int preButtonValue0=0;
int preButtonValue1=0;
boolean star1=false;
boolean star2=false;


void setup() {
  size(600, 600);
  background(0);
  setupSerial();
}


void draw() {
  updateSerial();
  printArray(sensorValues);
  background(0);
  if (sensorValues[0]==1 && sensorValues[0]!=preButtonValue0) {
    star1 = !star1;
  }
  if (sensorValues[1] ==1 && sensorValues[1] !=preButtonValue1) {
    star2 = !star2 ;
  }
  if (star1) {
    pushMatrix();
    translate(width*0.3, height*0.3);
    rotate(frameCount / 200.0);
    star(0, 0, 30, 70, 5);
    popMatrix();
  }
  if (star2) {
    pushMatrix();
    translate(width*0.7, height*0.7);
    rotate(frameCount / 400.0);
    star(0, 0, 80, 100, 40);
    popMatrix();
  }

  preButtonValue0= sensorValues[0];
  preButtonValue1= sensorValues[1];

}

void star(float x, float y, float radius1, float radius2, int npoints) {
  float angle = TWO_PI / npoints;
  float halfAngle = angle/2.0;
  beginShape();
  for (float a = 0; a < TWO_PI; a += angle) {
    float sx = x + cos(a) * radius2;
    float sy = y + sin(a) * radius2;
    vertex(sx, sy);
    sx = x + cos(a+halfAngle) * radius1;
    sy = y + sin(a+halfAngle) * radius1;
    vertex(sx, sy);
  }
  endShape(CLOSE);
}


void setupSerial() {
  printArray(Serial.list());
  myPort = new Serial(this, Serial.list()[1], 9600);

  myPort.clear();
  // Throw out the first reading,
  // in case we started reading in the middle of a string from the sender.
  myString = myPort.readStringUntil( 10 );  // 10 = '\n'  Linefeed in ASCII
  myString = null;

  sensorValues = new int[NUM_OF_VALUES];
}


void updateSerial() {
  while (myPort.available() > 0) {
    myString = myPort.readStringUntil( 10 ); // 10 = '\n'  Linefeed in ASCII
    if (myString != null) {
      String[] serialInArray = split(trim(myString), ",");
      if (serialInArray.length == NUM_OF_VALUES) {
        for (int i=0; i<serialInArray.length; i++) {
          sensorValues[i] = int(serialInArray[i]);
        }
      }
    }
  }
}
Code for Arduino:
// IMA NYU Shanghai
// Interaction Lab
// For sending multiple values from Arduino to Processing


void setup() {
  Serial.begin(9600);
}

void loop() {
  int sensor1 = digitalRead(4);
  int sensor2 = digitalRead(8);

  // keep this format
  Serial.print(sensor1);
  Serial.print(",");  // put comma between sensor values
  Serial.print(sensor2);
  Serial.println();
  // add linefeed after sending the last sensor value

  // too fast communication might cause some latency in Processing
  // this delay resolves the issue.
  delay(100);
}
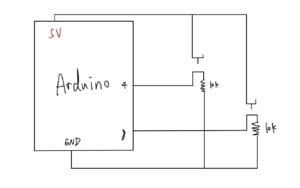
schematic for the circuit:

