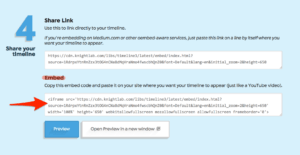
Have you created a beautiful timeline and got stuck on how to share it with peers? Try embedding it on a website such as Web Publishing or Omeka. The instructions below are tailored specifically for TimelineJS but can be applied to a number of other timeline platforms.
- Make sure your timeline can generate an iframe embed code.
- Make sure your website supports the embed code:
- if using Web Publishing, activate the iframe plugin: from the Dashboard, click on “Plugins,” search for “iframe,” then click “Activate.”
- if using Omeka, make sure iframe is included in the allowed HTML elements for the site by visiting Settings > Security. You can also choose to disable HTML filtering altogether by unchecking the appropriate box.
- Copy the embed code generated by TimelineJS. (If using a different platform, find its sharing settings and select “embed.”

- If using Web Publishing, paste the embed code into the text editor, making the following alterations: Replace the carrot brackets <> with square brackets [], so that your embed code should begin with [iframe… and end with a closing square bracket (instead of the original <iframe><… and >).
- If using Omeka, click on the HTML icon the text editor’s toolbar to open up the HTML Source Editor. Find the location you’d like your timeline to appear and paste the original embed code from your timeline. Click on “Update” to close the HTML editor and then click on “Save Changes.”

- Preview your page or post to verify that the embed code is working properly.

