Task 1
- What the circuit does:
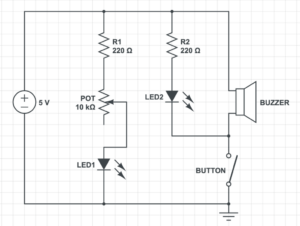
By twisting the knob of the POT-LIN, we can change the brightness of LED1 and when we press the button, the buzzer goes off and LED2 lights up.
- In step 1, we put the button on the same half part of the breadboard and the buzzer just couldn’t stop making sounds. And when we turned the button the other way around, the button was then able to control the buzzer. So we assumed that the button also has polarity, (but now I know that’s not true because Lydia told us so.)
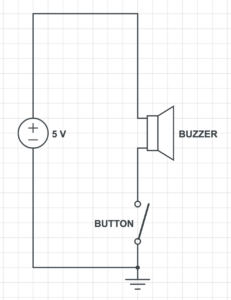
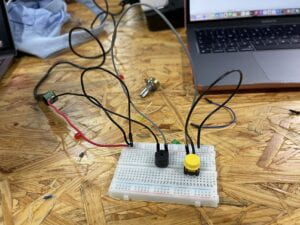
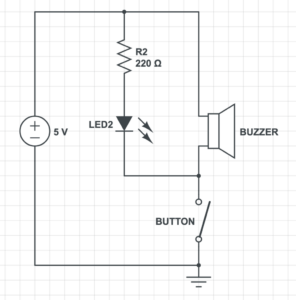
- In step 2, we connected the 220 ohm resistor to the breadboard and then we connected the LED light. At first our LED didn’t light up, so we changed it to another one. Then, we connected a cable from the negative end of the light to the positive end of the button and it lit up when we pressed the button. It was during this whole process that we discovered the first light that we used was defective.
- In step 3, I followed the graph and added another line to the circuit, but the LED in that line, which is LED1, didn’t light up, so we asked Prof. Rudi for help. I didn’t quite catch up with what he did, so I plan to figure it out during office hours on Monday. (This is now Monday and I built the circuit again. And I think I learned a lot from Lydia during the office hours. For example, when we both smelled a something funny, which suggested something is burning, she immediately cut the power off. Also, when the buzzer just couldn’t work, she used the multimeter to test if there was any electric flow between two specific components. I think the office hours are really helpful to me and I really enjoyed the sense of accomplishment when things worked out. )
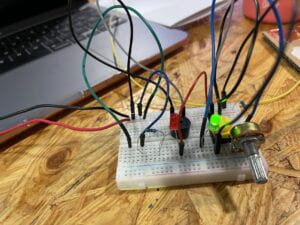
- My partner Nicole and I, I think, had a great time cooperating and working out the circuit together. Sometimes I would try to complete the circuit and it didn’t work, then she would try something else, like plugging the wire into another hole in the breadboard, and if things still didn’t work out, then we could confidently draw the conclusion that something had to be broken. With a partner, I think I can try more things out together with her, which is a great way to learn from the mistakes.
Task 2
- Things I learned and difficulties I had:
I think things went pretty smooth during this process, partly because the soldering station I used was shiny and clean, so that it was easier for me to melt the metal with direct heat, I suppose, but the melting metal got solid so fast that I couldn’t control the shape of it. And as I melt more metal, more of it sticked to and added a coating to the front area of the solder, which makes it harder to melt things. At last, as I was short of time, the connecting part ended up a lot of metal on one side but little on the other side, but it still worked, so it’s still something I feel proud of as my first try with soldering. Personally, this process requires us to have enough patience and practice is also necessary.
One thing I learned, which I found very interesting, is to bend the wires, posing a perpendicular shape and then taping it, which I have never thought of and I found it a really clever way to prevent the wire from easily being pulled off.
Task 3
- In this process, we replaced the button with our DIY paddle. As we didn’t finished this task during recitation, we went to the lab during office hours, so we unfortunately didn’t have the chance to decode another team’s secret code. However, we still managed to make our morse code by putting the two separate parts of the paddle together for a set of combination of different time units.
Additional Questions:
Q1:
LEDs need resistors to help limit the current that passes through them so they do not get damaged.
Q2: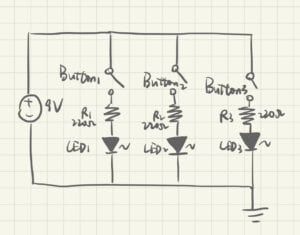
Q3: I think the circuit “listens” to my actions by sensing my pressing the button or my turning around the POT knob, “thinks” if the circuit allows the electricity to flow all the way from the positive to the negative, and finally “speaks” in the way of changing the brightness of the LED and making the buzzer going off as I “speak” my requirements. However, I think the degree of interactivity is low, because the requirements I can “speak” is really simple and also kind of dull, and upon hearing what the circuit “speak”, I can’t react towards that output, thus unable to keep a two-way conversation going on. Furthermore, the requirements I can speak is quite simple and are only of two types. Also, the “thinking” process isn’t that much about deep thinking.
Q4: Artists may first bear an idea of the original interaction design and can then use physical computing as a means to turn what they have in mind to a digital form directly through their five senses, which makes the whole process much more friendly to designers. When it is completed, physical computing can also be implemented to make the final work of art to be displayed in the ways it is desired to be.
