Concept aspect:
For our concept, since we made a nature-related self-made fabric during last class, we thought that it would be nice to make a project that shows the relationship between human and nature. Also, the international women’s day is approaching, we thought that women are often given gifts of flowers as well as being described as flowers, beautiful, delicate and needed to be protected by men. However, this can also be considered as a stereotype that constrains women to be themselves. So we made this dress that shows both women’s beauty and curve but also through the user experience, we can let the wearer feels an obvious constrain and danger of wearing the dress.
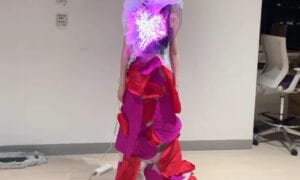
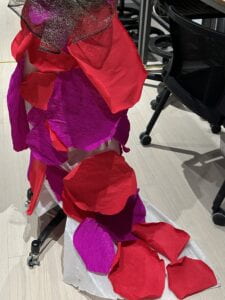
The bottom part of our dress is covered beautiful flower petals that we made ourselves using a special kind of paper that is delicate and can be shaped easily, which demonstrates the delicate and can-be-shaped-by-others characteristic. The graceful white long dress on the base also shows women’s grace. However, the dress has a really tough inner face that is very uncomfortable for the wearer, and the dress itself is very tight which is constraining the wearer’s movements. These represents the hidden harms that stereotypes like this can have on women.
The middle part of the body is covered by thin shinny fabric that barely cover anything, explicitly showing women’s fragility and fear. The collar has many layers, the part below the neck is stretching out, showing women’s desire to express themselves and to be powerful, and about the neck is instead is blocking the sight, which shows a stereotype that women should not care about the outside world and just do the domestic, creates a conflict here.

The collar also has a lot of iron sticks sticking out, showing how sharp this constrain is, which is not only dangerous to the wearer but also to the surrounding, so it demonstrates the stereotype on women is much more than just a harm on women but on the entire society.
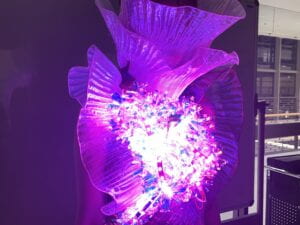
The mask is also blocking women’s face, blocking her from the outside world. The fabric is made by lace and leaves of flowers, representing the “standard” dress and symbol of women.
There is a big pumping shining heart outside the body, demonstrating that women are actually brave and true, they have their own feelings, thoughts, blood and also, heartbeats that can be and are supposed to be seen and felt.
Technical aspect:
We use the heartbeat sensor and neopixel string. The code is below:
// Function: This program can be used to measure heart rate, the lowest pulse in the program be set to 30.
//         Use an external interrupt to measure it.
// Hardware: Grove - Ear-clip Heart Rate Sensor, Grove - Base Shield, Grove - LED
// Arduino IDE: Arduino-1.0
// Author: FrankieChu
// Date: Jan 22, 2013
// Version: v1.0
// by www.seeedstudio.com
//Heart rate
#define LED 13//indicator, Grove - LED is connected with D4 of Arduino
//xboolean led_state = LOW; //state of LED, each time an external interrupt
//will change the state of LED
unsigned char counter;
unsigned long temp[21];
unsigned long sub;
bool data_effect = true;
unsigned int heart_rate;//the measurement result of heart rate

const int max_heartpluse_duty = 2000;//you can change it follow your system's request.
//2000 meams 2 seconds. System return error
//if the duty overtrip 2 second.

//LED pixels1
// NeoPixel Ring simple sketch (c) 2013 Shae Erisson
// Released under the GPLv3 license to match the rest of the
// Adafruit NeoPixel library

#include <Adafruit_NeoPixel.h>
#ifdef __AVR__
#include <avr/power.h> // Required for 16 MHz Adafruit Trinket
#endif

// Which pin on the Arduino is connected to the NeoPixels?
#define PINs1        6 // On Trinket or Gemma, suggest changing this to 1


// How many NeoPixels are attached to the Arduino?
#define NUMPIXELS1 120 // Popular NeoPixel ring size


// When setting up the NeoPixel library, we tell it how many pixels,
// and which pin to use to send signals. Note that for older NeoPixel
// pixels1s you might need to change the third parameter -- see the
// strandtest example for more information on possible values.
Adafruit_NeoPixel pixels1(NUMPIXELS1, PINs1, NEO_GRB + NEO_KHZ800);
//Adafruit_NeoPixel pixels2(NUMPIXELS1, PINs2, NEO_GRB + NEO_KHZ800);
//Adafruit_NeoPixel pixels3(NUMPIXELS1, PINs3, NEO_GRB + NEO_KHZ800);
//Adafruit_NeoPixel pixels4(NUMPIXELS1, PINs4, NEO_GRB + NEO_KHZ800);

#define DELAYVAL 500 // Time (in milliseconds) to pause between pixels

long int blinkTime = 200;
long int blinkStartTime = 0;
boolean lightsOn = false;
int prevCounter = 0;

void setup() {

  pixels1.begin(); // INITIALIZE NeoPixel pixels1 object (REQUIRED)


   pixels1.clear(); // Set all pixel colors to 'off'

  pinMode(LED, OUTPUT);
  Serial.begin(9600);
  Serial.println("Please ready your chest belt.");
  delay(5000);
  arrayInit();
  Serial.println("Heart rate test begin.");
  attachInterrupt(0, interrupt, RISING);//set interrupt 0,digital port 2


  Serial.begin(9600);   // We'll send debugging information via the Serial monitor
  pinMode(6, OUTPUT);
}


void loop()
{
  if (counter != prevCounter) {
    blinkStartTime = millis();
    lightsOn = true;
    Serial.println("lights on");
    //    prevCounter = counter;
    pixels1.fill(pixels1.Color(198, 0, 211), 0, 120);
    pixels1.show();
    prevCounter = counter;
    delay(50);
  }

  if (millis() - blinkStartTime > blinkTime) {
    lightsOn = false;
    Serial.println("lights off");
    pixels1.fill(pixels1.Color(0, 0, 0), 0, 0);
    pixels1.show();
  }
}
void sum()
{
  if (data_effect)
  {
    heart_rate = 1200000 / (temp[20] - temp[0]);
  }
  data_effect = 1;
}
void interrupt()
{
  temp[counter] = millis();
  Serial.println(counter, DEC);
  Serial.println(temp[counter]);
  switch (counter)
  {
    case 0:
      sub = temp[counter] - temp[20];
      Serial.println(sub);
      break;
    default:
      sub = temp[counter] - temp[counter - 1];
      Serial.println(sub);
      break;
  }
  if (sub > max_heartpluse_duty) //set 2 seconds as max heart pluse duty
  {
    data_effect = 0; //sign bit
    counter = 0;
    Serial.println("Heart rate measure error,test will restart!" );
    arrayInit();
  }
  if (counter == 20 && data_effect)
  {
    counter = 0;
    sum();
  }
  else if (counter != 20 && data_effect)
    counter++;
  else
  {
    counter = 0;
    data_effect = 1;
  }

}
void arrayInit()
{
  for (unsigned char i = 0; i < 20; i ++)
  {
    temp[i] = 0;
  }
  temp[20] = millis();
}
Future development:
Now, some of our concepts are still not straightforward enough, also as professor Marcele suggests, we could’ve used a sensor that can connect the viewer with the dress instead of just the wearer. And we can express the “women’s power” more explicitly by choosing more tough and attacking materials.