Recitation 9 – Sound in Processing

For this recitation, we use sound to do a lot of exercises. 

In the first exercise, we use keys to control the start of two sounds.

The code is below:

import processing.sound.*;

// declare three SoundFile objects
SoundFile kick;
SoundFile snare;


void setup() {
  size(640, 480);
  // create the objects and load sounds into them
  kick = new SoundFile(this, "kick.wav");
  snare = new SoundFile(this, "snare.wav");
 
}

void draw() {
  background(0);  
}

void keyPressed() {
  // when a key is pressed, use a switch statement
  // to determine which key was pressed
  // and play the appropriate sound file and set a background color
  switch(key) {
    case 'k':
      kick.play();
      background(255, 0, 0);
      break;
    case 's':
      snare.play();
      background(0, 255, 0);
      break;
    
  } 
}

 The video:

In the second exercise, we use the vibration motor to detect and show the beats of the song “Lost On The Free Way”.

The code is below:

For processing:

import processing.serial.*;


int NUM_OF_VALUES_FROM_ARDUINO = 1;   /** YOU MUST CHANGE THIS ACCORDING TO YOUR PROJECT **/
int sensorValues[];      /** this array stores values from Arduino **/

String myString = null;
Serial myPort;

import processing.sound.*;

// declare an AudioIn object
SoundFile sound;
// declare an Amplitude analysis object to detect the volume of sounds
Amplitude analysis;

void setup() {
  size(500, 500);
   sound= new SoundFile(this, "Lost On The Freeway.mp3");
   
   sound.play();
  // create the Amplitude analysis object
 
  // use the microphone as the input for the analysis
  analysis = new Amplitude(this);
  analysis.input(sound);

  setupSerial();
  
}

void draw() {
  background(0);
   println(analysis.analyze());
  background(0);
   float volume = analysis.analyze();
  // map the volume value to a useful scale
  float diameter = map(volume, 0, 1, 0, width);
  // draw a circle based on the microphone amplitude (volume)
  circle(width/2, height/2, diameter); 
  getSerialData();
 sensorValues[0]=int(map(analysis.analyze(),0,1,0,200));
}


void setupSerial() {
  printArray(Serial.list());
  myPort = new Serial(this, Serial.list( )[6], 9600);

  myPort.clear();
  myString = myPort.readStringUntil( 10 );  // 10 = '\n'  Linefeed in ASCII
  myString = null;

  sensorValues = new int[NUM_OF_VALUES_FROM_ARDUINO];
}

void getSerialData() {
  while (myPort.available() > 0) {
    myString = myPort.readStringUntil( 10 ); // 10 = '\n'  Linefeed in ASCII
    if (myString != null) {
      String[] serialInArray = split(trim(myString), ",");
      if (serialInArray.length == NUM_OF_VALUES_FROM_ARDUINO) {
        for (int i=0; i<serialInArray.length; i++) {
          sensorValues[i] = int(serialInArray[i]);
        }
      }
    }
  }
}

Arduino code:

// IMA NYU Shanghai
// Interaction Lab

/**
  This example is to send multiple values from Processing to Arduino.
  You can find the Processing example file in the same folder which works with this Arduino file.
 **/
#define ZD 3
#define NUM_OF_VALUES_FROM_PROCESSING 1    /** YOU MUST CHANGE THIS ACCORDING TO YOUR PROJECT **/


/** DO NOT REMOVE THESE **/
int tempValue = 0;
int valueIndex = 0;

/* This is the array of values storing the data from Processing. */
int processing_values[NUM_OF_VALUES_FROM_PROCESSING];
#include <Servo.h>

Servo myservo;  // create servo object to control a servo

int potpin = A0;  // analog pin used to connect the potentiometer
int val;    

void setup() {
  Serial.begin(9600);
  pinMode(ZD,OUTPUT);
   
}

void loop() {
  getSerialData();
analogWrite(ZD,200);
delay(5000);
analogWrite(ZD,0);
delay(1000);
analogWrite(ZD,100);
delay(5000);
analogWrite(ZD,0);
delay(1000);
  // add your code here using elements in the values array

  //this is an example connecting a buzzer to pin 8
  /*
    if (processing_values[0] == 1) {
      //turn on an LED when the mouse is pressed
      digitalWrite(13, HIGH);
      // map values from mouseX to frequency from (0 - 500 pixels)
      //to the output pitch range (120 - 1500Hz)
      int f = map(processing_values[1], 0, 500, 120, 1500);
      // map values from mouseY to frequency from (0 - 500 pixels)
      //to the output duration range (10 - 2000 milliseconds)
      int d = map(processing_values[2], 0, 500, 10, 2000);
      // play the pitch:
      tone(8, processing_values[1], processing_values[2]);
      delay(1);        // delay in between reads for stability
    } else {
      digitalWrite(13, LOW);
    }
  */
  //end of example

}
//receive serial data from Processing
void getSerialData() {
  while (Serial.available()) {
    char c = Serial.read();
    //switch - case checks the value of the variable in the switch function
    //in this case, the char c, then runs one of the cases that fit the value of the variable
    //for more information, visit the reference page: https://www.arduino.cc/en/Reference/SwitchCase
    switch (c) {
      //if the char c from Processing is a number between 0 and 9
      case '0'...'9':
        //save the value of char c to tempValue
        //but simultaneously rearrange the existing values saved in tempValue
        //for the digits received through char c to remain coherent
        //if this does not make sense and would like to know more, send an email to me!
        tempValue = tempValue * 10 + c - '0';
        break;
      //if the char c from Processing is a comma
      //indicating that the following values of char c is for the next element in the values array
      case ',':
       // processing_values[valueIndex] = tempValue;
        //reset tempValue value
        tempValue = 0;
        //increment valuesIndex by 1
        valueIndex++;
        break;
      //if the char c from Processing is character 'n'
      //which signals that it is the end of data
      case '\n':
        //save the tempValue
        //this will b the last element in the values array
       // processing_values[valueIndex] = tempValue;
        //reset tempValue and valueIndex values
        //to clear out the values array for the next round of readings from Processing
        tempValue = 0;
        valueIndex = 0;
        break;
    }
  }
}

Video:

The vibration motor is kind of scary hahaha, but the moving circle is very cool that gives a feel to the atmosphere and make the music even more popping and even interactive for it engages sights in the processes of enjoying music. It was a bit hard to use the map function for a proper extent, and it was also quite tricky when making the portfolio, for the music must be included in a portfolio called data with the processing sketch in the same portfolio.

In the homework part, we tried to use amplitude to draw something on Processing, I chose to draw a line that goes up and down accordingly.

The code:


import processing.sound.*;

// declare an AudioIn object
AudioIn microphone;
// declare an Amplitude analysis object to detect the volume of sounds
Amplitude analysis;

int x=0;
float prediameter;
 
void setup() {
   background(198,236,255);
  size(640, 480); 
  // create the AudioIn object and select the mic as the input stream
  microphone = new AudioIn(this, 0);
  // start the mic input without routing it to the speakers
  microphone.start();
  // create the Amplitude analysis object
  analysis = new Amplitude(this);
  // use the microphone as the input for the analysis
  analysis.input(microphone);
}      

void draw() {
  println(analysis.analyze());
 
  
  // analyze the audio for its volume level
  float volume = analysis.analyze();
  // map the volume value to a useful scale
  float diameter = map(volume, 0,1,  200, 0);
  // draw a circle based on the microphone amplitude (volume)
 
 
  x=x+1;
  strokeWeight(5);
  stroke(252,199,199);
  line(x, prediameter,x+1,diameter); 
  
  
  prediameter=diameter;
}

 Video:

It’s really fun to “see” your voice and to make different waves with it. However, it’s not so sensitive, I need to be very loud or very sharp can I make the line wave dramatically.

Essay

Our project is called Plastic Fish. It’s purpose is to convey the idea of protecting the marine environment by cutting down the amount of pollution people poured into the sea. According to Wekipedia, Marine pollution is a combination of chemicals and trash, most of which comes from land sources and is washed or blown into the ocean. This pollution results in damage to the environment, to the health of all organisms, and to economic structures worldwide. There are 6 types of marine pollution, they are pollution from marine debris, plastic pollution, including micro-plastics, ocean acidification, nutrient pollution, toxins and underwater noise.


We planned to build an interactive game involving two players. Each representing a fish. They can use sensors(potential meters/pressure sensors/sound/movement)to control the movement of the fish. The processing will have a background of blue ocean with  micro plastic(or actual plastic products) and fish food(maybe like little shrimps) bouncing around the whole page. For the micro plastic, it will start with one, and then double once 20 seconds. And the two players will need to avoid the micro plastic. By eating the little shrimps, they will grow bigger, and the player that is bigger at the end of the game will “win” the game. However, I add these quotation marks because that actually, there will be no winner in the game. We will also design a rising “pollution layer” that rises from the bottom of the sea and will reach 7/8 of the pages at the end. The fishes can only swim above this layer, so eventually the two players will find themselves stuck on the top. With the limited space and continuously doubling plastics, there’s no way that the fishes can still avoid touching them. So these two fishes will both die, no matter how much they struggle to survive. 

In the previous reading of 《Newton’s Sleep》, it describes a world that is “prototype of the Special Earth Satellite itself” because the earth is already over-polluted. This also stimulates us to develop the idea of reminding people we can’t consume the earth too wildly, it’s important that we appreciate all we’ve got and limit our pollution and harm to the earth. After all, what we’ve done to the earth will result on ourselves eventually, for the earth’s good, our own good and our latter generation’s good, we should be cautious of our actions now.

Recitation 8: Serial Communication

For this recitation, we did many exercises to get familiar with the connection between Arduino and processing.

Exercise 1:

The first exercise is using Arduino to send two analog values to Processing via serial communication. I find this one the most confident one for me to do. 
Below is the Arduino code:

void setup() {
  Serial.begin(9600);
}

void loop() {
  int sensor1 = analogRead(A0);
  int sensor2 = analogRead(A1);
  Serial.print(sensor1);
  Serial.print(",");  // put comma between sensor values
  Serial.print(sensor2);
  Serial.println();
  
}

Processing:

import processing.serial.*;
float x;
float y;

int NUM_OF_VALUES_FROM_ARDUINO = 2;   /** YOU MUST CHANGE THIS ACCORDING TO YOUR PROJECT **/
int sensorValues[];      /** this array stores values from Arduino **/
int sensorp[];
String myString = null;
Serial myPort;

void setup() {
  size(500, 500);
  setupSerial();
  sensorp = new int[NUM_OF_VALUES_FROM_ARDUINO];
  background(0);
}

void draw() {
  getSerialData();
  printArray(sensorValues);  
  x = map(sensorValues[0],0,1023,0,width);
  y = map(sensorValues[1],0,1023,0,width);

  stroke(255);
  line(sensorp[0], sensorp[1],x, y);
  sensorp[0]=int(x);
  sensorp[1]=int(y);
}

void setupSerial() {
  printArray(Serial.list());
  myPort = new Serial(this, Serial.list()[2], 9600);
  
  myPort.clear();
  myString = myPort.readStringUntil( 10 );  // 10 = '\n'  Linefeed in ASCII
  myString = null;

  sensorValues = new int[NUM_OF_VALUES_FROM_ARDUINO];
  
}
void getSerialData() {
  while (myPort.available() > 0) {
    myString = myPort.readStringUntil( 10 ); // 10 = '\n'  Linefeed in ASCII
    if (myString != null) {
      String[] serialInArray = split(trim(myString), ",");
      if (serialInArray.length == NUM_OF_VALUES_FROM_ARDUINO) {
        for (int i=0; i<serialInArray.length; i++) {
          sensorValues[i] = int(serialInArray[i]);
        }
      }
    }
  }
}

Video: 

Exercise 2:

For this exercise, I found two codes for the bouncing circle. The first one is like this:

/**
 * Bounce. 
 * 
 * When the shape hits the edge of the window, it reverses its direction. 
 */
 
int rad = 60;        // Width of the shape
float xpos, ypos;    // Starting position of shape    

float xspeed = 2.8;  // Speed of the shape
float yspeed = 2.2;  // Speed of the shape

int xdirection = 1;  // Left or Right
int ydirection = 1;  // Top to Bottom


void setup() 
{
  fullScreen();
  noStroke();
  frameRate(30);
  ellipseMode(RADIUS);
  // Set the starting position of the shape
  xpos = width/2;
  ypos = height/2;
}

void draw() 
{
  background(102);
  
  // Update the position of the shape
  xpos = xpos + ( xspeed * xdirection );
  ypos = ypos + ( yspeed * ydirection );
  
  // Test to see if the shape exceeds the boundaries of the screen
  // If it does, reverse its direction by multiplying by -1
  if (xpos > width-rad || xpos < rad) {
    xdirection *= -1;
  }
 
    ydirection *= 0;
  

  // Draw the shape
  ellipse(xpos, ypos, rad, rad);
}

However, I found it really hard to use this code to communicate with processing, I tried several times but don’t know how to use “if statement” in this case. And later Tracy and I figured another way to code the bouncing circle. My servo isn’t working, so I did the coding part with Tracy and she filmed how the servo interacts with the bouncing circle.

Arduino code:

#define NUM_OF_VALUES_FROM_PROCESSING 1    /** YOU MUST CHANGE THIS ACCORDING TO YOUR PROJECT **/
#include <Servo.h>
/** DO NOT REMOVE THESE **/
int tempValue = 0;
int valueIndex = 0;
bool prevState = false;
bool currentState = false;
Servo myservo;
int processing_values[NUM_OF_VALUES_FROM_PROCESSING];
void setup() {
  Serial.begin(9600);
  pinMode(12, OUTPUT);
  myservo.attach(10);
}
void loop() {
  getSerialData();
  currentState = processing_values[0];
 
  if (currentState != prevState && currentState == 1) {
    myservo.write(90);
   
    myservo.write(0);
  } else {
    myservo.write(0);
  }
  prevState = currentState;
}
//receive serial data from Processing
void getSerialData() {
  while (Serial.available()) {
    char c = Serial.read();
    switch (c) {
      case '0'...'9':
        tempValue = tempValue * 10 + c - '0';
        break;
      case ',':
        processing_values[valueIndex] = tempValue;
        tempValue = 0;
        valueIndex++;
        break;
      case '\n':
        processing_values[valueIndex] = tempValue;
        tempValue = 0;
        valueIndex = 0;
        break;
    }
  }
}

Processing:

import processing.serial.*;
int NUM_OF_VALUES_FROM_PROCESSING = 1;  /** YOU MUST CHANGE THIS ACCORDING TO YOUR PROJECT **/
int processing_values[] = new int[NUM_OF_VALUES_FROM_PROCESSING]; /** this array stores values you might want to send to Arduino **/
Serial myPort;
String myString;
int x=30;
int speedX = 5;
void setup() {
  fullScreen();
  background(0);
  setupSerial();
}
void draw() {
  background(0);
  circle (x, 100, 100);
  x= x+speedX;
  if (x > width-40 || x < 0+30) {
    speedX = -speedX;
  }
  if (x > width-30) {
    processing_values[0] = 1;
  } else {
    processing_values[0] = 0;
  }
  sendSerialData();
}
void setupSerial() {
  printArray(Serial.list());
  myPort = new Serial(this, Serial.list()[2], 9600);
  myPort.clear();
  myString = myPort.readStringUntil( 10 );  // 10 = '\n'  Linefeed in ASCII
  myString = null;
}
void sendSerialData() {
  String data = "";
  for (int i=0; i<processing_values.length; i++) {
    data += processing_values[i];
    //if i is less than the index number of the last element in the values array
    if (i < processing_values.length-1) {
      data += ","; // add splitter character "," between each values element
    }
    else {
      data += "\n"; // add the end of data character linefeed "\n"
    }
  }
  //write to Arduino
  myPort.write(data);
  print(data); // this prints to the console the values going to arduino
}

Video:

Additional homework:

I found the communication quite confusing for there are many sections and it’s sometimes even impossible to figure out which part goes wrong. So I participated in the workshop and learnt more about the whole logic behind this.

Arduino code:

// IMA NYU Shanghai
// Interaction Lab
// For recitation 8 homework, controlling the display of two stars with two buttons


void setup() {
  Serial.begin(9600);
}

void loop() {
  int button1 = digitalRead(9);
  int button2 = digitalRead(10);

  // keep this format
  Serial.print(button1);
  Serial.print(",");  // put comma between values
  Serial.print(button2);
  Serial.println(); // add linefeed after sending the last value

  // too fast communication might cause some latency in Processing
  // this delay resolves the issue.
  delay(100);
}

Processing:

// IMA NYU Shanghai
// Interaction Lab
// For recitation 8 homework, controlling the display of two stars with two buttons

/*
 * Based on the readStringUntil() example by Tom Igoe
 * https://processing.org/reference/libraries/serial/Serial_readStringUntil_.html
 */

import processing.serial.*;

String myString = null;
Serial myPort;


int NUM_OF_VALUES = 2;   /** YOU MUST CHANGE THIS ACCORDING TO YOUR PROJECT **/
int[] buttonValues;      /** this array stores values from Arduino **/
int prevButtonValue0 = 0;
int prevButtonValue1 = 0;
boolean star1Display = false;
boolean star2Display = false;


void setup() {
  size(600, 600);
  background(0);
  setupSerial();
}


void draw() {
  updateSerial();
  printArray(buttonValues);

  background(0);

  if (buttonValues[0]==1 && buttonValues[0]!= prevButtonValue0) {
    star1Display = !star1Display;
  }
  if (buttonValues[1]==1 && buttonValues[1]!= prevButtonValue1) {
    star2Display = !star2Display;
  }

  if (star1Display) {
    pushMatrix();
    translate(width*0.3, height*0.3);
    rotate(frameCount / 200.0);
    star(0, 0, 30, 70, 5); 
    popMatrix();
  }

  if (star2Display) {
    pushMatrix();
    translate(width*0.7, height*0.7);
    rotate(frameCount / 400.0);
    star(0, 0, 80, 100, 40); 
    popMatrix();
  }

  prevButtonValue0 = buttonValues[0];
  prevButtonValue1 = buttonValues[1];
}


void star(float x, float y, float radius1, float radius2, int npoints) {
  float angle = TWO_PI / npoints;
  float halfAngle = angle/2.0;
  beginShape();
  for (float a = 0; a < TWO_PI; a += angle) {
    float sx = x + cos(a) * radius2;
    float sy = y + sin(a) * radius2;
    vertex(sx, sy);
    sx = x + cos(a+halfAngle) * radius1;
    sy = y + sin(a+halfAngle) * radius1;
    vertex(sx, sy);
  }
  endShape(CLOSE);
}


void setupSerial() {
  printArray(Serial.list());
  myPort = new Serial(this, Serial.list()[ 6 ], 9600);
  // WARNING!
  // You will definitely get an error here.
  // Change the PORT_INDEX to 0 and try running it again.
  // And then, check the list of the ports,
  // find the port "/dev/cu.usbmodem----" or "/dev/tty.usbmodem----" 
  // and replace PORT_INDEX above with the index number of the port.

  myPort.clear();
  // Throw out the first reading,
  // in case we started reading in the middle of a string from the sender.
  myString = myPort.readStringUntil( 10 );  // 10 = '\n'  Linefeed in ASCII
  myString = null;

  buttonValues = new int[NUM_OF_VALUES];
}


void updateSerial() {
  while (myPort.available() > 0) {
    myString = myPort.readStringUntil( 10 ); // 10 = '\n'  Linefeed in ASCII
    if (myString != null) {
      String[] serialInArray = split(trim(myString), ",");
      if (serialInArray.length == NUM_OF_VALUES) {
        for (int i=0; i<serialInArray.length; i++) {
          buttonValues[i] = int(serialInArray[i]);
        }
      }
    }
  }
}

Video:


Research:

 For the coming classes we will be learning how to manipulate image, video and sound. I’m really excited about this, I think it can add a lot more interesting effects to the interaction. It also is so relevant to the final project as well. 

For our project, one of our ideas is to visualize the sound. Since originally, sound is a wave that comes from vibration. If it’s impossible for people with hearing problems to hear, it would be great for them to see the wave and feel the vibration, which are the two parts that builds the sound. By research we found that it’s possible to use processing to code wave or random shapes for different pitches, which I find really interesting.

Also, by searching for “processing image” on Google, I found that Processing currently works with GIF, JPEG, and PNG images. So it’s also possible to add actual pictures to the final result, which can also be very useful. I believe that using a GIF can have very funny effect.

Final Project Proposal

1, Circles

This project is designed for kids in kindergarten. It aims at teaching kids the three-primary colors, as well as how to properly compete and cooperate with one another. We were inspired by both the exercise we did during the class, the one that has a circle bouncing around the screen; and the project mood reflecting floor published by the “visualcraft” also gives me the idea of blending colors of each circle. We think the challenges may be that the switch of two mode as well as the connection of multiple sensors.

2, Etch-B-sketch

This is designed for people in all age and train their drawing skills as well as memory. This is inspired by the project “Etch-A- Sketch”, and it adopt the similar way of drawing like Etch_A_Sketch, switching the potentiometers, the processing will show a graph for 10s, and then the player will need to draw it. The challenge we think will be how to make the definition of a successful drawing and an unsuccessful one. 

3, Seeound

The specific audience is people with hearing impairments. This blog gave me the inspiration of this design choice that we can enable those special populations to “see” the sound. We decided to use processing to create a image that can change according to music pitch. And some LEDs can light according to the rhythm. It can help people with hearing impairments to see the shake of sound and how can we hear the sound, how does sound compose. When they use this project, it helps them learn how to live more vibrantly. It is the way they fuel their body, mind and spirit.

PREPARATORY RESEARCH AND ANALYSIS

I found two interaction projects that inspire me on YouTube. One is the solar tracker designed by Robot Greek in the video Top 10 Arduino projects all the time । Amazing Arduino school projects genius youtuber” . The other is the mood reflecting floor published by the “visualcraft”.  

For the first one, I think it’s successful because it can interact with the environment. While according to the “Art, Interaction and Engagement”, it mentions “infant behavior”, which is that infants will react according to the environment, I think this project can be viewed of a manifestation of the theory: the machine turn according to the light. From this project, it inspires me that, this project is very much like a sunflower, and maybe I can design a sunflower according to this idea but add more interaction with human, and make this interaction, continuous, according to the “Art, Interaction and Engagement”. And for the latter one, it provides a really good visual experience to me, and it’s also pretty entertaining and can interact with people for quite a long time. Also, I think I also reminds me of the interactive floor I saw in a hotel that there are many fishes projected on the floor, and they will “swim” away if you step on them. This inspires me that maybe I can also design my project with items that will change position or forms according to human movements.

I think a successful interactive experience should not only be containing the machine and people, as I said before in my definition of interaction. What’s more important in an interactive experience is that it should inspire the user to interact more, rather than just a one-round interaction. According to “Art, Interaction and Engagement”,  “the interaction [should be] continuous and fluid”. which, I think is also what I can improve for my midterm project as well. And also, the interactive experience should have a deeper intention. Just like what we did in our group project, by reading “The Winter Market” by William Gibson, we see the insight of how technology has negative influence on people, and integrated that in our design. So it is that we designed our midterm project to help people with eyesight disability.


Reference:

  • E. Edmonds, “Art, Interaction and Engagement,” 2011 15th International Conference on Information Visualisation, 2011, pp. 451-456, doi: 10.1109/IV.2011.73.
  • TGibson, W. (2000). The winter market. Burning chrome.

Recitation 7: Functions and Arrays

For this recitation, we tried to do more practices with Processing. It’s also a really good revision for Thursday’s lecture. By using parts of the codes we did during the lecture individually, I get to understand the codes more.

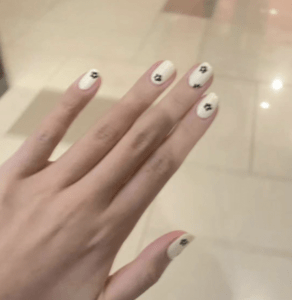
I first created a easy one based on what Professor Andy taught us during the lecture. I used the code and simply changed the graph and background. This graph and the color of the background were inspired by a nail art that I really like recently, but sadly due to the lockdown I’m not able to do the nails, I can only achieve the nails in this way😭

This is the nail art:

This is my code:


int count=10;

float x[] = new float[count];
float y[] = new float[count];
float size[] = new float[count];

float r[] = new float[count];
float g[] = new float[count];
float b[] = new float[count];
color flowerColor[] = new color[count];


float xspeed[] = new float[count];
float yspeed[] = new float[count];

void setup(){
  size(800,800);
  background(252,251,240);

 
 for ( int i=0; i < x.length; i++) {
   
    x[i] = random (100, width-100);
    y[i] = random (100, height-100);
    size[i]=random (50,80);


    r[i] = random(50,255);
    g[i] = random(100,255);
    b[i] = random(100,255);
  
    flowerColor[i] = color(r[i], g[i], b[i]);
     xspeed[i] = random (2, 5);
     yspeed[i] = random (2, 5);
 }
}
    void draw() {
      background(252,251,240);
      
    for ( int i=0; i < x.length; i++) {
    Flower(x[i], y[i], size[i], flowerColor[i]);
  }   
  move();
  bounce();
    }
    
    void move() {

  for ( int i=0; i < x.length; i++) {
    x[i] += xspeed[i] ;
    y[i]  += yspeed[i] ;
  }
}
    void bounce() {

  for ( int i=0; i < x.length; i++) {
    if ( x[i] <= 0 + size[i]/2 || x[i]>= width - size[i]/2 ) {
      xspeed[i] = -xspeed[i];
    }

    if ( y[i] <= 0+ size[i]/2 || y[i]>= height - size[i]/2 ) {
      yspeed[i] = -yspeed[i];
    }
  }
}

    void Flower(float x, float y, float size, color c) { 
 fill(0);
 ellipse(x, y, size, size);

  fill(0);
 ellipse(x+size/2, y-size/2, size, size);
 
 fill(0);
 ellipse(x+size, y, size, size);

 fill(0);
 ellipse(x+size/2-size/3, y+size/2, size, size);

 fill(0);
 ellipse(x+size/2+size/3, y+size/2, size, size);

 fill(c);
 ellipse(x+size/2, y+5, size, size);

  }

This is how it looks like:

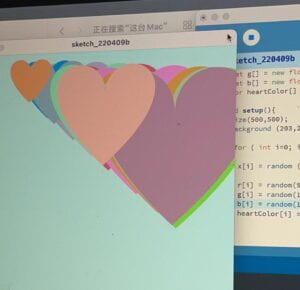
However, I wanted to challenge myself more, so I wanted to make one with a heart shape and are listed in a grid with blinking colors. This was pretty hard. I first came up with something like this:

Though it was quite pretty, it wasn’t what I wanted. Then I wanted to study how exactly does the codes for a heart shape works and how it was composited. I reached out to Professor Andy for help and learnt how to code for a heart as well as how to control its size and position, and I also learnt how to make it blink.

After that, I attended the workshop about functions and arrays and learnt how to list the hearts in a grid.

This is my result:


int count=13;
int number =10;
float[] xPositions =new float[number];
float[] yPositions =new float[number];

float x[] = new float[count];

color random1;
color random2;
int delay = 1000;// ONE SEC
int now; 
//a flag
boolean red = false;


void setup(){
  size(800,800);
  background (203,253,255);
  
   for ( int i=0; i < x.length; i++) {
   
    x[i] = random (100, width-100);
    
    now = millis();
 random1 = color(random(255),random(255),random(255));
 random2 = color(random(255),random(255),random(255));
    
}
  for(int i=0; i<number; i++){
    for (int j=0; j<number;j++){
  xPositions[i]=i*100-150;
  yPositions[j]=j*100-90;
    }
  }
}

void draw() {
  background (203,253,255);

for(int i=0;i<number;i++){
    for (int j=0;j<number;j++){
  pushMatrix();
  translate(xPositions[i],yPositions[j]);
if (millis() - now > delay) { 

    //change flag
    red = !red;

    //reset counter
    now = millis();
  }


  if (red)
    fill(random1);
  else
    fill(random2);
  heart( 100, 100, 2);
  popMatrix();
 
    }
}
  

    }

void heart (float x, float y, float size) {

  translate(x, y);
  scale(size);
  
  noStroke();
  beginShape();
  vertex(50, 15);
  bezierVertex(50, -5, 90, 5, 50, 40);
  vertex(50, 15);
  bezierVertex(50, -5, 10, 5, 50, 40);
  endShape();
}

  • Q1: In the reading “Art, Interaction and Engagement” by Ernest Edmonds, he identifies four situations in an interactive artwork: ‘Static’, ‘Dynamic-Passive’, ‘Dynamic-Interactive’ and ‘Dynamic-Interactive(Varying)’. From the exercise you did today which situations you identify in every part you executed? Explain.

Static: The part that I design the graph. After I code for the graph and click play, I can see the graph, but it doesn’t change and it doesn’t interact with me.

Dynamic-Passive: It might be like the bouncing and moving movements I had in my first try. Here, the internal mechanism is the code.

Dynamic-Interactive:  I think it’s the part that we assigned random color to the graph. Because every time we click play, the color will be shown randomly. It’s a kind of interaction between the viewer and we do have “an active role in influencing the changes in the art project”(3).

Dynamic-Interactive(Varying): Because that the color is randomly assigned, it has the sense of unpredictability in it. Also, in my blinking hearts, the art object changes color as well. So I think it fits in the varying dynamic-interactive concept.

  • Q2: What is the benefit of using arrays? How might you use arrays in a potential project?

In my case, I think listing the graphs in a grid is really tidy and visually comforting. It also reminds me of the game of whack-a-mole, maybe I can design a similar game in a potential project with some of the graphs in the grid blinking and others having other movements. The grid gives a sense of unity and solidity despite the fact that there are a lot of changes and therefore provides balance to the project as a whole.


Recitation 6: Animating an Interactive Poster

For this recitation, we tried to make a animated poster by using processing. I find it really interesting to do posters in this way. Though it takes some time to learn how to apply certain formulas, this process still has a lot of fun. I integrated my homework with the recitation together into one poster, and it’s below.

Video:

My code is below:

void setup(){
  size(768,1024);
  background(234,161,233,100);
  

}
void draw() {

  background(234,161,233,100);

  
  background(108,37,95,100);
  fill(247, 241, 207); 
  ellipse(frameCount*2, frameCount*2, 350, 300);


  fill(224,93,209,100);
  triangle(590,0,0,0,0,500);
  
  fill(192,90,229,100);
  triangle(768,0,178,0,768,500);
  
  fill (247,183,5);
  textSize(300);
  text("I",width/2-35,250);
  

  fill (255,111,0);
  textSize(200);
  text("M",width/2-66,200);

  fill(255,38,0);
  stroke(0);
  rect(width/2+23,150,28,10,28);
 
  
  fill(0);
  textSize(25);
  text("IMA Spring 22 End-Of-Semester Show",width/2-195,360);
 
  fill(0);
  textSize(25);
  text("Location: 8th floor",width/2-50,410);

  fill(0);
  textSize(25);
  text("Date: Friday May 13",width/2-50,460);
  
  fill(0);
  textSize(25);
  text("Time: 6pm to 8pm",width/2-50,510);
  
  
  Float r=random(0,255);
  Float g=random(0,255);
  Float b=random(0,255);
     
   
  float d = dist(mouseX, mouseY, 125, 200);
  if(d < 100) {
    fill(r,g,b);
  } else {
    fill(167,205,255); 
  }
  ellipse(125, 200, 200, 200);
  
  float f = dist(mouseX, mouseY, 650, 200);
  if(f < 100) {
    fill(r,g,b);   
  } else {
    fill(267, 205, 255);
  }
  ellipse(650, 200, 200, 200);
 
  fill(232,232,232,100);
  ellipse(-50,700,250,250);
 
  fill(234,206,231,100);
  ellipse(50,700,250,250);
  
  fill(234,178,227,100);
  ellipse(150,700,250,250);
  
 fill(229,147,242,100);
  ellipse(250,700,250,250);
  
   fill(222,114,240,100);
  ellipse(350,700,250,250);
  
   fill(217,73,240,100);
  ellipse(450,700,250,250);
  
    fill(210,38,237,100);
  ellipse(550,700,250,250);
  
   fill(232,40,207,100);
  ellipse(650,700,250,250);
  
   fill(234,19,206,100);
  ellipse(750,700,250,250);
  
   fill(209,2,182,100);
  ellipse(850,700,250,250);
  
  fill(247,183,5,200);
  rect(0,700,768,700);
  }


A few parts where I found a bit struggling with, one is the locations for these elements, I need to try multiple times and change accordingly to find out the most suitable coordination. Another is that I find the sequence of the codes matters, for if I put some codes before others, they will be covered by the patterns whose codes come after them.

Nonetheless, it’s really interesting to add elements one by one and feel that I have more and more idea about this poster, and to add more animations and patterns. Sometimes some mistake codes can have unexpected effect as well, for example, the ellipse that slide from the top left to the bottom right was actually an accident, I didn’t mean to place it this way, I wanted to create the effect of many circle dropping from the top like rain, but this turn out to be like a spotlight, which I found also very cool so I kept it that way.