Girltar- Elaine – Tracy

Girltar- Elaine – Tracy

 CONTEXT AND SIGNIFICANCE 

For our group project, we made a human-bodypart-selling machine based on Winter Market. The process of preparing for the group project inspires my deeper understanding of interaction: It’s both about the interaction the machine has with people, and about the storytelling. Also, the interaction should be meaningful and designed for a purpose. For our previous group project, it was designed to remind people that we shouldn’t let our desire control us and that we need to control our desire. For this midterm project, we not only want to help people with eyesight disability learn guitar, but also want to let normal people experience the difficulty of  people with eyesight problems and to cherish our ability to live as a normal people. Our target audience is mainly those people with eyesight disability because it’s hard for them to learn guitar when they’re not able to use their sight, however, their sensitive touch and hearing have been developed. Our project focuses on these two senses as their advantages and transfer the sight part into pressing the button-touch, and hearing the changing of the tone of guitar-hearing.

CONCEPTION AND DESIGN:

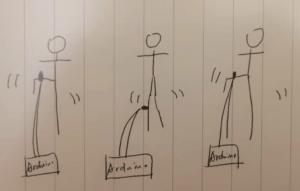
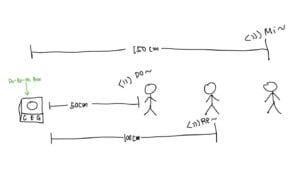
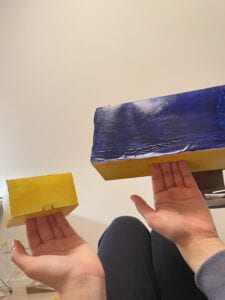
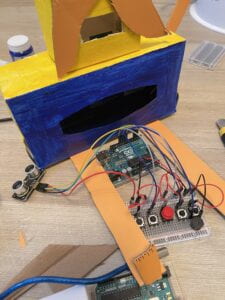
We used two different kinds of buttons in our design, one is the small button and the other is a bigger button. This is based on our considering of those people with eyesight disability can tell the difference by feeling the different size of the buttons. We have thought of using cardboards with different designs to stick on the buttons and enhance the experience of different touch feeling, however it affects the sensitivity of the button itself so we had to abandon that idea. Also, we made the robot with some details like the little feet and hair, so that by touching at these parts can have a clear expression to the users that we have built a man-like girl robot. And we mainly used cardboards and multiple boxes to build. We chose a tissue box because it happens to have a mouth on one of its surface that enables us to hide the Arduino inside. And to make it echos to our poster, we painted it blue and yellow. For this project, we had three previous drafts, the first one was a glove that connects to an ultrasound sensor with a spring. When the user moves his/her hand, as the spring goes longer and shorter, the distance sensor can sense different distance so to make different tone of the particular instrument the user steps on, or two instruments, each hand’s sensor controlling each instrument. And we also wanted to have four paddles on the ground and each hiding a button, which are the beats. However we found it really hard to construct all elements in time, so we eased that idea into a blanket with 20 buttons on it, five as a group, playing Do Re Mi Fa So for one particular instrument. There will be leds beside the buttons. When the game begins, the computer will randomly play a combined tone with two to three notes for one of the instrument, the user has to find the instrument and the notes. For the first round, it will give the user ten seconds, the leds will fade as count down, if the user succeed in finding the notes in time, all leds will blink and play a cheerful music, if not, then all leds will fade and there will be a frustrating voice. However, we didn’t have enough wires as well as buttons and leds, and we didn’t dare to rely on the delivery, so we just choose our current project idea and started 

 FABRICATION AND PRODUCTION:

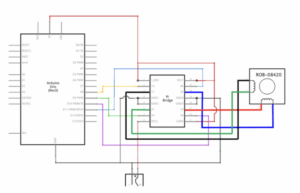
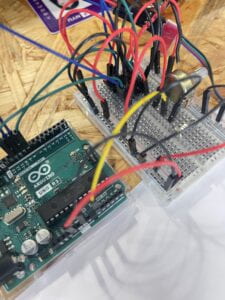
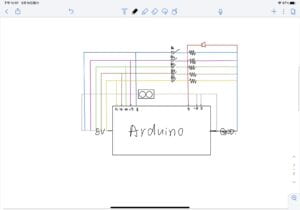
Tracy and I did the whole process together, including the beforehand design and the whole constructing and coding process. After we decided our project, we started with building the circuit. It was pretty hard to connect all five buttons on one small breadboard, there were a lot of wires that sometime confused us. As we uploaded the code for the first time, it didn’t work. So we dissembled the circuit and connected the buttons one by one and upload the code each time, and we found out that one of the buttons wasn’t connected properly. After the buttons all work, we connected the ultrasound to the circuit. It wasn’t working at all at first, however, after Andy reminded us to delete the // before the code for ultrasound, it worked. We wanted to change the guitar sound into other pieces of music, however we didn’t have the SD card and we looked online to see if we can play music without the SD card and sadly we didn’t find a way to do so. 
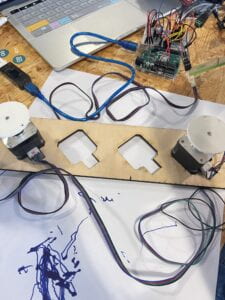
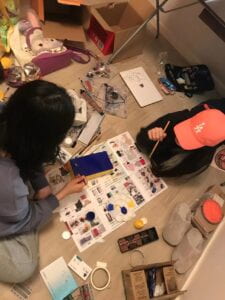
After we fixed the circuit and the code, we started to build the cardboard part. We painted a graph and just chose cardboards that have suitable sizes, we also used many boxes. And we painted them into yellow and blue. After the paint is dry, we sticked them together by the hot glue gun.

We finished the composition of the project pretty early, and we invited many people to try and play. I invited my mum and grandfather to try and interact with Girltar, what was really surprising to me is that they both found out how to interact with Girltar pretty quickly even without my introduction and made really cool music clips. Tracy invited her roommates, they also created some good music clips.

CONCLUSIONS:

Our project aims to enable people who are beginner at guitar learning or have eyesight issue to play guitar. As I written in previous blog, interaction is an entertaining communication between two actants, with either or none of them human, but doing man-like actions. Also, it’s consuming people’s senses like sight, hearing and so on. I think the project suits in my definition of interaction pretty nicely because the result of interacting with Girltar is a random clip of music that’s completely designed by the user, which is pretty entertaining, and the background of this robot having a name and body like human, last but not least, this project uses people’s sight, hearing and touching at the same time.

If we had more time and if the delivery is normal, I really wished that we could play more music, also we could add some LEDs on the project to make more visual effect. And we could also try more materials to make the buttons both have different touching experiences and to function properly. We’ve learnt that when connecting a complicated circuit with multiple ingredients, we should add on the components one by one. Also, it’s important to test the sensibility of the sensors before the idea for the project is fixed. And through this experience, I understand the coding skills more and am able to add codes independently now.

Although the construction of our project is pretty simple, just using cardboards and boxes, however, the idea behind the appearance is important. There are many people with eyesight disabilities, for them, even the simplest things can be of great difficulty. And it’s even harder for them to learn an instrument. But we think that everyone have the same right to pursue their dreams, and although we can’t really experience how their lives are like, at least we can help a little bit by building this project. 
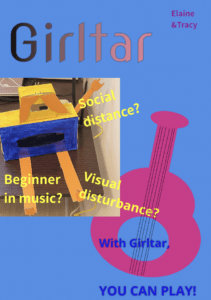
Our poster:

Our presentation video:

Our code:

void setup() {
#define echoPin 2 // attach pin D2 Arduino to pin Echo of HC-SR04
#define trigPin 3 //attach pin D3 Arduino to pin Trig of HC-SR04
// defines variables
long duration; // variable for the duration of sound wave travel
int distance; // variable for the distance measurement
int echoNote = 220;
int buttonOne = 4;
int buttonTwo = 5;
int buttonThree = 6;
int buttonFour = 7;
int buttonFive = 8;
int tomOne = 196;
int tomOnePlay = 0;
int tomTwo = 784;
int tomTwoPlay = 0;
int soundOut = 13;
void setup() {
  // put your setup code here, to run once:
  pinMode(trigPin, OUTPUT); // Sets the trigPin as an OUTPUT
  pinMode(echoPin, INPUT); // Sets the echoPin as an INPUT
  Serial.begin(9600); // // Serial Communication is starting with 9600 of baudrate speed
  pinMode(buttonOne, INPUT);
  pinMode(buttonTwo, INPUT);
  pinMode(buttonThree, INPUT);
  pinMode(buttonFour, INPUT);
  pinMode(buttonFive, INPUT);
  pinMode(soundOut, OUTPUT);
}
void loop() {
  //Clears the trigPin condition
 digitalWrite(trigPin, LOW);
 delayMicroseconds(2);
// Sets the trigPin HIGH (ACTIVE) for 10 microseconds
digitalWrite(trigPin, HIGH);
delayMicroseconds(10);
  digitalWrite(trigPin, LOW);
  // Reads the echoPin, returns the sound wave travel time in microseconds
  duration = pulseIn(echoPin, HIGH);
 // Calculating the distance
  distance = duration * 0.034 / 2; // Speed of sound wave divided by 2 (go and back)
// Displays the distance on the Serial Monitor
  Serial.print("Distance: ");
  Serial.print(distance);
 Serial.println(" cm");

  if (digitalRead(buttonOne) == HIGH) {
    tone(soundOut, 110, 100);
  }
  if (digitalRead(buttonTwo) == HIGH) {
    Serial.println(digitalRead(buttonTwo));
    tomOnePlay = 1;
  }
  if (tomOnePlay == 1) {
    tone(soundOut, tomOne, 50);
    delay(10);
    tomOne -= 6;
    if (tomOne < 41)
    {
      tomOne = 196;
      tomOnePlay = 0;
    }
  }
  if (digitalRead(buttonThree) == HIGH) {
    tomTwoPlay = 1;
  }
  if (tomTwoPlay == 1) {
    tone(soundOut, tomTwo, 40);
    delay(12);
    tomTwo -= 28;
    if (tomTwo < 262)
    {
      tomTwoPlay = 0;
      tomTwo = 784;
    }
  }
  if (digitalRead(buttonFour) == HIGH) {
    tone(soundOut, 147, 30);
    delay(10);
    tone(soundOut, 220, 30);
    delay(10); 
    tone(soundOut, 294, 30);
    delay(10);
    tone(soundOut, 349, 30);
    delay(10);
    tone(soundOut, 440, 30);
    delay(10);
  }
 

  //
  //  if (digitalRead(buttonOne) == HIGH)
  //  {
  //    tone(soundOut, 220, 30);
  //    delay(40);
  //    tone(soundOut, 330, 30);
  //    delay(40);
  //    tone(soundOut, 440, 30);
  //    delay(40);
  //    tone(soundOut, 523, 30);
  //    delay(40);
  //    tone(soundOut, 659, 30);
  //    delay(40);
  //  }
  //
  //  if (digitalRead(buttonTwo) == HIGH )
  //  {
  //    tone(soundOut, 262, 30);
  //    delay(40);
  //    tone(soundOut, 392, 30);
  //    delay(40);
  //    tone(soundOut, 523, 30);
  //    delay(40);
  //    tone(soundOut, 659, 30);
  //    delay(40);
  //    tone(soundOut, 784, 30);
  //    delay(40);
  //  }
  //
    if (digitalRead(buttonFive) == HIGH)  {
      if (distance < 7)
      {
        if (distance > 1)
        {
          echoNote = 220;
        }
      }
      if (distance < 9)
      {
        if (distance > 6)
        {
          echoNote = 262;
        }
      }
      if (distance < 11)
      {
        if (distance > 8)
        {
          echoNote = 294;
        }
      }
      if (distance < 13)
      {
        if (distance > 10)
        {
          echoNote = 330;
        }
      }
      if (distance < 15)
      {
        if (distance > 12)
        {
          echoNote = 392;
        }
      }
      if (distance < 17)
      {
        if (distance > 14)
        {
          echoNote = 440;
        }
      }
      if (distance < 19)
      {
        if (distance > 16)
        {
          echoNote = 523;
        }
      }
      if (distance < 21)
      {
        if (distance > 18)
        {
          echoNote = 587;
        }
      }
      if (distance < 23)
      {
        if (distance > 20)
        {
          echoNote = 659;
        }
      }
      if (distance < 25)
      {
        if (distance > 22)
        {
          echoNote = 784;
        }
      }
      if (distance < 40)
      {
        if (distance > 24)
        {
          echoNote = 880;
        }
      }
      if (distance < 40)
      {
        tone(soundOut, echoNote, 200);
      }
      if (distance > 39)
      {
        tone(soundOut, 220, 200);
      }
    }
}

Recitation 5: Workout

This is a very special recitation, off line, and also for me, off Arduino. However, thanks to Tracy and Robbin for taking me in, I got to work with them and overcame this tough time.

I built the circuit by myself according to this diagram. And later tested the code with Tracy. 

From our observation, when the tilt is standing straight, the numbers shown on the serial monitor are 1, and when the tilt lays down, the serial monitor turns to 0.

For the questions part:

  • At approximately what angle of tilt does it transition between HIGH and LOW?
  • I think it’s about 45 degree.
  • What else do you notice about its behavior?
  • The switch of numbers on the monitor is really regular when the tilt is moved from 90 degrees and 0 degree, but less sensitive in sensing the middle angle ranges in between. So I think this tilt can be more efficient when it’s applied to something that moves in a big angle.
  • What if you tilt the forearm?
  • When I hold it and tilt my forearm, the numbers on the serial monitor change from 1 to 0 and to 1, and repeat.
  • What if you hold the wires several centimeters away and tilt it?
  • The speed of numbers changing is faster.
  • What if you shake it?
  • Depending on the range of angles I shake it, when the angle is small, the tilt sometimes can’t sense the change and the numbers remain 0 or 1, but if I shake it in a big angle, the numbers change accordingly.

Workout1:

// constants won't change. They're used here to set pin numbers:
const int buttonPin = 6;    // the number of the pushbutton pin

int buttonState;             // the current reading from the input pin
int lastButtonState;   // the previous reading from the input pin
int counter = 0;

// the following variables are unsigned longs because the time, measured in
// milliseconds, will quickly become a bigger number than can be stored in an int.
unsigned long lastDebounceTime = 0;  // the last time the output pin was toggled
unsigned long debounceDelay = 50;    // the debounce time; increase if the output flickers

void setup() {
  pinMode(buttonPin, INPUT_PULLUP);
  Serial.begin(9600);
}
void loop() {
  // read the state of the switch into a local variable:
  int reading = digitalRead(buttonPin);
  
  // If the switch changed, due to noise or pressing:
  if (reading != lastButtonState) {
    // reset the debouncing timer
    lastDebounceTime = millis();
      //Serial.println(buttonState);

  }

  if ( (reading != buttonState) && (millis() - lastDebounceTime) > debounceDelay) {
    if ( reading == 1) {
      counter = counter + 1;
      Serial.println(counter);
    }
    if (counter >= 8) {
      counter = 0;
      Serial.println("Yay, you’ve done a set of curls");
    }
      buttonState = reading;
  }
  
  // save the reading. Next time through the loop, it'll be the lastButtonState:
  lastButtonState = reading;

 //if you want to use Serial Plotter, add these two lines:
  //Serial.println(buttonState);
  //delay(1);
}

 Workout2:

Questions:

Q1: Can you make changes to the speed of your “jumping jack” to detect it?

Yes, but as us speed up, the sensor might miss some comps.

Q2:What happens if you change the debounce lockout time? What do you need to change it to detect one “jumping” exercise?

It works when we changed it in a small range, however it missed more jumps as we changed it into a  large number.

Q3:How reliable is the counting? How many extra, or missed, counts happen as a fraction of the number of real exercises done? What do you think would happen to these fractions if you adjust the debouncing time).

I think it is not very reliable, for the miss of jumps it have. Maybe it will be more  precise if we adjust the debouncing time, however, it might turns out to be worse as well.

Workout3:


// constants won't change. They're used here to set pin numbers:
const int buttonPin = 6;    // the number of the pushbutton pin

int buttonState;             // the current reading from the input pin
int lastButtonState;   // the previous reading from the input pin
int counter = 0;
int duration = 0;

// the following variables are unsigned longs because the time, measured in
// milliseconds, will quickly become a bigger number than can be stored in an int.
unsigned long lastDebounceTime = 0;  // the last time the output pin was toggled
unsigned long debounceDelay = 70;    // the debounce time; increase if the output flickers

void setup() {
  Serial.begin(9600);
  pinMode(buttonPin, INPUT_PULLUP);
  delay(1000);
  Serial.println("Start your Workout");
}

void loop() {
  // read the state of the switch into a local variable:
  int reading = digitalRead(buttonPin);
  duration = millis();

  // If the switch changed, due to noise or pressing:
  if (reading != lastButtonState) {
    // reset the debouncing timer
    lastDebounceTime = millis();
    //Serial.println(buttonState);
  }

  if ( (reading != buttonState) && (millis() - lastDebounceTime) > debounceDelay) {
    if (duration <= 21000) {
      if (reading == 1) {
        counter = counter + 1;
        Serial.println(counter);
      }
    } else if (duration > 21000 && counter != 0){
      counter = 0;
      Serial.println("Stop, your time is up!");
    }
    buttonState = reading;
  }

  // save the reading. Next time through the loop, it'll be the lastButtonState:
  lastButtonState = reading;

  //if you want to use Serial Plotter, add these two lines:
  //Serial.println(buttonState);
  //delay(1);
}

Illustrating sketch:

Midterm Proposal

Do-Re-Mi Elaine Andy Garcia

The idea that people can interact with the machine by the distance in between is inspired by the “Tape Recorders” made by Rafael Lozano-Hemmer. I think it may be hard to identify the distance very precisely when it is actually presented to the users, but we can try to add a ruler on the ground or see if we can set the activation of a note into a range of distance.


Reference:

Published by Eric Forman View all posts by Eric Forman, Forman, P. by E., Forman, E., View all posts by Eric Forman, &amp; (required), N. (2012, February 18). “tape recorders” by Rafael Lozano-Hemmer. helloCircuits! Retrieved March 14, 2022, from https://hellocircuits.com/2012/02/18/tape-recorders-by-rafael-lozano-hemmer/

Recitation 4: Drawing Machines

This time, we built a drawing machine. It was really fun and satisfying to actually build a machine that can do some art work automatically by ourselves. There were quite a lot of components, which me and my partner felt a bit anxious about, however we had confidence and were exited to build this machine. 

we started with building the circuit. We’ve practiced the connection of the H-bridge during the lecture, so that it was easy for me to connect the wires, and doing this also refreshed my memory as well. We followed this diagram to connect it.

After connecting the H-bridges, we continued to connect a 10k potentiometer on the breadboard to read the analog input.

Then, after me and Jessica both finish our circuit, we started to assemble the arm for the drawing machine with the laser-cut arms and paper fasteners. And we also combined the code for the stepper with the one for the potentiometer. 

Below are our artistic drawing machine and its artistic work!!

Question 1: What kind of machines would you be interested in building? Add a reflection about the use of actuators, the digital manipulation of art, and the creative process to your blog post.

I would be interested in building the machines that has a high level of interaction with people, by which I particularly mean that people can have fun when engaging with the machine. However, although in this recitation, the machine doesn’t really interact with people that much, it does imitate people’s action—-it paints! It has two arms, just like we do. And the two arms can hold a pen to do some actual painting. It’s also interesting to see the machine itself conducting some artistic works and paint something that none of us has expected. It’s like that the machine itself also has its creativity, which is really fascinating.

Question 2: Choose an art installation mentioned in the reading ART + Science NOW, Stephen Wilson (Kinetics chapter). Post your thoughts about it and make a comparison with the work you did during this recitation. How do you think that the artist selected those specific actuators for his project?

In this chapter, I noticed the Exoskeleton designed by Stelarc. The skeleton he designed enable him to move in non-human ways. Which is, just the opposite of the drawing machine we built in this recitation. What we built, is a machine that has human way of actions. which the Exoskeleton makes human to do non-human actions. This is a reverse of character human and machine play in the process of interaction, which also inspire me that the imitation can be multidirectional. I think the artist chose the actuators with the purpose of breaking through human limits. The actuators may be some speeding motors to speed up normal human motions, detecting sensors to detect wispy things that human normally can’t sense and so on. 


Reflection on group project.

We delivered our group presentation this Friday, which was really fun and satisfying to show what we’ve done to everyone. And I’ll talk about how we came up with the idea and how the whole process was like.

At the very beginning, we met last week to discuss about our idea. We end up entangling between two ideas. One is, a box that can freeze people and achieve the goal of immortal by freezing one’s body as well as his/her time. However, this sounded more like a medical machine instead of an interactive project, so we abandoned this idea and chose the other, which is a human body part exchange machine. By which the seller of the body part and the buyer can exchange the body part. This idea comes from the fiction “Winter Market”. The main character in this fiction is so unhealthy that he needs outer skeleton to support him. So our project further developed the idea — since the body is so fragile, why not replace it? People who sell their body parts usually do this for money, to be more frankly, for desire. However, replacing body parts do have a bad influence. In order to illustrate this, we design the mode that once a person has traded all his/her body part, his/her consciousness will be turned into a machine, which can continue to conduct the process of exchanging body parts.

After deciding on the setting of the story, we decided our work. Me, Cindy, Lindy and Poom are mainly in charge of the building part, and Angela was writing the script. But we did help each other a lot so everyone had contributed to every part of the process.

Below are some videos and pictures of our preparation. 

we also rehearsed a several times before the final presentation. Every time we rehearsed, we always came up with some new ideas and do some more revising, which were very crucial to our final result.

And then came THE DAY!! We were really nervous before the performance, especially after watching fantastic works done by other groups.

One of the projects that impressed me the most is from group 2. They also were inspired by the “Winter Market”. Their idea was to invent outer skeleton that are able to do certain motions and with certain chips. This idea of outer skeleton is closely related to the fiction, and they’ve added their own creation, which is the chip part, to the project, which is very impressive, and add many new content to the whole performance. Also, they had fantastic cardboard design and really good acting. I think the idea that a chip can help people obtain motions, like dancing skills and so on, is really interesting and also reminds me of a scientific fiction called “Little Smart Roaming The Future”, in which the author also mentioned this idea. Also, the memory bread in Doraemon serves the same function. It has long been a really attracting idea to me and seeing them play the out was very impressive.

We were the last group to perform. That add a lot of pressure and nervousness to us. However these emotions all disappear when we really start to perform. Since we’ve rehearsed quite a few times, we all remember the lines and content clearly, so the process of acting was purely fun. And we conveyed our ideas to the audience successfully, which also meant a lot to us.

From our preparation and the comments professors and peers provided, this project really taught us a lot. It’s important to view technology as a neutral thing. It does provide us with convenience, but it also has many bad influence. For example, the one we show in our project that technology can magnify people’s desire. Technology provides both pathway to get the desire and the origin of desire. By technology, people can see more products online, which can stimulate their desire. In our project, it shows how technology acts as a pathway to get the desire. The machine enables people to give up their body parts for money to get what they want, a pair of shoes for example. However, when people are addicted to the money and sale more body parts, eventually they will lose themselves. It can echo to the real life too, for people sale their kidneys for money. 

We really enjoyed the whole process and had a lot of fun. Looking forward to the next project!


Recitation3:sensors

This time, I worked with Jessica to build a circuit that can control the movement of a servo by using a lighter sensor sensing the light. In our ideal situation, the “fan” on the servo should turn, for a big or small angle according to the brightness the sensor sensed.

We connected the servo to the Arduino according to this picture (except that we changed the analog output pin into 3).

And we also connected the light sensor to the breadboard as well as the Arduino according to this picture.

After this, we went to the Arduino software and used the sample-servo-knob code, and we changed some numbers to our circuit accordingly. Then I found the code for the light sensor and combined these two codes together. However, at first, the servo didn’t turn differently according to different brightness. And for the second time, the servo turned like it’s crazy.

However, we tried multiple ways to fix this, we checked the code, and then we found some useless codes that come with the sample and some numbers haven’t been changed accordingly. After we fixed that, we played the code again. The fan was reacting accordingly, but in a really tiny range, and the difference between strong lighting and darkness was very vague. After asking LA presented, we found that it was because for the lines:

 servo.write(val);
delay(500);
servo.write(val);
delay(500);

we should change the third line into “servo.write(-val);” for the servo to obtain a bigger turning angle. And after we changed this, it worked.

Here is my code:

/*
 Controlling a servo position using a potentiometer (variable resistor)
 by Michal Rinott <http://people.interaction-ivrea.it/m.rinott>

 modified on 8 Nov 2013
 by Scott Fitzgerald
 http://www.arduino.cc/en/Tutorial/Knob
*/

#include <Servo.h>
Servo servo;

int potpin = A1;  // analog pin used to connect the potentiometer
int val;    // variable to read the value from the analog pin;

const int Vresistor=A1;
int potval;

void setup() {
  Serial.begin(9600);
  servo.attach(3);  // attaches the servo on pin 9 to the servo object
}

void loop() {
  val=analogRead(A1);
  val=map(val, 0, 1023, 0,180);
  potval=analogRead(Vresistor);
  Serial.print("light");
  Serial.println(potval);
  
  servo.write(val);
delay(500);
 servo.write(-val);
delay(500);
 
                           // waits for the servo to get there
}

Here is my circuit:

Question1:What did you intend to assemble in the recitation exercise? If your sensor/actuator combination were to be used for pragmatic purposes, who would use it, why would they use it, and how could it be used?

We assembled a light sensor with a servo that turns a fan, fast or slow according to the brightness. I think it can be turned into a light-sensing air-conditioner. We can polish the system to sense daylight instead of indoor lights. So that when the sun is shining, which leads to the rise of temperature, the fan will spin fast to cool the temperature. And when the sunlight declines, the fan will slow down accordingly. Everyone can use it. It’s environmental-friendly and convenient too for it all functions automatically.

Question2:Code is often compared to following a recipe or tutorial.  Why do you think that is?
I think it’s a vivid metaphor. For recipe and tutorial mean something you can follow and use in order to achieve the result you want, that’s what codes do. Certain codes serve certain needs, and by choosing the proper code can help achieve the exact result you are looking forward to. So I do agree with this comparison.

Question3: In The Language of New Media, Manovich describes the influence of computers on new media. In what ways do you believe the computer influences our human behaviors?

Computer has already integrated in our daily lives. It provides a lot of convenience to us, for example, we no longer need to go into books to look for a certain reference, instead, we can do it simply by looking it up online, which saves a lot of time. Also, by having computer, it’s a lot more easier for us to keep in touch with friends and families. We don’t need to physically see them to greet them or to have conversations. However, it is not always a good thing. The decline of meeting friends and families physically does harm to the relationship to some extend. Also, with computer, computer games especially, people tend to avoid offline contacts, and that is really harmful to people’s social abilities.