For this recitation, we built three circuits with Arduino. And the level of interaction as well as difficulty is progressing.
Circuit1:
The first one was a simple circuit connecting the Arduino and the breadboard, and the code was to make the light fade. We succeeded in the first try and we studied the code for a while to see how it worked.
Circuit2:
And for the second circuit, it was basically changing the led in the first circuit into a buzzer. And the code we used was to make the buzzer play a piece of music. It was kind of fun to hear the same piece of music playing all around the classroom. However it was kind of weird that some teams’ music was louder than others, I guess it was because of different current?
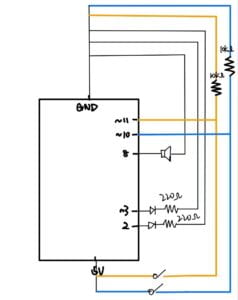
Circuit3:
Last but not least, the third circuit. It was quite complicated for there are many elements and wires used, however, after translated it into diagram, it was pretty clear. When connecting this circuit, the biggest problem we encountered was that the wires would easily fall out, and the connection was quite fragile, so we took some extra time to examine the connection of each element and each wire. At first, we could only detect one of the two buttons used, later we discovered that the other button was not working and after changing it, the circuit was working. We tested it a few times and found it quite entertaining, or in another word, interacting. And professor Minsky reminded us of the importance of observing the participants’ reaction, not only whether they are having a good time playing the game, but also some other detailed things, for example, in what way can people win this game? Do they have any common in their tactics? Which muscle do they use? Their fingers, wrists, or their arms? We realize from this that building an Interactive project is not only about the building process, but also the observation of the users.

Question1:
In order to make the game more interactive, I think we can add a screen to the circuit. On the screen, there are two programmed people standing against each other and they are programmed to hit the other person once the button is pressed. Whoever is hit 10 times will die and the other person will win the game with the LED lighted up. This idea comes from the article “Physical Computing”. In this article, the author mentioned the importance of image in the communication between human and computer. Also, in the article, there is a sentence saying, “We need to think about computers that sense more of your body, serve you in more places, and convey physical expression in addition to information“. From the original circuit 3, we have engaged our hearing–to hear the music played by the buzzer; we have also engaged muscle–to press the button. Although we have the LED, but I wouldn’t call it something that engage our sight, it’s more of a signal. But by adding the screen, it does engage our sight and add more entertainment element, which increases the degree of interaction here.
Question2:
The 10k resistors act as pull-down resistors. For they contain big resistance, they can prevent the circuit from short circuit.
schematic for circuit 3: