Save the Duck!-Yuni Song-Gohai

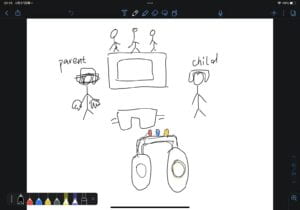
B. Conception and Design

As the title suggests, the goal of the project is to save the duck by driving a tank and avoiding obstacles. The conception and design changed significantly throughout the final project process. Initially, I planned to create a Minesweeper game with my partner using the processing screen and joystick. However, we received feedback that using a joystick would not be the best idea, so we decided to change the game to Flappy Bird, as we thought it would be more sensible to use a joystick and ultrasonic sensor.

However, during user-testing day, we received feedback that there was nothing special about the game, and we realized that our passion was not really in making a game with processing. Although we felt that all our preparatory work and efforts were wasted, we were also thankful that we realized it was better to do something we were actually interested and passionate about, rather than just finishing the project to get a decent grade.

After user-testing day, we focused on finding an idea that would challenge us. Finally, we decided it would be more fun to create a physical object, like the catapult we made for our midterm project. We thought it would be interesting to try making a tank, as the unique feature of its wheels is that only the two wheels in the back rotate, not the front.

Our ultimate goal for this project is to give the audience an interactive experience by allowing them to control the tank with a joystick and avoid obstacles in front of it using an ultrasonic sensor to detect distance and warn the audience to escape the obstacles.


C. Fabrication and Production

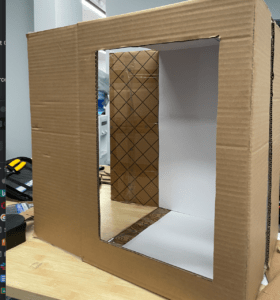
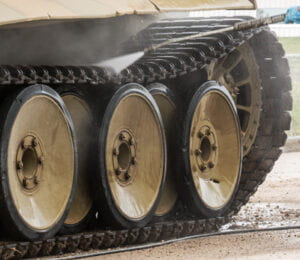
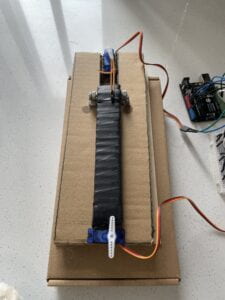
The most significant part of the production was building the tank. We believed that the tank’s wheels were cool, but they turned out to be the most challenging aspect of our work. We spent over 48 hours just trying to get the wheels to function properly. To achieve the desired rotation, we used stepper motors, as they offer excellent speed control, precise positioning, and repeatability of movement. The servo motors served a similar function, but they didn’t rotate at the angle we desired. We attempted various designs.

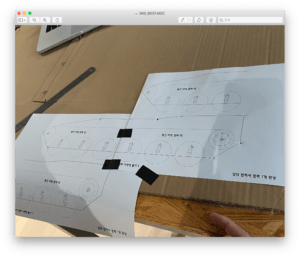
Initially, we created a blueprint of the tank to ensure precise construction and consideration of its mechanism. However, we encountered difficulties in making the tank move forward. Despite the stepper motors rotating, the tank remained stationary.

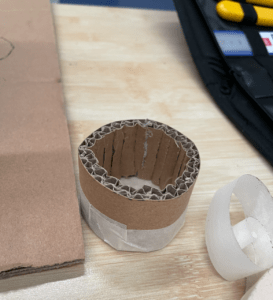
Although we were uncertain about the exact problem, we suspected a lack of friction might be the cause. Consequently, we began experimenting with different approaches. For instance, we wrapped tape around all the wheels and tested different types of cardboard to determine which provided better results. However, these attempts did not solve the problem. Consequently, we had to redesign everything once again.

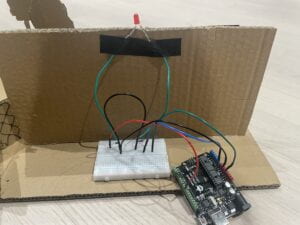
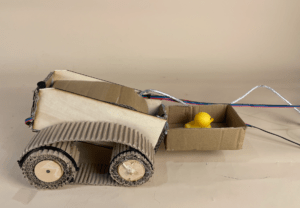
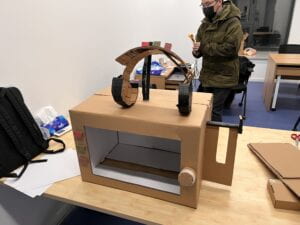
Despite sacrificing some features of the tank, such as using more than four big wheels and small wheels in combination, we were determined to make the project work. We modified the design by using one big wheel and one small wheel. Additionally, we utilized wood for the tank’s body to ensure it could withstand the weight of the stepper motors. To prevent the chain from coming off, we wrapped cable ties around the wheels. Furthermore, we added an ultrasonic sensor in front of the tank to detect objects, as our goal was to keep the duck safe from obstacles.

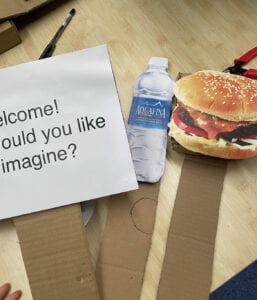
In addition, we incorporated a joystick to allow the audience to control the tank and avoid obstacles. To enhance audience participation and create an interactive experience that is both enjoyable and challenging, we added a war-themed song to the processing system. Additionally, we included a 45-second timer to increase the excitement as the audience tries to navigate the tank through the obstacles and reach the end of the desk.

I mostly focused on coding part and my partner focused on building a tank. However, we worked the whole thing together overall. 

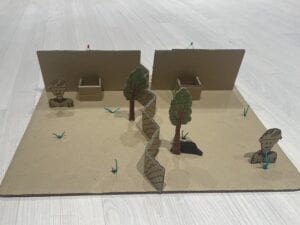
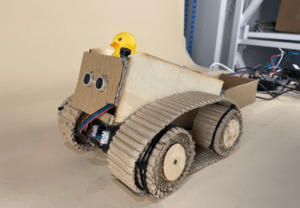
Final design of the Tank:

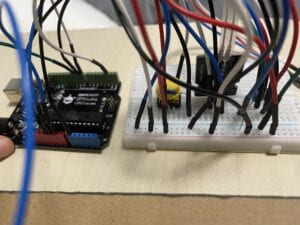
Code for Tank & Joystick & Ultrasonic sensor:

#include <AccelStepper.h>
// Define stepper1 pins
int DIR_PIN1 = 2;
int STEP_PIN1 = 3;
int EN_PIN1 = 4;
AccelStepper stepper1(AccelStepper::DRIVER, STEP_PIN1, DIR_PIN1);
// Define stepper2 pins
int DIR_PIN2 = 5;
int STEP_PIN2 = 6;
int EN_PIN2 = 7;
AccelStepper stepper2(AccelStepper::DRIVER, STEP_PIN2, DIR_PIN2);
// Define joystick pins
int JOY_PIN_X = A0;
int JOY_PIN_Y = A1;
void setup() {
// Enable the stepper1 driver
pinMode(EN_PIN1, OUTPUT);
digitalWrite(EN_PIN1, LOW);
// Enable the stepper2 driver
pinMode(EN_PIN2, OUTPUT);
digitalWrite(EN_PIN2, LOW);
stepper1.setMaxSpeed(800.0);
stepper1.setAcceleration(50.0);
stepper1.moveTo(1000);
stepper2.setMaxSpeed(800.0);
stepper2.setAcceleration(50.0);
stepper2.moveTo(1000);
Serial.begin(9600);
}
void loop() {
int joy_x = analogRead(JOY_PIN_X);
int joy_y = analogRead(JOY_PIN_Y);
Serial.print(“x = “);
Serial.print(joy_x);
Serial.print(“, y = “);
Serial.println(joy_y);
int midX = 523;
int midY = 529;
int dX = joy_x-midX;
int dY = joy_y-midY;
if (abs(dX) > abs(dY)){
Serial.print(“left/right”);
int speed1 = map(joy_x, 0, 1023, 580, -580);
int speed2 = map(joy_x, 0, 1023, 580, -580);
stepper1.setSpeed(speed1);
stepper2.setSpeed(speed2);
stepper1.runSpeed();
stepper2.runSpeed();
} else {

Serial.println(“up/down”);
int speed1 = map(joy_y, 0, 1023, 580, -580);
int speed2 = map(joy_y, 0, 1023, -580, 580);
stepper1.setSpeed(speed1);
stepper2.setSpeed(speed2);
stepper1.runSpeed();
stepper2.runSpeed();
}
// Map joystick position to stepper movement
int speed1 = map(joy_x, 0, 1023, 580, -580);
int speed2 = map(joy_y, 0, 1023, -580, 580);
// Set stepper speeds
stepper1.setSpeed(speed1);
stepper2.setSpeed(speed2);
// Run steppers
stepper1.runSpeed();
stepper2.runSpeed();

}

#define trigPin 8

#define echoPin 9

#define Buzzer 13

unsigned long duration;

unsigned long distance;

void setup() {

Serial.begin(9600);

pinMode(trigPin, OUTPUT);

pinMode(echoPin, INPUT);

pinMode(Buzzer, OUTPUT);

}

void loop() {

digitalWrite(trigPin, LOW);

delayMicroseconds(2);

digitalWrite(trigPin, HIGH);

delayMicroseconds(10);

digitalWrite(trigPin, LOW);

int duration = pulseIn(echoPin, HIGH);

int distance = (duration/2) / 29.1;

// Send 1KHz sound signal...

if(distance <= 13){

tone(Buzzer, 700);

}else{

noTone(Buzzer);

}

 
Code for Processing Screen:

import processing.sound.*;

int savedTime;
int totalTime = 0;
SoundFile soundFile;
boolean timerStarted = false;
Button startButton;

void setup() {
size(400, 450);
background(0);

savedTime = millis();

soundFile = new SoundFile(this, "music2.mp3");

// Create the start button
startButton = new Button(width/2 - 50, height - 75, 100, 50, "Start");
startButton.setOnClick(() -> {
timerStarted = true;
soundFile.play();
});
}

void draw() {
int passedTime = millis() - savedTime;

if (timerStarted) {
totalTime += passedTime;
}

savedTime = millis();

float progressAngle = map(totalTime, 0, 60000, 0, TWO_PI);

background(255);
noFill();
strokeWeight(10);
stroke(0);
ellipse(width/2, height/2, 150, 150);
stroke(255, 0, 0);
arc(width/2, height/2, 150, 150, -HALF_PI, -HALF_PI + progressAngle);

textAlign(CENTER, CENTER);
textSize(32);
fill(0);
text(ceil(totalTime/1000.0), width/2, height/2);

if (totalTime >= 60000) {
textAlign(CENTER, CENTER);
textSize(24);
fill(255, 0, 0);
text("Timer blown up!", width/2, height/2 + 40);
soundFile.stop();
noLoop();
}

// Display the start button
startButton.display();
}

void stop() {
super.stop();
}

void mouseClicked() {
startButton.checkClick();
}

class Button {
float x, y, width, height;
String label;
Runnable onClick;

Button(float x, float y, float width, float height, String label) {
this.x = x;
this.y = y;
this.width = width;
this.height = height;
this.label = label;
}

void setOnClick(Runnable onClick) {
this.onClick = onClick;
}

void checkClick() {
if (mouseX > x && mouseX < x + width && mouseY > y && mouseY < y + height) {
onClick.run();
}
}

void display() {
fill(200);
rect(x, y, width, height);
textAlign(CENTER, CENTER);
fill(0);
text(label, x + width/2, y + height/2);
}
}

Recording of the Processing Screen:

Processing

(The music wasn’t recorded)

D. Conclusions

The goal of our project was to create an interactive experience for the audience by allowing them to drive a tank using a joystick and attempt to escape obstacles and reach the finish line safely within 60 seconds. We successfully operated all the components that we had planned for the project, achieving our goals. Our project aligns with my definition of interactive, which involves communicating with the audience since they can have an experience of driving a tank while escaping obstacles and having fun.

However, we received unexpected feedback from the audience during the final presentation day. The tester did not know how the joystick works, so we should have included directional guidance below the joystick. Additionally, the tank did not operate as smoothly as we had expected because it worked better on a bumpy surface rather than a smooth one. Also, from the professors, we noticed that cardboard was not a good choice for the tank wheel material. Although we had wanted to make the tank with a 3D printed wheel, we lacked the time to do so. If we had more time, we would have tried making the tank with a 3D printer.

Nevertheless, I am proud of ourselves that we were able to make all the functions work throughout all the trials and not give up. From this final project, I learned not only how to work with processing and arduino, but also the importance of following your passion and doing what you want to do, regardless of the difficulties, time, or grades. We could have saved more time if we had chosen ideas according to our real interests.

The Battlefield-Yuni Song-Gottfried Haider

B) In my previous research, my team and I developed a captivating mind-reading TV inspired by the fictional work The Veldt. This innovative device allowed audiences to create and experience anything they desired, highlighting the importance of audience engagement in interactive artifacts. Through this experience, I gained a deeper understanding of the true meaning of interaction. For example, Behnaz Farahi’s artwork “Returning the Gaze – Perpetual (male surveillance)” showcased how audience participation is essential for creating an interactive piece. By tracking the eyes of models and displaying them on robotic arms, the artwork required active communication with the viewer to achieve interactivity.

Group project-“Mind Reading TV”
“Returning the Gaze – Perpetual (male surveillance)” by Behnaz Farahi

With these learnings in mind, I set out to create a midterm project that would encourage high audience participation. Thus, my team and I developed The Battlefield, an exciting catapult game. The game’s unique design allowed participants to launch objects into a designated area with ease and minimal physical exertion, making it more accessible and enjoyable for a broader audience. We took on the challenge of creating a cardboard catapult, modifying designs found online to make them suitable for the material. In this process, my partner focused on designing the catapult while I primarily focused on sourcing alternative materials from our lab and assembling the catapult.

Original catapult
The catapult that we designed

Our intended audience for The Battlefield was the general public, as we wanted to create a game that was easy to understand and accessible to all regardless of age, gender, or race. The primary objective was to provide entertainment and ensure that the game was enjoyable for everyone. Overall, this project enabled me to gain a deeper understanding of audience engagement and the importance of interaction in creating successful interactive artifacts.

C) In designing our project, our top priority was ensuring the audience’s comfort and safety. We carefully considered how we could create a design that would enable participants to use the catapult comfortably and with ease. To achieve this goal, we selected wood for the bottom part of the catapult. This decision was based on the fact that wood is more stable and robust than cardboard, making it a safer and more secure option for participants to hold and use to shoot objects. While we recognized the benefits of using wood, we also faced restrictions on its use, given the safety concerns involved in cutting it with a saw. To address this issue, we opted to use cardboard for the other parts of the catapult. Despite the challenges posed by this material, we were determined to make it work and we were able to create a design that met our safety and performance standards.

D) The successful creation of The Battlefield was accomplished through the construction of two key components: the catapult and the battlefield. In the process of designing the catapult, we referred to a Youtube video as a reference. However, as the original design was made with wood, we had to make significant modifications using cardboard as our main material. We began by constructing the basic shape of the catapult with cardboard and placing two servo motors. 

The most challenging aspect was creating the arm, rope, and cantilever-type spring.
As the arm had to bear the force, the rope had to be carefully constructed. To withstand the force, we used rubber bands that were not tightly stretched, allowing the arm part to endure the pressure. Though, because of this, the distance that object can travel was restricted.  
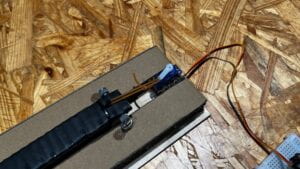
For the cantilever-type spring, I came up with the idea of using cable ties to prevent excessive weight from being applied to the arm part. Throughout the catapult making process, my partner focused on constructing the catapult while I focused on coding and creating the circuit. 

//Code for catapult 

const int buttonPin = 2; //button used to move servo to lock position, attached to digital input 2
int pressurePin = 0; // pressure sensor to trigger release of catapult, attached to analog input 0
int buttonState = 0; //initial state of button
int threshold=70; //threshold value of sensor at which the catapult launches 

Servo myservo; // create a servo object to control a servo
int position = 0; //servo starts at neutral position
servo myservo2;
int position = 0;

void setup() {
Serial.begin(9600); //display serial input (reads pressure sensor value - adjust threshold accordingly)
pinMode(buttonPin, INPUT); //make the button pin an input pin
myservo.attach(9); //servo attached to pin 9 to hold/fire catapult
myservo.attach(10);
}

void loop() {
buttonState = digitalRead(buttonPin); //read value of button
pressurePin=analogRead(pressurePin); //read value of pressure sensor

if(buttonState == HIGH) { //if button pressed...
myservo.write(90); //...move servo 90 degrees (change this number to fit your personal use)
delay (1000);
myservo.write2(90);
delay (1000);

}

if(pressurePin > threshold) { //if pressure sensor value is above threshold...
myservo.write(0); //...move servo back to neutral position
myservo.write2(0);
}
}

Circuit Design
Since I coded the catapult to detect pressure, a Force Resistor Sensor (FSR) was essential in the circuit. A force-sensitive resistor (FSR) is a material that changes its resistance when force or pressure is applied. The analog input will read the FSR value, which in turn controls the servo.
 

During user testing, we only brought the catapult as we had spent a significant amount of time designing it. However, we received feedback advising us to further develop the game idea using the catapult, making it more interactive. Thus, we came up with The Battlefield, utilizing cardboard to create the game board. As the designer, I decorated the game board, while my partner designed the circuit for the lights.

 
The purpose of the game is to shoot object with catapult and put it into a square basket looking area. When the object goes in, the light on top of the cardboard lights up.

//light sensor code

const int lightPin = A0; // Pin connected to the light sensor
const int ledPin = 9; // Pin connected to the LED
const int threshold = 500; // Threshold value for the light sensor

void setup() {
pinMode(lightPin, INPUT);
pinMode(ledPin, OUTPUT);
}

void loop() {
// Read the value from the light sensor
int lightValue = analogRead(lightPin);

// If the light level is below the threshold, turn on the LED
if (lightValue < threshold) {
digitalWrite(ledPin, HIGH);
} else {
digitalWrite(ledPin, LOW);
}
}

I believe that the user testing was instrumental in helping us to generate a more interactive game idea. This is because the game has the ability to engage and entertain individuals, leading to increased audience participation.
 
E) Our project’s primary goal was to create an interactive artifact. To accomplish this, we made audience interactivity our top priority, and hence set our target audience as everyone, regardless of gender, age, or race, and aimed to create games that were simple to play. Our final product required individuals to hold the catapult and aim it towards the goal, necessitating direct audience participation. In this regard, we can confidently state that we successfully achieved our objective of creating an interactive artifact.
 
Testing The Battlefield:

Audience playing The Battlefield:

However, the game’s level of difficulty was greater than we had initially anticipated. Compared to when we tested the game, the real-life outcome had a much lower success rate of the object landing in the goal. This unanticipated increase in game difficulty made it less inclusive for all individuals. During gameplay, audiences found it interesting but wished that the goal was larger or the object was rounder in shape to make it easier to land in the goal. If we had the opportunity to improve this game, we would make a game where individuals shoot a certain target on the cardboard game board. Additionally, we would add another catapult so that two people could compete within a given time frame. This would create a more enjoyable and interactive experience, as it would involve one more person and foster a competitive atmosphere. Throughout this project, my partner and I encountered numerous difficulties. Initially, we believed it was impossible to make the catapult function since we assumed cardboard would be unable to handle the force. However, we did not give up and continued to experiment while also seeking advice from various individuals. Through this experience, I learned that persistence is the key to accomplishing something. Additionally, during this project, I was able to utilize the skills and knowledge I had acquired in interactive lab classes, providing an excellent opportunity to apply theoretical concepts to a real-world situation.


Group research project

Mind-Reading TV

Step 1. Brainstorming

When our group was first tasked with creating interactive artifacts inspired by 3 stories: The Veldt, The Ones Who Walk Away from Omelas, and The Plaque, we all agreed to design an artifact inspired by The Veldt by Ray Bradbury. The common reason for this is that we all had striking memories of the story, including the parents of children being eaten by lions in a virtual reality room called the “nursery.”

Next, we tried to discuss the definition of interactive artifacts, which means that they must be communication between people or reactions between things working together. We also agreed that the evidence of communication with others would be high audience participation. So before creating interactive artifacts, we mainly considered 2 components: Relevance to the chosen story and communicability with the audience. With this in mind, we created our initial idea sketch.

Our first idea was to develop mind readers TV, glasses, and headphones. I suggested the TV because I was considering the story of The Veldt. The parents in the household are killed by lions because they are in the “nursery”, a virtual reality room. This room can create any virtual reality that people imagine. Although the parents recognized the nursery, they were so fascinated by the fully automated house that they did not recognize the danger. So I thought about how to reduce the underlying danger and keep people happy with their lives in the world in The Veldt story. I started looking at things around me, thinking that something you have never seen before can reduce audience engagement. And I thought that changing the channel to TV and changing the environment in the nursery were similar. So I decided to mix two things. Fortunately, when I proposed this idea, my teammate thought it was a good idea, so we decided to develop a mind reader TV that has the function of creating anything the audience wants and imagines. The other teammates suggested mind-reading glasses and headphones create the medium to read people’s minds.

Step 2. Building Process

1) Creating TV

First we create the basic shape of TV with the cardboard. Then with the cutter knife we cut out one side of the cardboard to create the screen part. We also cut out the bottom part to fit the objects we want to put in our artifacts. After that, we covered the inner part with white paper, not only to highlight the object coming out of our artifact, but also to look more realistic, since the inner part was messy. In this part, I contribute to cut out the screen part.

Next, we made buttons for our TV. First, we made three different colored buttons. We cut them out with a cutter knife in a square shape and colored them red, green, and purple. A red button means the machine is broken, a green button means it is working fine, and a purple button means it is ready to use. Then we made the button that we can turn. It is functioned to show the imagined object on the website TV. To make this button, we cut out a large strand and a small strand. Then we made a cut in these strands so that the cardboard is rolled without breaking. And we glued the edges so it would stay rolled. Then we attached the big rolled strands to the small rolled strands. When all the buttons were ready, we attached them to the TV.


2) Creating Headphones


To make the top part of the headphones out of cardboard, we cut out a large and wide strip of cardboard. And cut out the same buttons used for TV to show the audience that these two objects are connected. For the ear part, we cut out two circles big enough to cover our ears, and two long strips to put around the circles to make them three-dimensional. Since we need to run the strands around the circles, we made several cutouts so they can be rolled. Then we cut out two long strands so we can attach the ear piece and the top part of the headphones.

In the end, we decide to wrap the ear parts with black tape to make them look more realistic. We also decide to add a headphone stand at TV.


This is what our final artifact looked like.


Step 3. Prepare for the performance

<Script>

Yuni: I’m so hungry, I wish I can have a hamburger right now. Oh right! I forgot about the mind-reading machine. (Use machine)

Peirong: Oh today is so hot! I wish I can drink some water. Let me use this mind-reading TV!  (Use machine)

Malaine: Today is pretty chilly, I should have brought my jacket! There is mind-reading TV right over there. I’m so lucky. (Use machine)

Yuni: Today is my birthday! I wish I can have Airpods for my birthday gift.  My parents won’t get me Airpods…I’ll just use mind-reading TV! (Use machine)

As for the script, we thought we couldn’t talk directly about the machine during the performance, so we didn’t script much. I wish we had known this earlier so we could have prepared the performance better.

Final performance video:

https://drive.google.com/file/d/1GpLkvcnAdu83G1qB_GzKG5MLhOzvehXz/view?usp=sharing

Props:


After the project, I’m proud of our team because we communicated very well with each other and planned the performance in advance. I also liked the way we divided the roles to manage our time. For example, me, Peirong and Malaine focused on designing and making TV and the other team members focused on the headphones. One thing I’m grateful to our teammates for is that I contributed many ideas and scripts, but they listened to and agreed with my opinion. So we were able to successfully create our artifacts. But one thing we can do better is the design of the glasses. In the planning phase, we had decided to make glasses as well, but due to technical problems we decided against it.

During the performance, I liked the artifact of the first team. They took inspiration from the story The Plaque. They seem to focus on the script, so it was easy for us to understand the use of the artifact. I also liked the shape of their artifact (a robot-like mask) because not only is it unique, but it is also very functional in preventing infection. I think they successfully met the criteria for creating an interactive artifact because it is communicable and helps people avoid contracting the disease. But one thing they can improve is to add more small details to their artifact. I think it would be better how the parts of the mask prevent infection.

Hello world!

Welcome to Web Publishing @ NYU. This is your first post. Edit or delete it, then start creating your site!

Online help is available via the Web Publishing Knowledge Site (wp.nyu.edu/knowledge) and the ServiceLink knowledge base (www.nyu.edu/servicelink). Through ServiceLink, you can find step-by-step instructions, as well as tutorials.

Digital Accessibility

As content creators who create and publish text, images, video, and audio, you must adhere to the NYU Website Accessibility Policy (https://www.nyu.edu/digitalaccessibility/policy) when creating and publishing digital content.

Web Publishing-specific Digital Accessibility Best Practices and examples of how to ensure your content are compliant are available at https://wp.nyu.edu/digitalaccessibility

If you have additional questions, contact the IT Service Desk for assistance. Support is available 24/7/365. For more details, visit www.nyu.edu/it/servicedesk.