B. Conception and Design
As the title suggests, the goal of the project is to save the duck by driving a tank and avoiding obstacles. The conception and design changed significantly throughout the final project process. Initially, I planned to create a Minesweeper game with my partner using the processing screen and joystick. However, we received feedback that using a joystick would not be the best idea, so we decided to change the game to Flappy Bird, as we thought it would be more sensible to use a joystick and ultrasonic sensor.
However, during user-testing day, we received feedback that there was nothing special about the game, and we realized that our passion was not really in making a game with processing. Although we felt that all our preparatory work and efforts were wasted, we were also thankful that we realized it was better to do something we were actually interested and passionate about, rather than just finishing the project to get a decent grade.
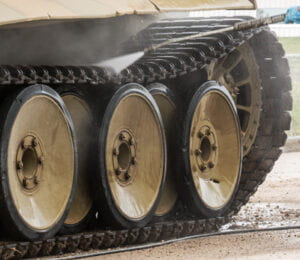
After user-testing day, we focused on finding an idea that would challenge us. Finally, we decided it would be more fun to create a physical object, like the catapult we made for our midterm project. We thought it would be interesting to try making a tank, as the unique feature of its wheels is that only the two wheels in the back rotate, not the front.
Our ultimate goal for this project is to give the audience an interactive experience by allowing them to control the tank with a joystick and avoid obstacles in front of it using an ultrasonic sensor to detect distance and warn the audience to escape the obstacles.
C. Fabrication and Production
The most significant part of the production was building the tank. We believed that the tank’s wheels were cool, but they turned out to be the most challenging aspect of our work. We spent over 48 hours just trying to get the wheels to function properly. To achieve the desired rotation, we used stepper motors, as they offer excellent speed control, precise positioning, and repeatability of movement. The servo motors served a similar function, but they didn’t rotate at the angle we desired. We attempted various designs.
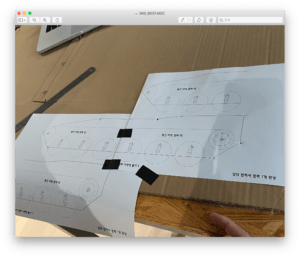 Initially, we created a blueprint of the tank to ensure precise construction and consideration of its mechanism. However, we encountered difficulties in making the tank move forward. Despite the stepper motors rotating, the tank remained stationary.
Although we were uncertain about the exact problem, we suspected a lack of friction might be the cause. Consequently, we began experimenting with different approaches. For instance, we wrapped tape around all the wheels and tested different types of cardboard to determine which provided better results. However, these attempts did not solve the problem. Consequently, we had to redesign everything once again.
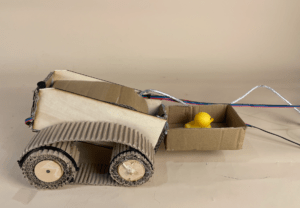
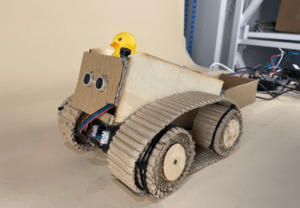
Despite sacrificing some features of the tank, such as using more than four big wheels and small wheels in combination, we were determined to make the project work. We modified the design by using one big wheel and one small wheel. Additionally, we utilized wood for the tank’s body to ensure it could withstand the weight of the stepper motors. To prevent the chain from coming off, we wrapped cable ties around the wheels. Furthermore, we added an ultrasonic sensor in front of the tank to detect objects, as our goal was to keep the duck safe from obstacles.
In addition, we incorporated a joystick to allow the audience to control the tank and avoid obstacles. To enhance audience participation and create an interactive experience that is both enjoyable and challenging, we added a war-themed song to the processing system. Additionally, we included a 45-second timer to increase the excitement as the audience tries to navigate the tank through the obstacles and reach the end of the desk.
I mostly focused on coding part and my partner focused on building a tank. However, we worked the whole thing together overall.
Final design of the Tank:
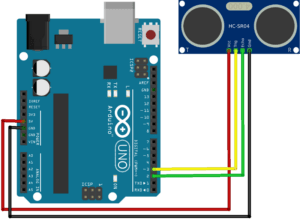
Code for Tank & Joystick & Ultrasonic sensor:
#include <AccelStepper.h>
// Define stepper1 pins
int DIR_PIN1 = 2;
int STEP_PIN1 = 3;
int EN_PIN1 = 4;
AccelStepper stepper1(AccelStepper::DRIVER, STEP_PIN1, DIR_PIN1);
// Define stepper2 pins
int DIR_PIN2 = 5;
int STEP_PIN2 = 6;
int EN_PIN2 = 7;
AccelStepper stepper2(AccelStepper::DRIVER, STEP_PIN2, DIR_PIN2);
// Define joystick pins
int JOY_PIN_X = A0;
int JOY_PIN_Y = A1;
void setup() {
// Enable the stepper1 driver
pinMode(EN_PIN1, OUTPUT);
digitalWrite(EN_PIN1, LOW);
// Enable the stepper2 driver
pinMode(EN_PIN2, OUTPUT);
digitalWrite(EN_PIN2, LOW);
stepper1.setMaxSpeed(800.0);
stepper1.setAcceleration(50.0);
stepper1.moveTo(1000);
stepper2.setMaxSpeed(800.0);
stepper2.setAcceleration(50.0);
stepper2.moveTo(1000);
Serial.begin(9600);
}
void loop() {
int joy_x = analogRead(JOY_PIN_X);
int joy_y = analogRead(JOY_PIN_Y);
Serial.print(“x = “);
Serial.print(joy_x);
Serial.print(“, y = “);
Serial.println(joy_y);
int midX = 523;
int midY = 529;
int dX = joy_x-midX;
int dY = joy_y-midY;
if (abs(dX) > abs(dY)){
Serial.print(“left/right”);
int speed1 = map(joy_x, 0, 1023, 580, -580);
int speed2 = map(joy_x, 0, 1023, 580, -580);
stepper1.setSpeed(speed1);
stepper2.setSpeed(speed2);
stepper1.runSpeed();
stepper2.runSpeed();
} else {

Serial.println(“up/down”);
int speed1 = map(joy_y, 0, 1023, 580, -580);
int speed2 = map(joy_y, 0, 1023, -580, 580);
stepper1.setSpeed(speed1);
stepper2.setSpeed(speed2);
stepper1.runSpeed();
stepper2.runSpeed();
}
// Map joystick position to stepper movement
int speed1 = map(joy_x, 0, 1023, 580, -580);
int speed2 = map(joy_y, 0, 1023, -580, 580);
// Set stepper speeds
stepper1.setSpeed(speed1);
stepper2.setSpeed(speed2);
// Run steppers
stepper1.runSpeed();
stepper2.runSpeed();

}
#define trigPin 8

#define echoPin 9

#define Buzzer 13

unsigned long duration;

unsigned long distance;

void setup() {

Serial.begin(9600);

pinMode(trigPin, OUTPUT);

pinMode(echoPin, INPUT);

pinMode(Buzzer, OUTPUT);

}

void loop() {

digitalWrite(trigPin, LOW);

delayMicroseconds(2);

digitalWrite(trigPin, HIGH);

delayMicroseconds(10);

digitalWrite(trigPin, LOW);

int duration = pulseIn(echoPin, HIGH);

int distance = (duration/2) / 29.1;

// Send 1KHz sound signal...

if(distance <= 13){

tone(Buzzer, 700);

}else{

noTone(Buzzer);

}
Code for Processing Screen:

import processing.sound.*;

int savedTime;
int totalTime = 0;
SoundFile soundFile;
boolean timerStarted = false;
Button startButton;

void setup() {
size(400, 450);
background(0);

savedTime = millis();

soundFile = new SoundFile(this, "music2.mp3");

// Create the start button
startButton = new Button(width/2 - 50, height - 75, 100, 50, "Start");
startButton.setOnClick(() -> {
timerStarted = true;
soundFile.play();
});
}

void draw() {
int passedTime = millis() - savedTime;

if (timerStarted) {
totalTime += passedTime;
}

savedTime = millis();

float progressAngle = map(totalTime, 0, 60000, 0, TWO_PI);

background(255);
noFill();
strokeWeight(10);
stroke(0);
ellipse(width/2, height/2, 150, 150);
stroke(255, 0, 0);
arc(width/2, height/2, 150, 150, -HALF_PI, -HALF_PI + progressAngle);

textAlign(CENTER, CENTER);
textSize(32);
fill(0);
text(ceil(totalTime/1000.0), width/2, height/2);

if (totalTime >= 60000) {
textAlign(CENTER, CENTER);
textSize(24);
fill(255, 0, 0);
text("Timer blown up!", width/2, height/2 + 40);
soundFile.stop();
noLoop();
}

// Display the start button
startButton.display();
}

void stop() {
super.stop();
}

void mouseClicked() {
startButton.checkClick();
}

class Button {
float x, y, width, height;
String label;
Runnable onClick;

Button(float x, float y, float width, float height, String label) {
this.x = x;
this.y = y;
this.width = width;
this.height = height;
this.label = label;
}

void setOnClick(Runnable onClick) {
this.onClick = onClick;
}

void checkClick() {
if (mouseX > x && mouseX < x + width && mouseY > y && mouseY < y + height) {
onClick.run();
}
}

void display() {
fill(200);
rect(x, y, width, height);
textAlign(CENTER, CENTER);
fill(0);
text(label, x + width/2, y + height/2);
}
}
Recording of the Processing Screen:
(The music wasn’t recorded)
D. Conclusions
The goal of our project was to create an interactive experience for the audience by allowing them to drive a tank using a joystick and attempt to escape obstacles and reach the finish line safely within 60 seconds. We successfully operated all the components that we had planned for the project, achieving our goals. Our project aligns with my definition of interactive, which involves communicating with the audience since they can have an experience of driving a tank while escaping obstacles and having fun.
However, we received unexpected feedback from the audience during the final presentation day. The tester did not know how the joystick works, so we should have included directional guidance below the joystick. Additionally, the tank did not operate as smoothly as we had expected because it worked better on a bumpy surface rather than a smooth one. Also, from the professors, we noticed that cardboard was not a good choice for the tank wheel material. Although we had wanted to make the tank with a 3D printed wheel, we lacked the time to do so. If we had more time, we would have tried making the tank with a 3D printer.
Nevertheless, I am proud of ourselves that we were able to make all the functions work throughout all the trials and not give up. From this final project, I learned not only how to work with processing and arduino, but also the importance of following your passion and doing what you want to do, regardless of the difficulties, time, or grades. We could have saved more time if we had chosen ideas according to our real interests.