Step On Tune – Kelly Liu – Inmi Lee
CONTEXT AND SIGNIFICANCE
In our previous research of interactive projects, we looked into interactive instruments in which the user could use to play different songs on. For instance, each note that is pressed would have a different sound as the output. We saw floor pianos as a way to create interaction between the project and the user as they could play around with different sequences to play different songs. To us the most important part of interaction was being able to have a constant conversation between the project and the user, we agreed that building an interactive instrument would be able to achieve the back and forth conversation element to our definition of interaction. Although floor instruments have been created many times, we wanted to ad a twist to the already existing floor pianos and add a metronome to our project. This way people could play songs with different tempo beats rather than only notes. The project also has large dimensions, especially in terms of its length which encourages people to get together and collaborate in playing a song on our instrument. This project is intended for those who love music and are willing to have fun with a floor instrument.
CONCEPTION AND DESIGN
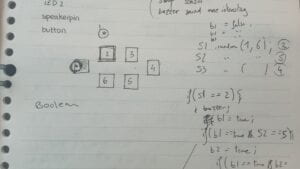
Our understanding of how our users would interact with our project was for them to step on the tiles that made the different sounds. To accommodate this, we cut out cardboard tiles that fit the average foot. We didn’t want to make the cardboard tiles too big as it would be hard for the sensor to read, so we made tiles that were big enough for a foot to fit, but small enough for the sensor to read when it has been triggered. When it came to sensors, we explored with touch sensors, however they were very sensitive and we could not personalise and map the values within a certain threshold as the touch sensor was a digital sensor. We chose to use vibration sensors since they are analog sensors and we could test the values they were reading in Arduino and map accordingly a threshold for when the user steps on them. Lastly, since the project is meant to play different sounds we chose to use the buzzer provided to us in out Arduino starter kits as we were most familiar with them. Later on, during the fabrication and production stage we made considerable changes in the material we used for our project after receiving constructive feedback on how to improve our project.
FABRICATION AND PRODUCTION
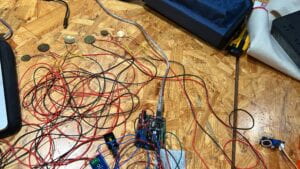
In the production process we first started by cutting the cardboard into the desired sized squares. We realised we needed to cut out double the amount of tiles we wanted to use as we would embed the vibration sensor in the middle of two cardboard squares. Then we wired up each of the six vibration sensors to get a sense of what Arduino was reading the values to be when we triggered the sensors. We decided to create the threshold to 100, as all of them fell below 100 when not touched and over 100 when triggered. We then created a code for when the sensors were triggered they would play a different note. A fellow helped us with the code and advised us to use Pitches.h from the tone melody examples in Arduino which helped us create different notes for each sensor. We also used the example slides from sensors and recitations to create this code. Once the code was written, we wired up all 6 of our sensors and a buzzer and uploaded the code, the code was working as desired and when we triggered each sensor a different sound would play on the buzzer.
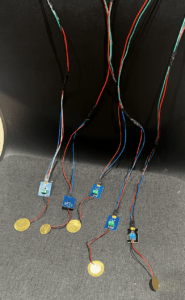
Next, we realised we needed to solder the male to female wires to longer wires so that the tiles could stretch further. We recalled the first recitation and the process of soldering and applied it to our process of soldering. I was responsible for most of the soldering jobs, so while I was soldering my partner would help me put them in the right position to be soldered into. Each sensor had three wires to solder, and we had 6 sensors, so I first soldered 18 wires together. Then we were told to put electrical tape on the soldered parts so that they would be more secure. However, there was a misunderstanding on my part and I taped all three of the soldered wires together. This meant that the positive, ground, and signal were all touching. So when I tested what Arduino was reading for each of the sensors, they were very unstable. The professor explained to me that each of the wires should be taped individually so that they are not exposed to each other. After undoing the original tape and re-taping each of the wires individually, the sensors were working when the code was uploaded. Then we embedded each of the sensors into the middle of two tiles and continued on to the user testing session.
The user testing session made us realise that the tiles alone would be a safety hazard as they could slide on the floor that we laid them on. This led us to the idea of sticking our tiles onto a rubber yoga mat that had more friction when being stepped on and would move less. The tiles themselves would then be permanently arranged and static so that when the users stepped on them they would not move, solving the previous concern for safety. At first we chose to use the normal buzzers given to us in our Arduino starter kits, however during the user experience session, we got a lot of feedback on how the volume of the sounds was not loud enough, this led us to our decision to make use of the amplifiers instead of the buzzers as they produced a louder sound. We also chose to use two different Arduino boards and codes, as this allowed for the beats to continue running while the notes were played. Since there were two Arduino boards we also had to hook them up to two different amplifiers, this way, the different sounds could play simultaneously. Lastly, we were advised to make the other side of the three wires from the sensor longer instead of soldering longer connecting wires.
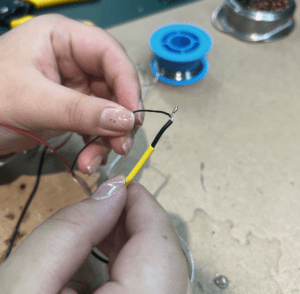
My partner focused more on the code, especially for the beats. With the help of Professor Gottfried, she was able to create a code for the different tempo beats with the Boolean function. While she was focusing on the code, I focused more on the technical parts of our project, for example I had to cut off the initial soldering of wires and ask another professor for help on how to replace the already existing wires from the sensor to longer wires. The process was to first unscrew them from the sensor, then expose the wire so that we could re-solder the wires with the flexible wire, and lastly add a plastic tube around the soldering and using the welding machine to tighten the plastic tube around the soldering job. Throughout this process, many of the wires came off of the sensor so we had to re-solder them as they came off. We re-soldered each of the sensors multiple times as they came off, however when we re-tested the already working code, the sensors were not even reading stable values. We had a hard time figuring out what the problem was, we looked into the wiring, the soldering, the code, and the speakers. After struggling to find the reason they were not reading, we asked a fellow for help. The reason was as simple as the positioning of the soldering onto the sensor. The ground wire needs to be soldered onto the outside of the sensor while the positive is soldered on the inside. Although this took much of our time in building the project, it also gave us a big relief as it was a very fixable problem. Once we re-soldered the positioning of the wires, the code finally worked.
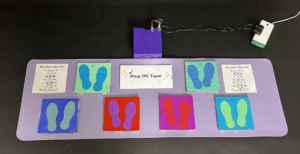
Then I helped to figure out exactly what notes we want to personalise tiles to be, which would be the commonly known Do, Re, Mi, and Sol. After finding the frequencies for each note we replaced them into the code and also gave an example song that used these notes. The last part of completing the project was to decorate and paint each of the components for presentation.
CONCLUSION
Our goals for this project was to recreate an interactive instrument for users to play with and create different music with. Our project results aligned with our definition of Interaction as the users were able to have a constant back and forth conversation with our project. Each input got a different output, allowing for the user to respond in different ways. However the level of interaction could be improved on, by adding even more dimensions to the output and feedback. Our project only responds with a certain type of sound, which only allows the audience to experience one type of sound. Though we have different notes, different types and categories of sound could make this project interactive on a deeper level. The audience ultimately played with our instrument in different ways, however some of their inputs were not exactly being “listened to” or responding in the expected way. If we had more time, I think we would explore different categories of sound and make our project into a multi-instrument that could excite the audience more with larger variety of outputs. From the project, I have learned the importance of patience and solving problems in a logical way. More importantly to keep testing in an incremental manner so that whenever something goes wrong we could go back to exactly what went wrong. Although this project was very time consuming and sometimes frustrating when things did not go the way we expected, it has brought me a better understanding and appreciation for the process of building and creating. It’s because of the very set-backs, failures, and upsetting results that make the ultimate working presentation so worth it!
DISASSEMBLY
APPENDIX
Beat 1 and 2 Code:
#include "pitches.h"
const int vibrationSensorPin1 = A0; // Pin connected to vibration sensor 1, plays beat 1
const int vibrationSensorPin2 = A1;// Pin connected to vibration sensor 2, plays beat 2
const int buzzer2 = 7;

bool isPlaying = false;
int melody[] = {

  NOTE_GS3, NOTE_GS3, NOTE_GS3, NOTE_GS3, NOTE_G6, 0, NOTE_G6, NOTE_GS3
};

// note durations: 4 = quarter note, 8 = eighth note, etc.:
int noteDurations[] = {

  4, 4, 8, 4, 8, 4, 4, 4
};

/*int note[] = {
  NOTE_C4
  };
  int noteDuration[] = {
  8
  };
*/
void setup() {
  pinMode(vibrationSensorPin1, INPUT);
  pinMode(vibrationSensorPin2, INPUT);
  pinMode(buzzer2, OUTPUT);
  Serial.begin(9600);
}

bool isPlayingBeat1 = false;
bool isPlayingBeat2 = false;

void loop() {
if (analogRead(vibrationSensorPin1) > 515) {
  if (isPlayingBeat1 == true) {
    isPlayingBeat1 = false;
    //Serial.println("turning off beat 1");
    delay(100);
  } else {
    isPlayingBeat1 = true;
    //Serial.println("turning on beat 1");
    delay(100);
  }
}

//int test = analogRead(vibrationSensorPin1);
//Serial.println (test);

bool wantSound = false;

  if (isPlayingBeat1 == true) {
    if (millis() % 1000 < 100) {
      tone(8, 200);
      wantSound = true;
    }
   }
    if (isPlayingBeat2 == true) {
      if (millis() % 1000 > 500 && millis() % 1000 < 600) {
        tone(8, 400);
        wantSound = true;
      }
     }
      if (wantSound == false) {
        noTone(8);
      }
      if (digitalRead(vibrationSensorPin2) == HIGH) {
        if (isPlayingBeat2 == true) {
          isPlayingBeat2 = false;
          Serial.println("turning off beat 2");
          delay(100);
        } else {
          isPlayingBeat2 = true;
          Serial.println("turning on beat 2");
          delay(100);
        }
      }
    }


void playMelody() {
      // iterate over the notes of the melody:
      for (int thisNote = 0; thisNote < 8; thisNote++) {
        int noteDuration = 1000 / noteDurations[thisNote];
        tone(8, melody[thisNote], noteDuration);
        int pauseBetweenNotes = noteDuration * 1.30;
        delay(pauseBetweenNotes);
        // stop the tone playing:
        noTone(8);
      }
    }
Pitches Code:
#include "pitches.h"
// Define the pin numbers for the vibration sensor, speaker, and the threshold value
// Analog pin for the vibration sensor
const int vibrationSensorPin3 = A2;
const int vibrationSensorPin4 = A3;
const int vibrationSensorPin5 = A4;
const int vibrationSensorPin6 = A5;
const int speakerPin = 8; // Digital pin for the speaker
const int threshold = 100; // Adjust this value based on sensor sensitivity
const int noteFrequencies[] =
{262, 294, 330, 392};
void setup() {
  pinMode(vibrationSensorPin3, INPUT);
  pinMode(vibrationSensorPin4, INPUT);
  pinMode(vibrationSensorPin5, INPUT);
  pinMode(vibrationSensorPin6, INPUT);
  pinMode(speakerPin, OUTPUT);
  Serial.begin(9600);
}

void loop() {
  int sensorValue3 = analogRead(vibrationSensorPin3);
  int sensorValue4 = analogRead(vibrationSensorPin4);
  int sensorValue5 = analogRead(vibrationSensorPin5);
  int sensorValue6 = analogRead(vibrationSensorPin6);

  if (sensorValue3 > threshold) {
    tone(speakerPin, NOTE_C4, 262); // Play a tone at 1000 Hz
  } else if (sensorValue4 > threshold) {
    tone(speakerPin, NOTE_D4, 294);
  } else if (sensorValue5 > threshold) {
    tone(speakerPin, NOTE_E4, 330);
  } else if (sensorValue6 > threshold) {
    tone(speakerPin, NOTE_G4, 392);
  } else {
    noTone(speakerPin);
  }

  delay(100); // Adjust delay based on your needs
}
