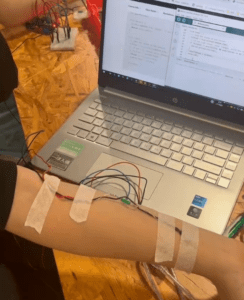
Recitation 3:Workout
Step 1: Prepare your tilt sensor
In task 1, we need to build our tilt sensors with 2 long wires and a tilt switch. At first, I tried to twist the wires together but the connection was not very secure. So I took out the electronic iron from the tool kit to do the solder. In case of the heat, I fixed the calbes on the cardboard and was guided to melt a piece of iron wire. Then I waited until it cooled down and got solidified.
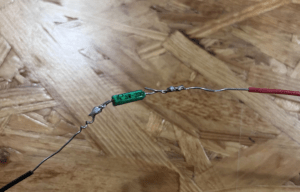
In task 2, I followed the instruction to build the circuit.
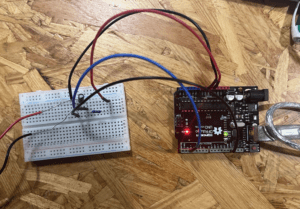
In task 3, I copied the given code to run the program
int SENSOR_PIN = 2;

int tiltVal;

void setup() {

pinMode(SENSOR_PIN, INPUT);    // Set sensor pin as an INP

Serial.begin(9600);

}

void loop() {

// read the state of the sensor

tiltVal = digitalRead(SENSOR_PIN);

Serial.println(tiltVal);

delay(10);

}
Step2:Refine The Code
int SENSOR_PIN = 2;

int tiltVal;

int prevTiltVal;

void setup() {

 pinMode(SENSOR_PIN, INPUT); // Set sensor pin as an INPUT pin

 Serial.begin(9600);

}

void loop() {

 // read the state of the sensor

 tiltVal = digitalRead(SENSOR_PIN);

 // if the tilt sensor value changed, print the new value

 if (tiltVal != prevTiltVal) {

   Serial.println(tiltVal);

prevTiltVal = tiltVal;

 }

delay(10);

}
step 3: Wear your sensor
Step 4: Bicep Curl Workout!
TASK1
int SENSOR_PIN = 2;

int tiltVal;

int prevTiltVal;

void setup() {

pinMode(SENSOR_PIN, INPUT); // Set sensor pin as an INPUT pin

Serial.begin(9600);

}

void loop() {

// read the state of the sensor

tiltVal = digitalRead(SENSOR_PIN);

// if the tilt sensor value changed, print the new value

if (tiltVal != prevTiltVal && prevTiltVal == 0) {

Serial.println(tiltVal);

}

prevTiltVal = tiltVal;

delay(10);

}
TASK2
int SENSOR_PIN = 2;

int tiltVal;

int prevTiltVal;

int count=0;

void setup() {

  pinMode(SENSOR_PIN, INPUT); // Set sensor pin as an INPUT pin

  Serial.begin(9600);

}

void loop() {

  tiltVal = digitalRead(SENSOR_PIN);

  if (tiltVal != prevTiltVal && prevTiltVal == 0) {

    count ++;

   Serial.println(count);

  }

 prevTiltVal = tiltVal;

  delay(10);

}
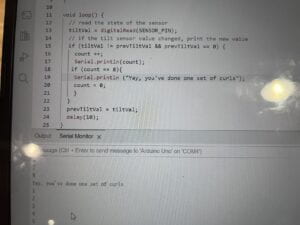
TASK 3
int SENSOR_PIN = 2;

int tiltVal;

int prevTiltVal;

int count=0;

void setup() {

  pinMode(SENSOR_PIN, INPUT); // Set sensor pin as an INPUT pin

  Serial.begin(9600);

}

void loop() {

  tiltVal = digitalRead(SENSOR_PIN);

  if (tiltVal != prevTiltVal && prevTiltVal == 0) {

    count ++;

   Serial.println(count);

  }

  if (count == 8){

    Serial.println("Yay, you've done one set of curls");

    count = 0;

  }

 prevTiltVal = tiltVal;

  delay(10);

}
step 5
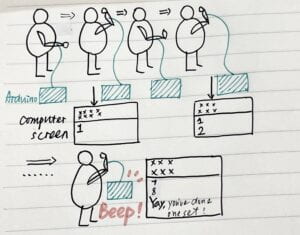
I added a buzzer to the circuit to celebrate each set of exercise.
int SENSOR_PIN = 2;

int tiltVal;

int prevTiltVal;

int count=0;

void setup() {

  pinMode(SENSOR_PIN, INPUT); // Set sensor pin as an INPUT pin

  Serial.begin(9600);

}

void loop() {

  tiltVal = digitalRead(SENSOR_PIN);

  if (tiltVal != prevTiltVal && prevTiltVal == 0) {

    count ++;

   Serial.println(count);

  }

  if (count == 8){

    Serial.println("Yay, you've done one set of curls");

    count = 0;

    tone(12, 900, 500);

  }

 prevTiltVal = tiltVal;

  delay(10);

}
Illustration sketch:
Reflections
During the recitation, something always went wrong when I upload the code in Arduino for some reasons like forgetting a punctuation or the upper class letter. Maybe I need more practice to get familiar with the computer language.
The wearable workout sensor is easy to use for anyone since it can actually be used on any part of our body whether it is arm or leg. However, I found my sensor not very sensitive so it was hard to get a data record on the Arduino. And due to the slight time delay of the record, it was confusing about what angle corresponds HIGH or LOW.

