Project title: Bravada game
Group member: Siwen Fang,Siwei Chen
Instructor: Gottfried Haider
1. CONTEXT AND SIGNIFICANCE
In the previous class, I learned how to use circuits to connect Arduino, various motors, servo, or components that would give interactive responses such as the buzzer and LEDs. I was inspired by a previous recitation class when we made two paddles instead of a switch, and the game was a competition between the two sides to make the buzzer sound by pressing the paddle as fast as possible. In addition, we also learned about various motors, such as how to change the code to control the rotation time of the fan, the angle of motor rotation, etc. During my previous group research project, I also gained a new understanding of what interaction is. Interaction does not only exist between people and things but is also a continuous process consisting of lots of parts. For example, in the previous project, when a person pressed a button, the automatic disinfection bath machine would react, the code would be transcoded, and the parts of the machine would be connected and then interact with the person. The person also makes an action or speaks a language to let others know that the machine responds back to him. All the above projects and research sparked my idea of the BRAVADA game, which is a remade and advanced version of truth or dare(https://en.wikipedia.org/wiki/Truth_or_dare%3F). Truth or Dare is primarily a party game that requires two or more players. The player can choose to answer the question truthfully or do a challenge as a punishment. The more players join the game, the game will be more interesting. But if there are only 2 people, it may be not that interactive and interesting because it might look like two players taking turns answering questions or doing challenges. So we kept the concept and designed a two-player game. We added a speed competition and some random elements to make a machine that is more interesting and interactive. This allows you and your buddy to compete in a hand speed contest to determine who the winner is, and then ask random questions or complete daring challenges chosen by the turnplate to add to the interactive game experience.
2. CONCEPTION AND DESIGN:
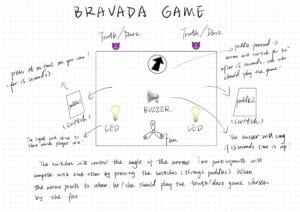
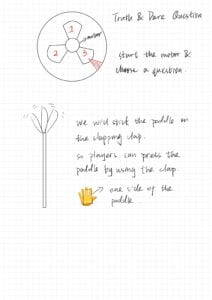
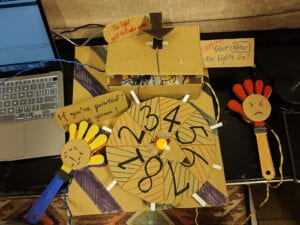
We decided to make a two-player game and add some fun elements like speed competition, sounds, movements, and random, which can enlarge the participation and make the artifact more interactive. Here is the full process of our interactive machine. When the game starts, the machine lights up and the buzzer will count for 3 seconds to give a cue( we used LEDs), and both sides see the light and are instructed to start the competition. They will change the direction of the arrow by shaking the clapper. Each time they shake it, the arrow will turn towards the opposite player. The faster they clap, the more possible they will win. As they see the arrows constantly changing their position, the players get nervous and keep shaking their clap pads. Meanwhile, the buzzer will sound every second, raising its pitch as the countdown reaches five seconds. After 15 seconds, the winner’s side will light up as a reminder, while the arrow will point to the person who needs to complete the Truth or Dare challenge. At last, a small fan that spins randomly between 1.5-3 seconds with an arrow stuck on it will decide the question as a punishment, which adds more fun to the game The losing side will see what number of the spinning wheel they need to draw a piece of paper from based on the fan blade with the arrow on it. To the rule more informative, we wrote the instructions on the cardboard and stuck it between the machine. Considering the materials, we used cardboard and the materials from our Arduino kit which we learned during the lecture and recitation. Breadboard, cables, LEDs, buzzers, and resistors are the common materials in building the circuit, and we use a servo to act as an “arrow” that can be controlled. We used cardboard paddles as switches to control the servo which we learned in recitation 2. However, we finally changed our idea and selected clapping toys as alternatives because they are“noisier” which can add more fun and become more interactive. And we changed our servo into a standard one borrowed from the equipment room which is more stable than the one from our kit.
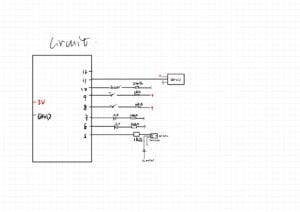
Here is our draft:
3. FABRICATION AND PRODUCTION:
In this section, describe and assess the most significant steps in your production process, both in terms of failures and successes. Please clarify exactly what contributions and roles you personally made to the process and project along the way, and describe the process your group used to work together. What happened during the User Testing Session? How did your user testing process influence some of your following production decisions? What kind of adaptations did you make? Were they effective? In short, keeping in mind your project goals, how do you account for and justify the various production choices you made for your project? Include sketches and drawings.
We divided our work: I took charge of the appearance of the artifact and decoration part, and Siwei was responsible for the circuit and coding part. We drew the draft individually and combined our ideas of the artifact, and checked the circuit diagram together to avoid the mistake in advance.
The led lights in our tool kits were very dim, so we borrowed two from ER and mounted them on the box. I put the circuit boards in the box as well, not only to make them look better but also to make both sides of the game clear. Also, I learned how to write code to make different programs run simultaneously and how to make a specific motor rotate randomly. We need to set different variables and pay attention to the position of the if when looping
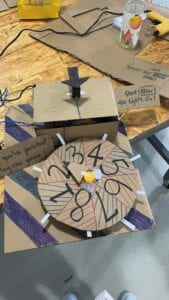
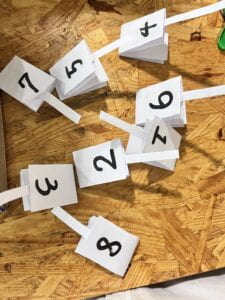
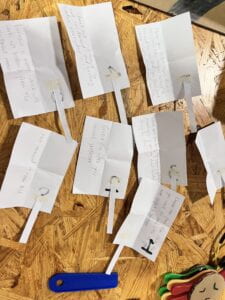
During my making process, after soldering the wires to be glued to the racket, I found that the paddle always had poor contact because there was a gap in the middle of the racket. So I added a piece of cardboard to allow the two sides of the paddle to touch. Before the user test, the motor controlling the fan was very unstable, sometimes turning and sometimes not, so we changed its pin and tried to add a transistor to allow it to turn at the end of the game. I also cut out a large disc and painted it, and designed eight compartments to use as our turntable. But when I was making the compartments, I didn’t align the front and back dividers and forgot to leave room for the fan. So I had to reapply it with a glue gun. Ultimately, because our servo was still not very stable, we replaced the 5V DCmotor on the advice of the professor.
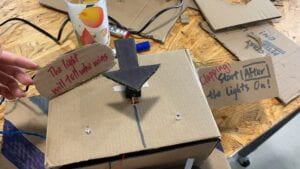
During the user test, I found that when the testers did not see the light on, they would start shaking and clapping, so Siwei changed the time of the light on and shortened the time from 5 seconds to 3 seconds with the buzzer making a noise. We also found that our code did not match the clapping beat, which would control the arrow in the opposite direction we expected, so we changed the code. And someone broke the wire because of excessive force, so I re-soldered and reinforced it with multiple layers of tape. Some people would have doubts because the side with the light on and the side with the arrow pointing were not the same, so I re-wrote the rules of the game and stuck the instruction cardboard. In addition, I changed the color of the wire to match the color of the clapping handle to make it clearer to players. And finally, I decorated and painted the bottom of our cardboard. The adaptations made our artifact more playable.
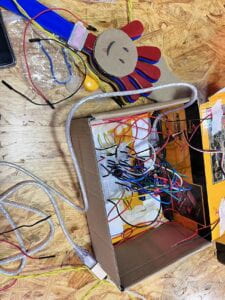
Here is my making process:
I soldered the artifact again after the user test to make an adaption.
Our final coding:
 #include
Servo servo;
const int pushButton_1 = 8; //player1
const int pushButton_2 = 9; //player2
int a = 90; //angle
int fan = 5; // the PWM pin the fan is attached to
int brightness = 5; // how quick the fan is
int fadeAmount = 5; // how many points to fade the fan by
int num = 1;
int pre_buttonState1 = LOW;
int pre_buttonState2 = LOW;
int flag = 1;
int button; int pre_button=LOW;
int starttime=0;
void setup() {
Serial.begin(9600);
pinMode(5, OUTPUT);
pinMode(6, OUTPUT);
pinMode(7, OUTPUT);
pinMode(fan, OUTPUT);
pinMode(pushButton_1, INPUT);
pinMode(pushButton_2, INPUT);
servo.attach(11);
servo.write(a);
}
int lastBuzzer = 0;
//buzzer
void loop() {
int buttonState1 = digitalRead(pushButton_1);
int buttonState2 = digitalRead(pushButton_2);
// if(millis()==1000){
// digitalWrite(5, HIGH);
// }
if(millis()-starttime == 3000){
digitalWrite(6, HIGH);
digitalWrite(7, HIGH);
}
// this is the most robust solution (we can sleep as long as we want below)
/*
if(millis()>=6000 && millis()<=15000) { if (millis()-lastBuzzer >= 1000) {
tone(10, 440, 200);
lastBuzzer = millis();
}
}
*/
// here, this increases the window (to a 10th of a second)
if(millis()-starttime == 4000){

digitalWrite(6, LOW);
digitalWrite(7, LOW);
}
if(millis()-starttime > 0 && millis()-starttime <= 2000 && ((millis()-starttime) / 10) % 100 == 0){ tone(10, 440, 200); } // the window here might be to narrow (if the code below takes too much time) /* if(millis()>=6000 && millis()<=15000 && millis()%1000 == 0) { tone(10, 440 ,200); } */ if(millis()-starttime ==3000 && ((millis()-starttime) / 10) % 100 == 0){ tone(10, 880, 200); } //servo if(millis()-starttime >= 3000 && millis()-starttime <= 17000 && (millis()-starttime)%25==0){ if(buttonState1 == HIGH && buttonState1 != pre_buttonState1 && a >= 0){
//Serial.println("button 1");
a = a - random(-1, 10);
//random(-1, 10);
}
if(buttonState2 == HIGH && buttonState2 != pre_buttonState2 && a <= 180){
// Serial.println("button 2");
a = a + random(-1, 10);
//random(-1, 10);
}
pre_buttonState1 = buttonState1;
pre_buttonState2 = buttonState2;
Serial.println(a);
/*
a = a + -2 + random(5);
if (a < 5) { a = 5; } if (a > 175) {
a = 175;
}
*/
if((millis()-starttime) % 100 == 0){
servo.write(a);
// Serial.println(a);
}
}
//LED
if(millis()-starttime == 17000){
if(a < 90){ digitalWrite(6, HIGH); } if(a > 90){
digitalWrite(7, HIGH);
}
Serial.println("F");
}
//delay(5);

//fan
if(millis()-starttime > 17000 && flag==1){
digitalWrite(5, HIGH);
delay(random(1500,3000));
digitalWrite(5, LOW);
flag=0;
}
}
The circuit:
The adaption:
4. CONCLUSION
Unfortunately, one of our claps broke during the presentation: (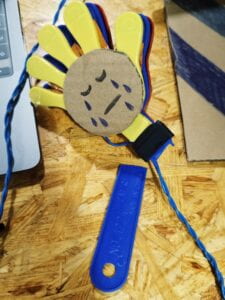
Luckily, we shot a video before that 🙂 Let’s see our final project:
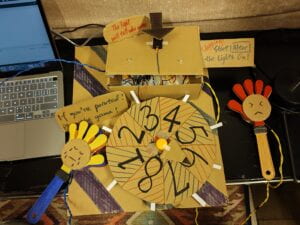
The goal of our project is to design an interactive two-player game. They accomplished three forms of interaction: human to human, object to object, and human to object through interaction with the machine, the machine’s own transcoding and reaction, the interconnection of different parts of the machine, and the reaction given by both sides of the game based on the artifact (the truth or dare game). We use buzzers, LEDs, and a selection of clapping toys to increase the fun of the interaction and to meet my definition of interaction. We want to expect the players to enjoy themselves and have fun with the game. If we had more time, I would like to reinforce our clapping so that he does not break easily and also improve the look of the artifact. We could also add colored LED strips. We also got feedback at the end of the show that we could make it clearer to players who won by changing the color of the LED lights on both sides of the game. From this project, I learned more about coding and gained a basic understanding between circuitry and code. I also developed my patience in cutting cardboard, using a glue gun, and soldering. I gained experience through failure and mistakes again and again. I also learn to collaborate with others better, from the initial design idea to the final product, Siwei and I worked together to solve the problems step by step, ensuring that all parts of the work were centered on “interaction”, refreshing and deepening our understanding of interaction.