Hello, everyone! Welcome to Vivian’s blog! This time I would like to introduce my midterm project in interaction lab. Bella and I(Vivian) cooperated in this midterm project. Our instructor is Eric. In addition, we also received help from other professors and learning assistants(Thank you very much!!). Finally, we named it I’m sensitive to sounds!
According to our research on previous interactive installations and previous life experience, we agree that art comes from life but is higher than life, so we hope to design interactive works of art based on life that can help people live a better life.In our daily lives, we often need a quiet environment where we can focus on doing our own things. But the reality is that even in reading rooms, coffee shops and other places need to be quiet, there are still people talking loudly or talking on the phone to break the quiet atmosphere. In this regard, we hope to design a device that can monitor the ambient volume in real time and provide an alert to remind people to control the volume and keep quiet.According to my definition,“Interaction” refers to the process that two or more subjects respond to each other’s behavior, communicate with each other, and cooperate with each other with the help of technology.To achieve this, we used LED strips and sound sensors to maximize its characteristics, namely immediacy and continuity.
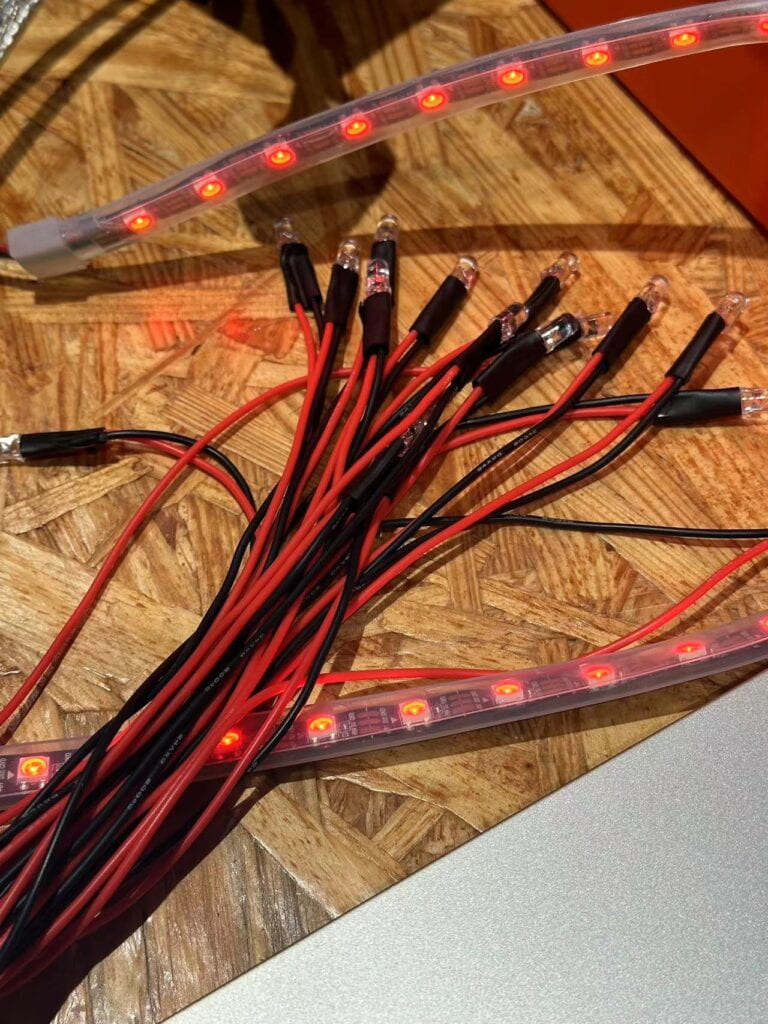
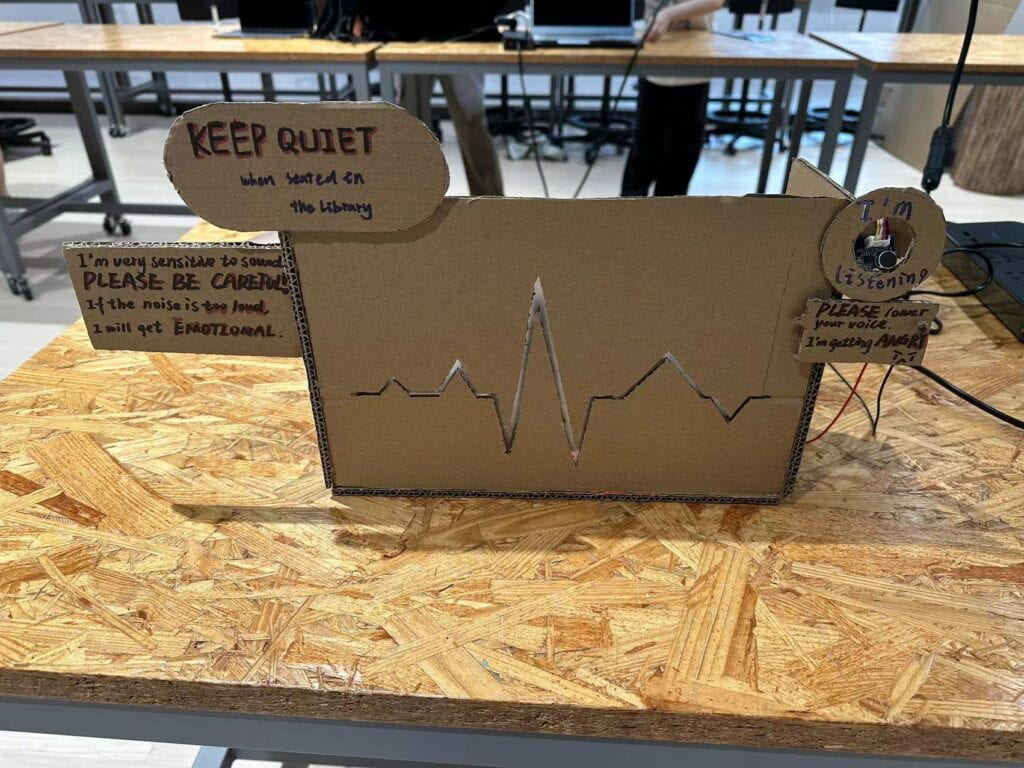
To maximize the effect, we used a combination of sound sensor, LED, and cardboard. In fact, our initial idea is to use LED bulbs, LED one by one flashing, their flashing speed is determined by the ambient volume, the greater the ambient volume, the faster the LED flashing speed. We re-welded the LED with the wire and made sixteen (!!) However, one by one separate LED speed is too slow and coordination is not good, did not meet our expectations, so LA suggested that we use the light belt, so we overturned the previous idea and re-conceived around the light belt, taking advantage of the advantages of the light belt, adding the change of color on top of the change of speed, yellow when the sound is low, orange when it is loud, and red when it is too loud or noisy.We use cardboard for the shell of the interactive device. Cardboard is a good material, which is not only easy to cut and splice, but also has a certain hardness, which can support the whole device. In addition, it can also be freely decorated to become the desired shape and color.We carved electrocardiograms on the cardboard at the front of the device, and when the sound became louder, the light band would flash along the hollow part to give it a more design sense.
In the whole production process, we have a relatively clear division of labor and cooperation. We put forward our own ideas respectively, and after combining them, we formulated the final scheme and designed the circuit. Since I was still in the preliminary stage of exploring the code and programming, I was mainly responsible for making the appearance of the project, cutting and gluing the cardboard, and Bella was responsible for writing the code (special thanks to Bella for her help!And she also taught me how to code). Because the code related to the LED belt is too complicated, we also consulted three professors, two fellow and two LA, and everyone was very enthusiastic to help us guide the code and fill the gap in our knowledge. I once again felt the warmth of the IMA family!
What’s more, in the user test, we got a lot of effective suggestions, such as increasing the color change, speeding up the reaction speed of the device, and reducing the set decibel value. We expected the user to react by just talking, but in fact in the user test they had to clap loudly close to the sound sensor, which we improved after the user test.
After more than half a month of hard work, we finally completed our project. (Although not perfect!) From my personal point of view, I think it is in line with our definition of interaction. People make a sound, the sound sensor in the device receives the sound and allows the light to give feedback. When people see the LED color change to red, they will consciously lower the sound to reduce the interference to the surrounding people (of course, this part is our hope!). It completes the closed-loop process from output to input and input to output, which is the mutual feedback of man and machine and completes the interaction.However, although our device eventually worked successfully, it still did not live up to our original idea. We wanted to add a pop-up device, when the decibel reached a certain value, the device would pop up and display the word “Be Quiet”. However, because it was too complicated to combine this part of code with the source code, we unfortunately failed to implement it in the end, but pulled out all the devices before the presentation. If we had more time, I think we’d figure out a way to finish our pop-up and decorate it better.
https://drive.google.com/file/d/1ja2mOlE9f_y_OU0RTXhk9IwP7t8hMrzH/view?usp=sharing
All in all, it was a very novel and wonderful experience, which allowed me to have the fun of designing and assembling interactive devices by myself. I also felt the kindness from my partner, professors and IMA group. It was also interesting to communicate with other groups and try out their interactive devices. But I think the most important thing is that in the process of success, failure, overthrow and continuous improvement, I realized that everything we learned in the interaction lab is flexible and interactive, and nothing is static. We need to maximize the use of knowledge learned in the class to solve problems creatively. Take responsibility for our own work.
Looking forward to more productions in the future!
The code:
#include <FastLED.h>
#include <AccelStepper.h>
#define NUM_LEDS 51
#define DATA_PIN 3
#define CLOCK_PIN 13
#define SOUND_SENSOR_PIN A0
#define SysSpeed 50
#define limit 100
CRGB leds[NUM_LEDS];
int speed = 500;
int soundValue = 0;
int previousSoundValue = 0;
int led = 0;
int ledpos = 0;
AccelStepper stepper(AccelStepper::FULL3WIRE, 5, 6, 7);
void setup() {
pinMode(8, OUTPUT);
Serial.begin(9600);
Serial.println(“resetting”);
FastLED.addLeds<WS2812, DATA_PIN, RGB>(leds, NUM_LEDS);
FastLED.setBrightness(84);
stepper.setMaxSpeed(100);
stepper.setAcceleration(20);
stepper.moveTo(500);
}
void fadeall() {
for (int i = 0; i < NUM_LEDS; i++) {
leds[i].nscale8(250);
}
}
void loop() {
soundValue = analogRead(SOUND_SENSOR_PIN);
int colorsound = map(soundValue, 0, 1023, 60, 255);
speed = map(soundValue, 0, 1023, SysSpeed, 200);
Serial.print(“sounds=”);
Serial.println(soundValue);
if (soundValue > limit) {
led = 1;
// if (stepper.distanceToGo() == 0)
stepper.moveTo(-stepper.currentPosition());
stepper.run();
} else {
led = 0;
stepper.stop();
}
// 如果声音变大,加快LED速度
// if (soundValue > previousSoundValue) {
// speed = max(100, speed – 100); // 最低速度为100
// }
// // 如果声音变小,减慢LED速度
// else if (soundValue < previousSoundValue) {
// speed = min(SysSpeed, speed + 100); // 最高速度为1000
// }
previousSoundValue = soundValue;
long StartTime = millis();
for (int i = 15; i < NUM_LEDS; i++) {
// Serial.print(“running”);
if ((millis() – StartTime > 200) && led) {
// Serial.print(“reversed”);
digitalWrite(8, ledpos);
ledpos = !ledpos;
StartTime = millis();
}
// Serial.print(” “);
// Serial.println(ledpos);
leds[i] = CHSV(colorsound, 255, 255);
FastLED.show();
delay(speed);
fadeall();
FastLED.show();
}
Serial.println(“stop”);
digitalWrite(8, LOW);
FastLED.clear();
}
Citation:
https://www.arduino.cc/reference/en/
https://www.airspayce.com/mikem/arduino/AccelStepper/
https://stackoverflow.com/questions/58688181/how-to-use-millis-instead-of-for-loop-in-this-function
https://forum.arduino.cc/t/led-strip-ws2812b-with-millis/680950