Midterm Project: Clown Fiesta
CLOWN FIESTA
Tu Quynh Vuu – Gottfried Haider
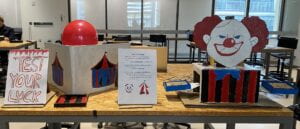
Context & Significance
For the midterm project, my partner (Joyce Tam) and I implemented a circus theme with a clown figure and a balloon popper. There are two parts to this project where both have correlating yet different functions with the interactor. The previous group project where we were to create an artifact in relation to one of the short stories did not quite impact my midterm project. In the group project, we explored the usage of cardboard and how to manipulate the material to create the helmet and detector we wanted, but did not use any circuits or wires to function it. It was mainly based on our imagination of how the artifacts would function, so overall, I do not believe that it influenced my midterm project at all. My project doesn’t necessarily reflect something that does exist, but I do believe that the balloon mechanism has been used before or something similar to it. I did no prior research for my project and merely used my imagination to come up with the concept, and the mechanisms through knowledge I have acquired throughout the class and throughout my past experiences and projects in high school and middle school. The intended audience of this project is younger children and adolescents because it is more entertaining to them, and the balloon popping is exciting. Initially, I planned for my midterm project to be a money dispenser based on a memory game; however, my partner and I explored with various ideas that would be more interesting and larger scaled, and decided to make a circus game. We chose to focus on a clown and the circus theme because as kids, we loved going to the carnival, so this project brought back positive childhood memories. We did not plan on making the balloon mechanism, but along the way, we believed it would be more interesting and leave a better effect on the players.
Conception & Design
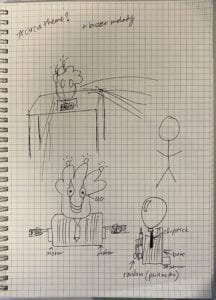
For the interaction, we utilized the distance sensor and set it at a random number for every 60 seconds, so that when the player moves back and forth and hits the picked position, the clown reacts, and its arms move back and forth holding fake money, the eyes and top of the clown also lights up, and a melody is played. The player then takes the money from the clown’s hands, and moves over to the balloon station, where they essentially test their luck to see if the balloon will pop or not, which is activated by placing both the bills on the tray in front of the balloon. The mechanism for the balloon popper is also set with random parameters, which is why it’s called “Test your Luck.” We were aiming for users to see a figure that they would essentially need to activate, which is why we decided to recreate the upper half of a clown. We mainly used cardboard for the material of this project visual, and painted over it to add details. We also wanted players to know where to put the money they get from the clown at the balloon station, which is why we created a tray in the middle of the balloon stand. To cover the wires and mechanisms, we used a box for the clown’s body where the arm motors were hidden inside, and behind the head is where we taped the arduino and other wires. For the balloon station, we covered the mechanisms and wires by folding a long piece of cardboard in half, where it was a triangular shape to only show the balloon sticking out. For the clown’s arms, the hands were too heavy compared to the cardboard stick it was connected to, so the motor wouldn’t move the way they should’ve and drooped down. To counteract this issue, I tried to glue on more cardboard, but it didn’t work so we used metal rulers and taped it onto the cardboard to give it more support. We thought of using wood instead of the rulers, but did not have any on hand. To hold up the balloon, we made a cardboard stand, but it did not hold up after the balloon popped, so we replaced it with a water bottle where we simply taped the balloon on the cap. We had an abundant amount of cardboard, so it made up most of the foundation of our project which did not pose too much of a problem, but was a little difficult to work with since cardboard is quite moldable and can bend.
Fabrication & Production
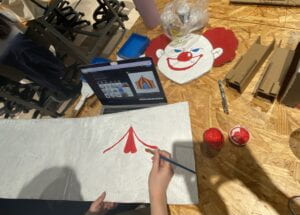
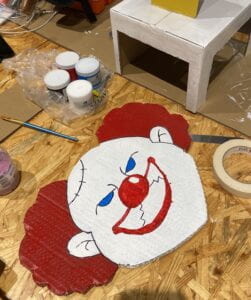
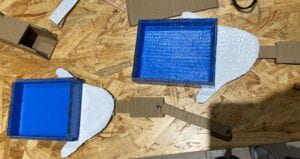
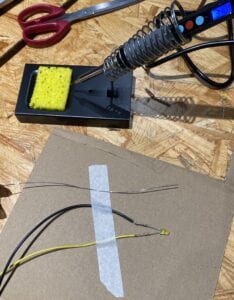
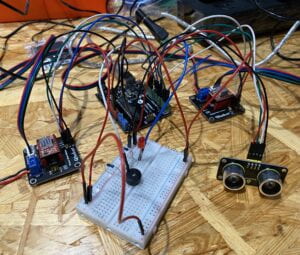
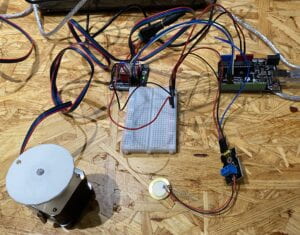
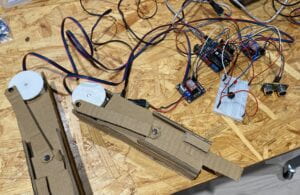
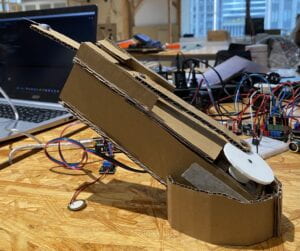
Materials: arduino (x2), stepper motors (x3), 12v barrel jack connector (x3), stepper driver module (x3), M/M cables, F/M cables, 220v resistors (x4), buzzer, LEDs (x3), touch sensor, Ultrasonic Ranger HC-SR04 (distance sensor), cardboard, paint, tape, hot glue, rulers (x2), needle extra wires + other materials to solder and assemble the project pieces
Regarding the production process, we followed the sketch I drafted up and started off by cutting out the cardboard pieces for the clown. We then hot glued together the trays for the clown’s hands, and made the box for its upper half of the body. We basically cut out all the cardboard pieces first, painted them, and glued the pieces together. My partner then made the cardboard holders for the 3 motors we used in our project and she painted most of the cardboard. On the other hand, I started working on the clown mechanism. I connected the stepper driver module and the 12v barrel jack connector to each of the stepper motors. Then connected the wires from the arduino to the two stepper motors, and used the Arduino application to code it so that both motors worked from one arduino. After I finished with the motors, I moved on to connecting the distance sensor to the Arduino. This step took quite some time because I had to test out the time period and distances to see how accurate and which position the sensor needed to be placed so that it would function well for the players. Then I needed to make the 3 LEDs connect to the arduino breadboard. After they initially worked, I soldered the leds onto longer wires with an M/M cable at the end of each one to make it connect to the breadboard smoothly; I also color coded to make sure I knew which side was positive and negative. The yellow LEDs were placed into the clown’s eyes, while the red LED was placed on top of its head. I used 220v resistors for each connecting LED on the breadboard, and taped the longer wires together to make sure it was not too confusing or messy. I looped these wires through the hole we cut on top of the clown’s body to have it connect back to the arduino in the back. After the LEDs were done, I moved onto implementing the buzzer onto the breadboard, where I found the Pink Panther song online (credit) and added a second page to my arduino code labeled pitches.h for the tones. I assembled together the arms of the clowns onto the motors, where I then realized that I needed to use the metal ruler rather than just cardboard in order to support the weight of the hands. I used extra short wires to tie the ruler to the plastic part of the motor, and adjusted the shape of the motor stand so that the arms wouldn’t get stuck on the cardboard sides. After all the building of circuits and cardboard was complete, I coded the clown mechanism. This part was quite difficult as there were so many wires, and all of the pins on the Arduino were used up, which made it quite confusing and complicated to label. I ran into trouble while writing the code for setting everything off once the player reached the exact position, and making the mechanism pick a random value in the parameters every 60 seconds. TO resolve this problem, I sought out my instructor, Gohai, for assistance, where he helped me create the code and explained how it functioned. After everything was set in place for the clown itself, I moved onto the balloon mechanism, which was more simple. On a separate Arduino board, I connected the motor I previously assembled, and connected the touch sensor. I tested out the code I wrote for this mechanism and fixed it to make sure everything was working properly. I also implemented parameters for the random value of the motor, so that the needle may or may not pop the balloon based on the player’s luck. After the code was furnished for the balloon mechanism, I assembled the pieces together. I tried to solder the needle onto the cardboard leg connected to the motor, but obviously it did not work, so I used hot glue instead. Then, taped the touch sensor to the bottom of the cardboard tray where the money gets placed, and to make sure that the motor could stand up slanted, I made a cardboard holder that perfectly fit the shape of the motor stand and propped the entire mechanism on the arduino kits to make it taller. The cardboard cover for the balloon was separate from everything else and could stand on its own, so it was not necessary to tape it to the table. To test out the balloon mechanism, we had a few trials where we used cardboard and tape to hold up the balloon, which did not work well since everything collapsed after the balloon popped. We decided to tape the balloon to a water bottle since the weight would hold it together. We had to test out the balloon popping multiple times to see where the needle should be placed for the mechanism to work, but not each time since it was set to random parameters. After everything was essentially complete, it was time to assemble everything and test it out altogether. Over the course of the week, I spent most of my time in the IMA lab to perfect the project, and fixed the code erratically to make sure everything was set in stone for interaction day. It took a lot of testing to complete this project and there were many errors and stressful events throughout the course of working on it, but it all came together well in the end.
CODE:
CLOWN MECHANISM (first page // main code)
const int trigPin = 12;const int echoPin = 7;int led = 5;int led2 = 6;int led3 = 10;long duration;int distance;#include <AccelStepper.h>int DIR_PIN = 2;int STEP_PIN = 3;int EN_PIN = 4;int DIR_PIN2 = 8;int STEP_PIN2 = 9;int EN_PIN2 = 13;AccelStepper stepper(AccelStepper::DRIVER, STEP_PIN, DIR_PIN);AccelStepper stepper2(AccelStepper::DRIVER, STEP_PIN2, DIR_PIN2);#include "pitches.h"#define BUZZER_PIN 11// all melody related -> credit: https://github.com/hibit-dev/buzzer/blob/master/src/movies/pink_panther/pink_panther.inoint melody[] = { REST, REST, REST, NOTE_DS4, NOTE_E4, REST, NOTE_FS4, NOTE_G4, REST, NOTE_DS4, NOTE_E4, NOTE_FS4, NOTE_G4, NOTE_C5, NOTE_B4, NOTE_E4, NOTE_G4, NOTE_B4, NOTE_AS4, NOTE_A4, NOTE_G4, NOTE_E4, NOTE_D4, NOTE_E4, REST, REST, NOTE_DS4, NOTE_E4, REST, NOTE_FS4, NOTE_G4, REST, NOTE_DS4, NOTE_E4, NOTE_FS4, NOTE_G4, NOTE_C5, NOTE_B4, NOTE_G4, NOTE_B4, NOTE_E5, NOTE_DS5, NOTE_D5, REST, REST, NOTE_DS4, NOTE_E4, REST, NOTE_FS4, NOTE_G4, REST, NOTE_DS4, NOTE_E4, NOTE_FS4, NOTE_G4, NOTE_C5, NOTE_B4, NOTE_E4, NOTE_G4, NOTE_B4, NOTE_AS4, NOTE_A4, NOTE_G4, NOTE_E4, NOTE_D4, NOTE_E4, REST, REST, NOTE_E5, NOTE_D5, NOTE_B4, NOTE_A4, NOTE_G4, NOTE_E4, NOTE_AS4, NOTE_A4, NOTE_AS4, NOTE_A4, NOTE_AS4, NOTE_A4, NOTE_AS4, NOTE_A4, NOTE_G4, NOTE_E4, NOTE_D4, NOTE_E4, NOTE_E4, NOTE_E4};int durations[] = { 2, 4, 8, 8, 4, 8, 8, 4, 8, 8, 8, 8, 8, 8, 8, 8, 8, 8, 2, 16, 16, 16, 16, 2, 4, 8, 4, 4, 8, 8, 4, 8, 8, 8, 8, 8, 8, 8, 8, 8, 8, 1, 2, 4, 8, 8, 4, 8, 8, 4, 8, 8, 8, 8, 8, 8, 8, 8, 8, 8, 2, 16, 16, 16, 16, 4, 4, 4, 8, 8, 8, 8, 8, 8, 16, 8, 16, 8, 16, 8, 16, 8, 16, 16, 16, 16, 16, 2};void setup() { pinMode(trigPin, OUTPUT); pinMode(echoPin, INPUT); Serial.begin(9600); pinMode(led, OUTPUT); pinMode(led2, OUTPUT); pinMode(led3, OUTPUT); pinMode(BUZZER_PIN, OUTPUT); pinMode(EN_PIN, OUTPUT); pinMode(EN_PIN2, OUTPUT); digitalWrite(EN_PIN, LOW); digitalWrite(EN_PIN2, LOW); stepper.setMaxSpeed(1000); stepper2.setMaxSpeed(1000); stepper.setAcceleration(1000); stepper2.setAcceleration(1000);}long nextRandomPick;int randomTarget;void loop() { digitalWrite(trigPin, LOW); delayMicroseconds(2); digitalWrite(trigPin, HIGH); delayMicroseconds(10); digitalWrite(trigPin, LOW); duration = pulseIn(echoPin, HIGH); distance = duration * 0.034 / 2; Serial.println(distance); if (millis() > nextRandomPick) { randomTarget = random(30, 300); nextRandomPick = millis() + 60000; Serial.print("Picked random distance "); Serial.println(randomTarget); } if (randomTarget-3 < distance && randomTarget+3 > distance) { digitalWrite(led, HIGH); digitalWrite(led2, HIGH); digitalWrite(led3, HIGH); stepper.runToNewPosition(300); delay(50); stepper2.runToNewPosition(300); delay(50); stepper.runToNewPosition(0); delay(50); stepper2.runToNewPosition(0); delay(50); stepper.runToNewPosition(300); delay(50); stepper2.runToNewPosition(300); delay(50); int size = sizeof(durations) / sizeof(int); for (int note = 0; note < size; note++) { int duration = 1000 / durations[note]; tone(BUZZER_PIN, melody[note], duration); int pauseBetweenNotes = duration * 1.30; delay(pauseBetweenNotes); noTone(BUZZER_PIN); } } else { digitalWrite(led,LOW); digitalWrite(led2, LOW); digitalWrite(led3, LOW); }}CLOWN MECHANISM (page 2 // pitches.h (where the melody notes are defined))
// -------------------------------------------------// Copyright (c) 2021 HiBit <https://www.hibit.dev>// -------------------------------------------------#ifndef pitches_h#define pitches_h#define NOTE_B0 31#define NOTE_C1 33#define NOTE_CS1 35#define NOTE_D1 37#define NOTE_DS1 39#define NOTE_E1 41#define NOTE_F1 44#define NOTE_FS1 46#define NOTE_G1 49#define NOTE_GS1 52#define NOTE_A1 55#define NOTE_AS1 58#define NOTE_B1 62#define NOTE_C2 65#define NOTE_CS2 69#define NOTE_D2 73#define NOTE_DS2 78#define NOTE_E2 82#define NOTE_F2 87#define NOTE_FS2 93#define NOTE_G2 98#define NOTE_GS2 104#define NOTE_A2 110#define NOTE_AS2 117#define NOTE_B2 123#define NOTE_C3 131#define NOTE_CS3 139#define NOTE_DB3 139#define NOTE_D3 147#define NOTE_DS3 156#define NOTE_EB3 156#define NOTE_E3 165#define NOTE_F3 175#define NOTE_FS3 185#define NOTE_G3 196#define NOTE_GS3 208#define NOTE_A3 220#define NOTE_AS3 233#define NOTE_B3 247#define NOTE_C4 262#define NOTE_CS4 277#define NOTE_D4 294#define NOTE_DS4 311#define NOTE_E4 330#define NOTE_F4 349#define NOTE_FS4 370#define NOTE_G4 392#define NOTE_GS4 415#define NOTE_A4 440#define NOTE_AS4 466#define NOTE_B4 494#define NOTE_C5 523#define NOTE_CS5 554#define NOTE_D5 587#define NOTE_DS5 622#define NOTE_E5 659#define NOTE_F5 698#define NOTE_FS5 740#define NOTE_G5 784#define NOTE_GS5 831#define NOTE_A5 880#define NOTE_AS5 932#define NOTE_B5 988#define NOTE_C6 1047#define NOTE_CS6 1109#define NOTE_D6 1175#define NOTE_DS6 1245#define NOTE_E6 1319#define NOTE_F6 1397#define NOTE_FS6 1480#define NOTE_G6 1568#define NOTE_GS6 1661#define NOTE_A6 1760#define NOTE_AS6 1865#define NOTE_B6 1976#define NOTE_C7 2093#define NOTE_CS7 2217#define NOTE_D7 2349#define NOTE_DS7 2489#define NOTE_E7 2637#define NOTE_F7 2794#define NOTE_FS7 2960#define NOTE_G7 3136#define NOTE_GS7 3322#define NOTE_A7 3520#define NOTE_AS7 3729#define NOTE_B7 3951#define NOTE_C8 4186#define NOTE_CS8 4435#define NOTE_D8 4699#define NOTE_DS8 4978#define REST 0#endifint SENSOR_PIN = A0;int sensorVal;int randomPosition;#include <AccelStepper.h>int DIR_PIN = 2;int STEP_PIN = 3;int EN_PIN = 4;AccelStepper stepper(AccelStepper::DRIVER, STEP_PIN, DIR_PIN);void setup() { Serial.begin(9600); pinMode(EN_PIN, OUTPUT); digitalWrite(EN_PIN, LOW); stepper.setMaxSpeed(3000); stepper.setAcceleration(2600);}void loop() { sensorVal = analogRead(SENSOR_PIN); randomPosition = random(60, 150); Serial.print("Sensor Value "); Serial.println(sensorVal); delay(100); if(sensorVal > 10){ stepper.runToNewPosition(randomPosition); delay(50); Serial.print("Needle Position "); Serial.println(randomPosition); stepper.runToNewPosition(0); delay(50); }}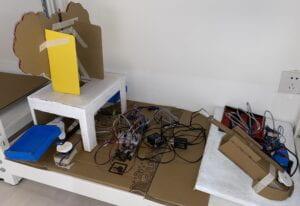
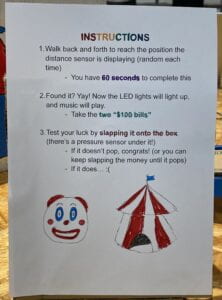
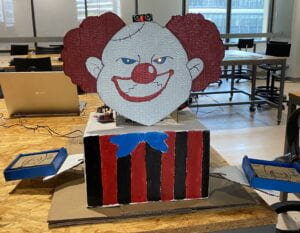
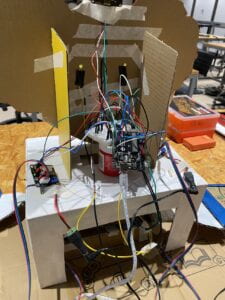
Interaction Day: At first glance, the clown mechanism is confusing, and users had a difficult time testing it, so the feedback they gave was to add instructions. Another issue was the starting position of the needle mechanism, which I then altered on the spot so that the connecting cardboard was at the very back of the motor, rather than on the side. This was done so that the chances of the balloon popping would be lower, and the motor would have more room to move back and forth so that the random value could be fulfilled accurately.
After interaction day, I wanted to alter the code so that the LEDs on the clown’s eyes or on top of its head would light up to indicate if the player needed to move close or further. I also had the idea of doing that with a buzzer or a speaker. However, I caught the flu in the middle of the week (prior to Interaction Day) and my sickness worsened over the weekend, so I did not have time or energy to work on the project. I came back to school on Tuesday for the project presentation, and for the two hours I worked on it before class, I could not alter the code to have it function the way I wanted to. Therefore, my partner and I only made instructions for the project and left it as it was. If I had more time and didn’t catch the flu, I would have definitely spent more time trying to add more indicators to make the clown mechanism more interesting and instructive.
Conclusions
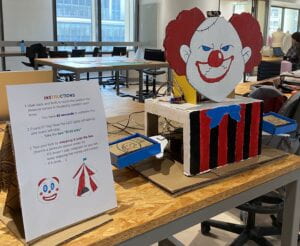
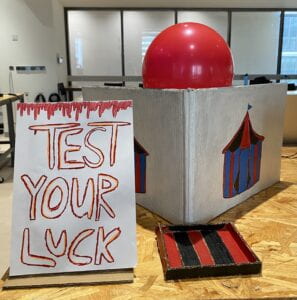
The initial goal of this midterm project was to create a game both visually appealing and interactive in a fun way. We wanted the circus to bring back childhood memories of going to the carnival, and wanted users to feel excitement, especially at the end where they tested their luck to see if the balloon would pop or not. I believe that the balloon popper tied the entire project together, as it left a lasting and strong impression on the audience, since it was both loud and anxiety inducing. Most users also mentioned that they really liked the large-scale project and how there were two parts to the project. Regarding my definition of interactivity, I mentioned that interaction shouldn’t have a solid goal that the users need to reach. However, my midterm project does go against my definition of interaction as it does hold somewhat of a goal. The goal of the clown mechanism is to activate all its mechanics by walking back and forth until you reach the random designated position, but there is not much of a goal for the balloon mechanism. The balloon station is merely a test of luck for users as they gamble whether or not the needle will reach the balloon. There is slight alignment of my project and my definition of interaction since I implemented random values to make things more interesting and unpredictable. The audience enjoyed our project as it left a strong impression and was quite visually appealing; however, the implementation of instructions was necessary since no one knew what to do without them. If I had more time, I would make sure the clown mechanism has an indicator to let the user know whether they need to move forward or backward to reach the random position. Whether it is by implementing a speaker, or having the buzzer or LEDs go off. I would also implement a timer to show the audience how much time they have left to try and activate the clown. For the balloon mechanism, I would incorporate a speaker so that the clown may essentially “laugh” or say something depending on if the balloon popped or not. The main setback for this project was the time crunch, and some issues with code. However, I took all the knowledge I acquired both from this course and my previous creative coding course to code adequately and demonstrate my vision through a physical project. Through this midterm, I learned that it is important for a project to be somewhat visually predictive so that the audience does not need to refer to instruction in order to interact with the object. Although there are flaws of this midterm project that I would’ve liked to fix and alter to make it better, I do believe that I expressed my vision to the best of my ability. Overall, this midterm project was quite stressful but I had fun and was extremely determined to have it function the way I envisioned it to, and it allowed me to bring my imagination to life.
External Sources/References
- Interaction Lab Slides (example codes)
- Previous Recitation Instructions (for wiring/codes)
- Pink Panther Melody: https://github.com/hibit-dev/buzzer/blob/master/src/movies/pink_panther/pink_panther.ino
