Be My Light
2021 By Sherry Wu Instructor: Rudi
Part I: Conception and Design
Project Description: Got hurt? Emotional breakdown? I got a friend for you. Nothing’s a big deal. Your heart will be lightened.
Project Basic Purpose and Inspiration: Ar first, I wasn’t inspired or had a strong will to do a project I am interested in. But after a long time of emotional breakdown and following unfortunate news online, I decided to do a project that goes with “healing.” There is no significant function of this work, unlike games, daily used machines and interfaces. My project is more conceptual or childish in a sense. But when I heard comments such as “cute” and “thoughtful” during user testing, that is the best comment I believe I could get. Hope everyone else can take things easy. Nothing’s a big deal.
My understanding of this project is to create an artwork with the media of Arduino and Processing coding. In my opinion, an artwork aims to express a specific phenomenon or emotion, and I applied the second. A visualization of a specific emotion can be abstract or concrete. I used a symbol together with animation. In my perspective, it is a combination of abstraction and concretization.
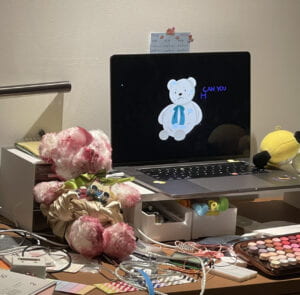
I had a bloody bear for user testing. Since I didn’t finish the work, the prototype is very fragmented. Therefore, many suggestions are applicable and practical. I mostly applied all of them for my final presentation. [See below Step 2.5: User Testing Presentation] for detail.
Part II: Fabrication and Production
Project Composition (Material Used):
|
Teddy Bear *1
|
Cotton
|
|
I2C Touch Sensor*1
|
3D Print Heart*1
|
|
Arduino
|
Wooden Base*1
|
|
Processing
|
Neopixel Stripe*1
|
|
Procreate
|
Laptop Screen & Speaker |
|
Glass Dome Protector*1
|
Photoshop |
Step 1: Planning
Reviewing my research proposal, the proposed idea seems to have a minimal linkage with my final product. I researched two projects that I had significant interests in, I did not have any progressive thoughts on top of that. What made me have the motivation is an emotion at the given time.
Discard personal reasons, what triggered the theme of “cure” and “help” was news I read about a dog named Eleanor. She was in extreme depression due to traumatic experiences. I soon proposed a “curing machine” sketch and presented it to the class.
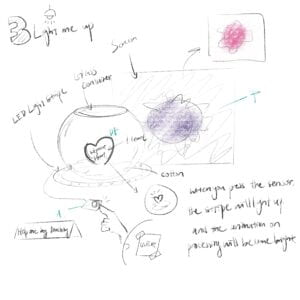
With classmates’ comments, I accepted the idea of using a teddy bear. While considering what type of interactive methods I should use, I simply planned a “touch sensor” but ignored the fact that using a touch sensor is sort of “useless.”
Before coming up with this idea, I came up with 2-3 other ideas that I elaborated from the Daniel Rozin work, which I researched by having a sensor that detects body shape or background/foreground relationship and controls the piece by using that.
If you are curious with my initial ideas, please go to: Final Project Proposals
The basic diagram was created when the idea slowly came up (this was revised after user testing and before the final presentation, so the input is a touch sensor and not an ultrasound sensor).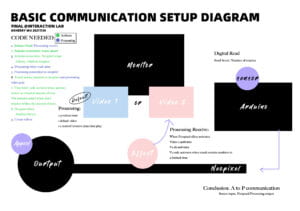
Based on this diagram, the construction should start from the Arduino connection. Based on the ultrasound circuit I did last time and the Neopixel workshop I attended during class, I came up with a primary Neopixel circuit using the fastLED examples (we used this in class).
Step 2: Building
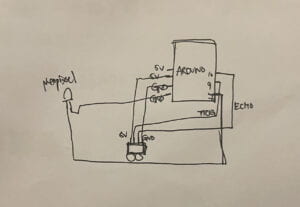
Since I initially used ultrasound sensors, I started with a circuit composed of ultrasound and a neopixel strip. The code for color effect is from the Fast_LED library, which I learned in our last recitation.
Code:
#include <FastLED_NeoPixel.h>

// Which pin on the Arduino is connected to the LEDs?
#define DATA_PIN 7

// How many LEDs are attached to the Arduino?
#define NUM_LEDS 60

// LED brightness, 0 (min) to 255 (max)
#define BRIGHTNESS 100

//Setup the variables for ultrasoud
const int trigPin = 9;
const int echoPin = 10;


int timeCount = 0;

long microsecondsToInches(long microseconds)
{
  return microseconds / 74 / 2;
}

long microsecondsToCentimeters(long microseconds)
{
  return microseconds / 29 / 2;
}

FastLED_NeoPixel<NUM_LEDS, DATA_PIN, NEO_GRB> strip;      // <- FastLED NeoPixel version


void colorWipe(uint32_t color, unsigned long wait) {
  for (unsigned int i = 0; i < strip.numPixels(); i++) {
    strip.setPixelColor(i, color);
    strip.show();
    delay(wait);
  }
}
void theaterChase(uint32_t color, unsigned long wait, unsigned int groupSize, unsigned int numChases) {
  for (unsigned int chase = 0; chase < numChases; chase++) {
    for (unsigned int pos = 0; pos < groupSize; pos++) {
      strip.clear();  // turn off all LEDs
      for (unsigned int i = pos; i < strip.numPixels(); i += groupSize) {
        strip.setPixelColor(i, color);  // turn on the current group
      }
      strip.show();
      delay(wait);
    }
  }
}


void setup() {
  Serial.begin(9600);
  pinMode(echoPin, INPUT);
  pinMode(trigPin, OUTPUT);
  strip.begin();  // initialize strip (required!)
  strip.setBrightness(BRIGHTNESS);

}

void loop() {
  //set for ultrasound
  long duration, inches, cm;
  pinMode(trigPin, OUTPUT);
  digitalWrite(trigPin, LOW);
  delayMicroseconds(2);
  digitalWrite(trigPin, HIGH);
  delayMicroseconds(10);
  digitalWrite(trigPin, LOW);

  pinMode(echoPin, INPUT);
  duration = pulseIn(echoPin, HIGH);

  inches = microsecondsToInches(duration);
  cm = microsecondsToCentimeters(duration);

  Serial.write(inches);
  Serial.write(timeCount);


//  Serial.print(inches);
//  Serial.print("in, ");
//  Serial.print(cm);
//  Serial.print("cm");
//  Serial.println();


  if (inches <= 3) {
    if (timeCount <2){
      colorWipe(strip.Color(255, 116, 200), 40);  // pink
      colorWipe(strip.Color(105, 93, 255), 40);//blue
    }
    timeCount = timeCount + 1;
//    Serial.println(timeCount);
    if (timeCount >= 2){
//      Serial.print(inches);
//      Serial.println("in");
      theaterChase(strip.Color(255, 57, 126), 20, 2, 100);  // red
      timeCount = timeCount + 1;
//      Serial.println(timeCount);
//      Serial.println("red");
     }
   }
   else if (inches >4){
      colorWipe(strip.Color(0, 0, 0), 10);  // turn off
      timeCount = 0;
  }
//  Serial.write(timeCount);
// }
}
In Arduino, I uploaded [timeCount] to serial, and included three videos I created. My aim was to let processing read [timeCount] and the video could change when timeCount increases (because the neopixel was controlled by the timeCount function in Arduino). So here is the code I had:
import processing.serial.*;

Serial myPort;
int inches;
int timeCount;

import processing.video.*;
Movie myMovie; //sad
Movie myMovie1; //sending
Movie myMovie2; //happy

void setup()
{
  size(1440, 990);
  background(0);
  fullScreen();
  String portName = Serial.list()[2];
  myPort = new Serial (this, portName, 9600);
  myMovie = new Movie(this, "sad.mp4");
  myMovie.play();
  myMovie1 = new Movie(this, "sending.mp4");
  myMovie.play();
  myMovie2 = new Movie(this, "happy.mp4");
  myMovie.play();
}

void draw()
{
  if (myPort.available() >0) {
    inches = myPort.read();
    timeCount = myPort.read();
  }
  if (inches> 5) {
    myMovie.loop();//loop the sad video
    if (myMovie.available()) {
      myMovie.read();
    }
    image(myMovie, width/2, height/2);//place it at center of the canvas
    imageMode(CENTER);
    timeCount =0;
  }
  if (inches<=3 && timeCount< 300) {
    myMovie1.loop();//loop the sending video
    if (myMovie1.available()) {
      myMovie1.read();
    }
    image(myMovie1, width/2, height/2);//place it at center of the canvas
    imageMode(CENTER);
    timeCount = timeCount +1;
    println(timeCount);
  }

    if (timeCount ==300) {
      println(timeCount);
      myMovie2.loop();//loop the video
      if (myMovie2.available()) {
        myMovie2.read();
      }
      image(myMovie2, width/2, height/2);//place it at center of the canvas
      imageMode(CENTER);
    }

  //if (inches> 4 && timeCount< 300) {
  //  myMovie.loop();//loop the sad video
  //  if (myMovie.available()) {
  //    myMovie.read();
  //  }
  //  image(myMovie, width/2, height/2);//place it at center of the canvas
  //  imageMode(CENTER);
  //}
}
Circuit:
Frame-by-Frame Animations:
Sad (Default): sad
Sending (During interaction): sending
Happy (When neopixel light is red): happy
Step 2.5: User Testing Presentation:
During User testing, I had my station set up like below:
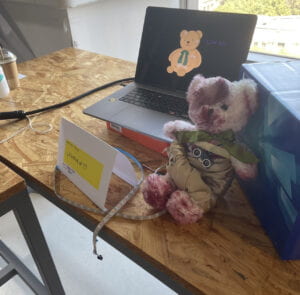
Here is a video of how the user testing day interaction overview: User testing effect video
Step 3: Revising
After user testing, I abolished most of my interaction methods according to feedbacks received. First, I decided to change my interaction method and animation display entirely, which means that I need to re-write most of my codes.
This project aims to let the user feel some sort of empathy and display the action of “caring” through interaction. First of all, the exposure of an ultrasound sensor is significantly disconnected from the primary method of the project. Therefore, I decided to accept the suggestion to create an environment. In this case, I chose weather specifically.
Then, I modified my animation from 3 videos to 2. I also decided to include audio to make the experience more immersive.
Rain (Default): https://bpb-us-e1.wpmucdn.com/wp.nyu.edu/dist/1/22283/files/2021/12/xiayula.mp4
Fireworks (When neopixel lights up): https://bpb-us-e1.wpmucdn.com/wp.nyu.edu/dist/1/22283/files/2021/12/xiaoyanhua.mp4
Next, I made a new document and researched i2C sensors (the reason I didn’t use a regular touch sensor is that I purchased the wrong one, and the only touch sensor ER has is the i2C sensors). And started writing the code for touch regulations:
- Touch 5 times (any one of 4) within a period of time, the strip lights up.
- Touch less than 5 times and leave for 15 seconds. The counting restarts.
- Neopixel effect: whiteness is stable, RGB colors random every time.
- Serial send to Processing: timeCount
Here is the code:
//IMA Interaction Lab Final
//Be my light by Sherry Wu
//I commented all serial print and println except the one that I'm sending to arduino

#include <Adafruit_NeoPixel.h>
#include <Wire.h>
#include "Adafruit_MPR121.h"

#ifndef _BV
#define _BV(bit) (1 << (bit))
#endif

#define PIN    7// On Trinket or Gemma, suggest changing this to 1

#define NUMPIXELS 60 // How many lights on the neopixel

#define touch_delay 10          //The light will only beturned on if you touch the sensor four times within a given time
#define light_delay 10           //How long the time will be on

Adafruit_NeoPixel strip(NUMPIXELS, PIN, NEO_GRB + NEO_KHZ800);


int timeCount = 0;
boolean touch_flag = false;
boolean light_flag = false;
double touch_start_time =0;
double lightsup_time =0;

/*************************************
*******about I2C Touch Sensor*********
**************************************
Arduino UNO           I2C Touch Sensor
3.3                   VCC
GND                   GND
A4                    SDA
A5                    SCL
*************************************/
//theI2C touch snesor is what I am using, so I googled what does SDA and SCL mean since I've never used this kind of sensors before

//I used Adadruit neopixel library for this progect
Adafruit_MPR121 cap = Adafruit_MPR121();
uint16_t lasttouched = 0;
uint16_t currtouched = 0;


void setup() {
    Serial.begin(9600);

    strip.begin(); // INITIALIZE NeoPixel strip object (REQUIRED)
    strip.show();

    if (!cap.begin(0x5A)) {
//        Serial.println("MPR121 not found, check wiring?");//check if it work
        while (1);
    }
//    Serial.println("MPR121 found!");
    touch_flag = false;
    light_flag = false;
    touch_start_time =0;
    lightsup_time =0;

}

void loop() {
    //ini touch sensor
    int sensor1 =digitalRead(timeCount);

    Serial.print(timeCount);
    Serial.print(",");
    Serial.println();

    currtouched = cap.touched();


    //initial code for user testing: ultrasound and neopixel

    //set for ultrasound


//  when shorter than 2 inches, the strip will light up
//  if (inches <= 3)  {
//    colorWipe(strip.Color(255, 116, 200), 40);  // pink
//    colorWipe(strip.Color(105, 93, 255), 40);//blue
//  }
//
//  else if (inches >= 4) {
//    colorWipe(strip.Color(0, 0, 0), 10);  // turn off
//  }
//  delay(0);

    //Every time you touch, the timecount will +1
    if ((timeCount > 0) && (touch_flag == false)){
        touch_flag = true;
    }
    if ((timeCount<5) && (millis()-touch_start_time > touch_delay*1000) && (touch_flag == true)){
        touch_flag = false;
        Serial.println("overtime");//checking serial
        timeCount = 0;
    }
    if ((timeCount == 5) && (light_flag ==false)){
        light_flag = true;
        for(int i=0; i<strip.numPixels(); i++) { //For each pixel in strip...
            strip.setPixelColor(i, strip.Color(random(255),random(255),random(255)));         //Set pixel's color (in RAM)
            delay(0);                              //Pause for a moment
        }
        strip.show();                          //Update strip to match
        lightsup_time = millis();
    }
    //the neopixel will only light up if you touch it more than 4 times
    if (timeCount>=5 && (millis()-lightsup_time > light_delay*1000)){
        strip.clear();
        strip.show();
        delay(10);
        light_flag = false;
//        Serial.println("lightdown");//check serial
        lightsup_time = 0;
        timeCount = 0;
    }

//If you touch the sensors <5 times and you leave, the timeCound will become 0
//If you touch the sensors 5 times within a given time (10 seconds), it will light up the neopixel stripe.
    for (uint8_t i=0; i<8; i++) {
    // it if *is* touched and *wasnt* touched before, alert!
        if ((currtouched & _BV(i)) && !(lasttouched & _BV(i)) ) {
            //Serial.print(i); Serial.println(" touched");
        }
    // if it *was* touched and now *isnt*, alert!
        if (!(currtouched & _BV(i)) && (lasttouched & _BV(i)) ) {
            //Serial.print(i); Serial.println(" released");
            timeCount = timeCount + 1;
            touch_start_time = millis();
//            Serial.print("times:");Serial.println(timeCount);
        }
    }

    // reset our state
    lasttouched = currtouched;


}
I need to include specific audio for a video for the processing part. And the video will play according to serial data received. Due to some problems with serial receive, the video cannot load, so I changed the “video” to gif (from mp4. to gif.). To play gif animation, I had to import a gif animation library which I downloaded from GitHub.
import processing.serial.*;
int NUM_OF_VALUES_FROM_ARDUINO = 2;   /** YOU MUST CHANGE THIS ACCORDING TO YOUR PROJECT **/
int sensorValues[];      /** this array stores values from Arduino **/

String myString = null;
Serial myPort;

//import processing.video.*;
//Movie myMovie; //rain
//Movie myMovie2; //fireworks

import processing.sound.*;
SoundFile sound;//rain
SoundFile fireworks;//fireworks
boolean playSound = true;

//import gif animation library
import gifAnimation.*;
Gif rain;
Gif fire;


void setup() {
  size(1000, 1000);
  //fullScreen();
  background(0);

  String portName = Serial.list()[2];
  myPort = new Serial (this, portName, 9600);

  //define movie and sound
  //myMovie = new Movie(this, "xiayula.mp4");//rain
  //myMovie.play();

  //myMovie2 = new Movie(this, "xiaoyanhua.mp4");//fireworks
  //myMovie2.play();

  rain = new Gif(this, "rain.gif");
  rain.play();
  fire = new Gif(this, "yan.gif");
  fire.play();

  sound = new SoundFile(this, "rain.mp3");
  fireworks = new SoundFile(this, "yan.mp3");

  setupSerial();
}

void draw() {
  getSerialData();
  printArray(sensorValues);

   if (sensorValues[0]>=5) {
    //myMovie2.loop();//loop the fireworks video
    //myMovie2.loop();
    //if (myMovie2.available()) {
    //  myMovie2.read();
    //}
    image(fire, width/2, height/2);//place it at center of the canvas
    imageMode(CENTER);
    if (playSound == false) {
      // play the sound
      sound.stop();
      fireworks.play();
      // and prevent it from playing again by setting the boolean to false
      playSound = true;
    } else {
      playSound =true;
    }
  } else {
  }

  //rain animation
  if (sensorValues[0]< 5) {
    //myMovie.loop();//loop the rain video
    //millis();
    //myMovie.loop();
    //if (myMovie.available()) {
    //  myMovie.read();
    //}
    image(rain, width/2, height/2);//place it at center of the canvas
    imageMode(CENTER);
    if (playSound == true) {
      // play the sound
      sound.play();
      sound.loop();
      // and prevent it from playing again by setting the boolean to false
      playSound = false ;
    } else {
      playSound =false;
    }
  } else {
  }
}

  //fireworks animation


void setupSerial() {
  printArray(Serial.list());
  // WARNING!
  // You will definitely get an error here.
  // Change the PORT_INDEX to 0 and try running it again.
  // And then, check the list of the ports,
  // find the port "/dev/cu.usbmodem----" or "/dev/tty.usbmodem----"
  // and replace PORT_INDEX above with the index number of the port.

  myPort.clear();
  // Throw out the first reading,
  // in case we started reading in the middle of a string from the sender.
  myString = myPort.readStringUntil( 10 );  // 10 = '\n'  Linefeed in ASCII
  myString = null;

  sensorValues = new int[NUM_OF_VALUES_FROM_ARDUINO];
}

void getSerialData() {
  while (myPort.available() > 0) {
    myString = myPort.readStringUntil( 10 ); // 10 = '\n'  Linefeed in ASCII
    if (myString != null) {
      String[] serialInArray = split(trim(myString), ",");
      if (serialInArray.length == NUM_OF_VALUES_FROM_ARDUINO) {
        for (int i=0; i<serialInArray.length; i++) {
          sensorValues[i] = int(serialInArray[i]);
        }
      }
    }
  }
}
Lastly, I need to have a base for the glass dome and a 3D-printed heart to construct the actual work. I quickly made the heart on tinkercad and printed it. Set up the basic aesthetic.
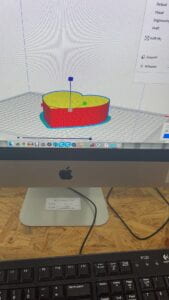
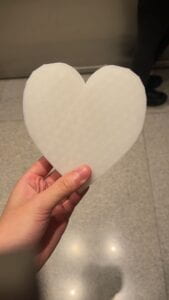
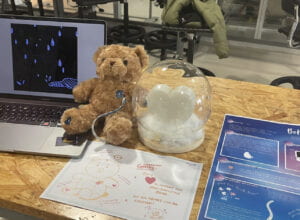
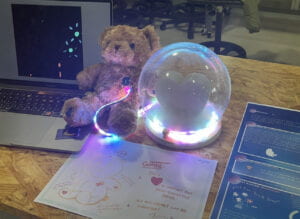
After a long time of testing and building, the final work is done.
Here is a video:
Final Step: In-class Presentation:
December 9, 2021
Notes I prepared for presentation:
|
|
|
|
|
|
|
By concluding the people who presented in the first class, I listed some notes that I would like to tell the audience in advance. I clearly know the weakness of my peers is that the “playness” isn’t high. Most people thought of doing a game for this final project, but I challenged myself by not using any source code. I researched and viewed many interactive installations, and I believed I needed to show a considerable process from beginning to end.
The comments I received from the presentation are out of my expectations. I thought people would be silent and felt no empathy with it. But comments such as “great progression, and big future development can be done,” “a thing that I would actually buy,” and comments on visuals such as “great aesthetic” actually made me feel significant accomplishment.
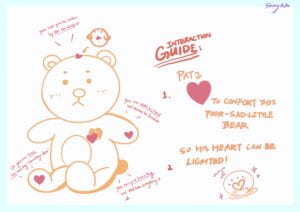
Poster + interaction guide:
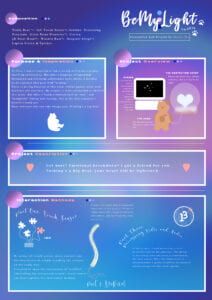
Pictures:
Part III: Conclusion
My expectations and thoughts about what the final work will differ from what actually turned out. I planned to use a touch sensor at first, so there would be some effect when the user touches a specific part of the bear. But due to external reasons, this technique cannot be implemented.
The process of writing an i2C touch sensor took me a long time. Therefore I failed to progress from simply [counting touches].
The most unfortunate aspect of this project is how short the interaction process is. I was definitely not making a game but ignored the time I needed to complete a long and playful interaction.
I definitely think the project aligns with “interaction” by [the user is changing the outlook of the installation]. Users are becoming part of the environment; the bear can only change its emotion with the assistance of the users. In other words, the work cannot reach the level of “help, care, and empathy” without users’ interaction.
I would change the i2C sensors with individual touch sensors for future development. And for each of them, I can write a response from the bear to the user. I will also change the bear to a bigger one (about 1.6-1.8 meters tall) to add immersive-ness to the installation. I will also improve animation quality (or write effect in processing or other software).
Personally, I think this project’s most significant accomplishment is a portrait/display of Processing and Arduino skills taught this semester. And also, I think it has a full personal style within. I put total effort and aesthetic considerations into it, and I hope people can be engaged during the short interaction process.
Thank you very much for all instructors and peers’ support, the project wouldn’t come to an end without any of your’ support.