Final Project: Stayin Alive

Project Title: Stayin Alive | Name: Serena Cajigal | Instructor: Andy Garcia 

Preface

Originally, I started the final project solo. My initial concept was to make an interactive game between two users, utilizing heartbeat sensors. The initial design of the project was going to resemble a heartbeat monitor as a nod to my earliest idea, which was a heartbeat visualizer that could be used in a medical setting. I turned that idea into a game instead because I wanted my project to be more interactive and engaging, rather than just a single input-output art installation.
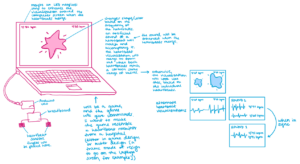
However, I realized that I did not have enough time or means to create this by myself. Therefore, I joined forces with my friend, Cassandra, and merged our project ideas. Her initial idea was to create a launchpad and music visualizer combination, which was similar to my project (the visualizing component). That being the case, we decided to turn our project into a collaborative game, both incorporating my heartbeat sensors and her music, while still keeping the visualization aspect.

Conception and Design

The concept of our combined project was a game based on synchronization of heartbeats; two players would have to work together to match each other’s heart rhythm. If the players managed to match each other’s heart rate at a specific BPM (beats per minute), the song “Stayin’ Alive” would then play and the monitor (that contained both BPMs) would display a visualization that correlated with the song. We chose “Stayin’ Alive” as the song to play because the BPM of “Stayin’ Alive” is the same BPM that one is supposed to use when performing CPR on someone. Our original song was “Sober” by BIGBANG, but that music selection did not make sense for the theme or meaning of our project.

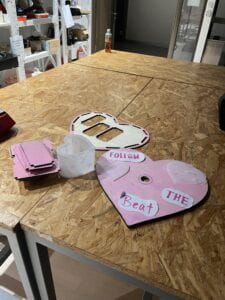
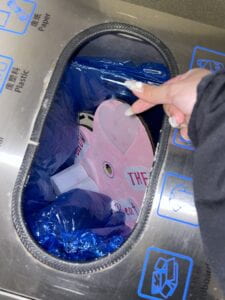
During the User Testing Section, our user testers recommended that we improve the design of our game to make it match the theme or point of the game better. We were also told to make it “cuter.” Therefore, we made a pink, laser-printed, heart-shaped box to keep our wires and circuits. I believe that this change in the design improved the project by a lot. Since our project during the User Testing was still in its early stages, there was no context, so that is why we decided to include directions/visual aids in our design. We also attempted to incorporate these directions into our Processing code for the visuals in the form of text. These directions in Processing would have been very useful, but we could not incorporate text into our code without making everything in the code lag. Therefore, we opted for directions that were pasted directly on the heart box that stated, “Follow the beat.” Although it still confused users who tested it, this did provide more context. 

Fabrication and Production

When constructing our project, we initially put all of our wires and circuits into a tiny, laser-printed box. For the basis of our wiring, we used the example from Last Minute Engineers for the pulse sensors. As mentioned above, the tiny and almost bare design of the box did not complement the purpose or theme of our project, so we created a large, pink heart.
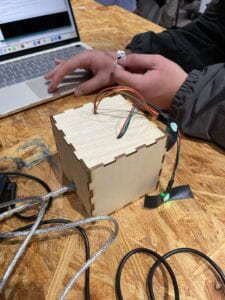
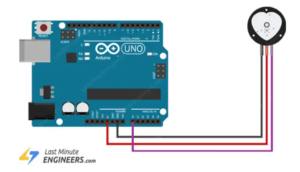
However, throughout the entire process, my partner and I had been having trouble with the Arduino code and getting the heartbeat sensors to work; when we tried to test the sensors, they would either give scarily inaccurate results, or both of the sensors would record the same data despite being separate. Therefore, to separate them, we utilized two Arduino Unos and connected them to separate baud rates on Arduino. This succeeded in separating the heartbeat sensors, but the results produced by the sensors were inconsistent and buggy each time.

After almost a week of trying to debug to no avail, we had no choice but to change the heartbeat sensors into pressure sensors. The pressure sensors were a good alternative because they essentially did the same thing as the heartbeat sensors function-wise, except that the “heartbeats” were to be done manually by the users instead. This turned our project into a rhythm game, which made it easier for the users to win the game.
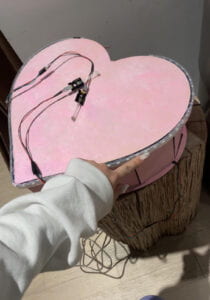
After we achieved this, we decided to laser cut a mini, semi-transparent acrylic heart-shaped box to sit on top of the wooden heart box (similar to a cake) to make the design cuter. To hide the wire connection of the pressure sensors, we covered it with cotton to give the project a softer appearance. We then attached the sensors to acrylic hearts, as they were the leftovers from the laser-cutting of the mini-heart box; I loved it because it reminded me of miniature remote controls.

To enhance the visuals, we stuffed an LED Neopixel inside this miniature box. Before, the LED Neopixels were stuck to the outer rims of the heart box, but we decided to relocate it inside of the miniature heart box because it looked more visually pleasing, and the wires from the Neopixel were not visible, as we had cut a hole inside the area that the mini-heart occupied to connect the LEDs to the Arduino Uno. We also covered the base of the acrylic mini-heart with cotton to match the overall design (and it looked a bit like cake icing), and we added mini LEDs inside of the heart box to blink when the sensors were activated; this made the heart look like it was beating. In hindsight, I believe this was a great move on our part because the cute design compensated for the bugged code.
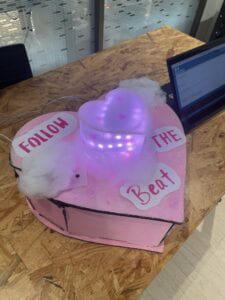
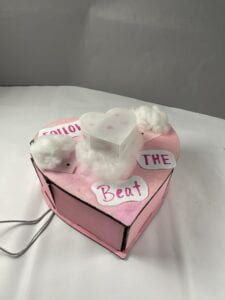
Finally, here is the final working product:

Here is a run-through of the gameplay with commentary:

Conclusion

This project encourages teamwork and collaboration, and it promotes an even deeper message of the tight-knit relationship between life and music. Music keeps us alive and keeps us imaginative, innovative, and upbeat. The goal of the project was to remind others of this fact, as shown through the use of “Stayin’ Alive” (the CPR song) as the song that users had to keep the rhythm of.

The audience responded positively towards this project for the most part; although it was quite difficult for first-time players to win the game when they finally did, the project was met with enthusiasm. However, due to the lack of directions in the final product, it was expected that the audience would be slightly confused. When the audience played the game, it was as if both players were performing CPR on the big heart box, which I believe added to the overall game experience.

I define interaction as a back-and-forth engagement between two or more people or things. It is a dynamic relationship that causes something to happen. Therefore, I believe that my project results did align with my definition of interaction. If I had more time, however, I would fix the code, add more directions, and improve the overall design of the Processing visualization and perhaps the outer design of the heart box as well. Though, I am pretty happy about the result of the project.

When making our project, my partner and I stayed up late in the interaction lab every day for a week leading up to the due date of the final project. This whole experience has taught me that I would never have been able to accomplish the things that my partner and I have accomplished, had I worked on this project alone—the ability to balance and collaborate is an important life skill, and my partner and I have definitely mastered this skill. All of our setbacks due to buggy code, laser cutting problems, and malfunctioned sensors tested our problem-solving and creativity while enhancing our teamwork. Because of all of this, I am proud of how far we have come and how hard we worked. In the end, if I could go back in time, I don’t think I would do things any differently. Shout out to Cassandra Du 🙂 

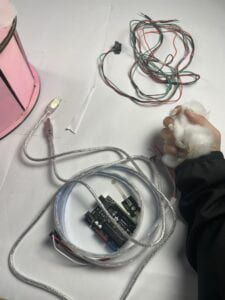
Disassembly
Appendix

Arduino code:

#define USE_ARDUINO_INTERRUPTS true // Set-up low-level interrupts for most acurate BPM math.
#include <PulseSensorPlayground.h> // Includes the PulseSensorPlayground Library.

#include <FastLED.h>
#define NUM_LEDS 60 // How many LEDs in your strip?
#define DATA_PIN 3 // Which pin is connected to the strip’s DIN?

//EXTRA
// #define LED_TYPE WS2812B /* I assume you have WS2812B leds, if not just change it to whatever you have */
// #define BRIGHTNESS 255 /* Control the brightness of your leds */
// #define SATURATION 255 /* Control the saturation of your leds */

CRGB leds[NUM_LEDS];
int next_led = 0; // 0..NUM_LEDS-1
byte next_col = 0; // 0..2
byte next_rgb[3]; // temporary storage for next color

// Variables
const int PulseWire = 0; // PulseSensor PURPLE WIRE connected to ANALOG PIN 0
const int LED = LED_BUILTIN; // The on-board Arduino LED, close to PIN 13.
int Threshold = 550; // Determine which Signal to “count as a beat” and which to ignore.
// Use the “Gettting Started Project” to fine-tune Threshold Value beyond default setting.
// Otherwise leave the default “550” value.

PulseSensorPlayground pulseSensor; // Creates an instance of the PulseSensorPlayground object called “pulseSensor”

void setup() {

Serial.begin(9600); // For Serial Monitor

// Configure the PulseSensor object, by assigning our variables to it.
pulseSensor.analogInput(PulseWire);
pulseSensor.blinkOnPulse(LED); //auto-magically blink Arduino’s LED with heartbeat.
pulseSensor.setThreshold(Threshold);

// Double-check the “pulseSensor” object was created and “began” seeing a signal.
if (pulseSensor.begin()) {
Serial.println(“We created a pulseSensor Object !”); //This prints one time at Arduino power-up, or on Arduino reset.
}

FastLED.addLeds<NEOPIXEL, DATA_PIN>(leds, NUM_LEDS);
FastLED.setBrightness(50); // external 5V needed for full brightness
leds[0] = CRGB::Red;
FastLED.show();
delay(3000);
leds[0] = CRGB::Black;
FastLED.show();
}

void loop() {

if (pulseSensor.sawStartOfBeat()) { // Constantly test to see if “a beat happened”.
int myBPM = pulseSensor.getBeatsPerMinute(); // Calls function on our pulseSensor object that returns BPM as an “int”.
// “myBPM” hold this BPM value now.
//Serial.println(“♥ A HeartBeat Happened ! “); // If test is “true”, print a message “a heartbeat happened”.
//Serial.print(“BPM: “); // Print phrase “BPM: “
Serial.print(myBPM);
Serial.println(); // Print the value inside of myBPM.
}

delay(20); // considered best practice in a simple sketch.

while (Serial.available()) {
char in = Serial.read();
if (in & 0x80) {
// synchronization: now comes the first color of the first LED
next_led = 0;
next_col = 0;
}
if (next_led < NUM_LEDS) {
next_rgb[next_col] = in << 1;
next_col++;
if (next_col == 3) {
leds[next_led] = CRGB(next_rgb[0], next_rgb[1], next_rgb[2]);
next_led++;
next_col = 0;
}
}
if (next_led == NUM_LEDS) {
FastLED.show();
next_led++;
}
}

//EXTRA
// for (int j = 0; j < 255; j++) {
// for (int p = 0; p < NUM_LEDS; p++) {
// leds[p] = CHSV(p – (j * 2), SATURATION, BRIGHTNESS); /* The higher the value 4 the less fade there is and vice versa */
// }
// FastLED.show();
// delay(25); /* Change this to your hearts desire, the lower the value the faster your colors move (and vice versa) */
// }
}

Processing code:

//for the final processing sketch

import processing.serial.*;
import processing.sound.*;

Serial serialPort;
Serial serialPort2;

int NUM_OF_VALUES_FROM_ARDUINO = 1;  /* CHANGE THIS ACCORDING TO YOUR PROJECT */
int NUM_OF_VALUES_FROM_ARDUINO2 = 1;

/* This array stores values from Arduino */
int arduino_values[] = new int[NUM_OF_VALUES_FROM_ARDUINO];
int arduino_values2[] = new int[NUM_OF_VALUES_FROM_ARDUINO2];

int stage = 0;
SoundFile stayingalive;
SoundFile WeDidIt;
SoundFile sixbpm;
Amplitude analysis;

int NUM_LEDS = 60;
color[] leds = new color[NUM_LEDS];


void setup() {

  size(1600, 900);
  frameRate(30);

  //size(500, 500);
  background(0);
  
  //metronome
  sixbpm = new SoundFile(this, "60bpm.mp3");
  sixbpm.play();

  //printArray(Serial.list());
  // put the name of the serial port your Arduino is connected
  // to in the line below - this should be the same as you're
  // using in the "Port" menu in the Arduino IDE
  serialPort = new Serial(this, "COM3", 9600);
  serialPort2 = new Serial(this, "COM8", 19200);
  
  //text
  fill(#EAB4B4);
  textSize(150);
  strokeWeight(2);
  textAlign(CENTER);
  text("REMEMBER THE BEAT!", width/2, height/2);

  stayingalive = new SoundFile(this, "staying alive (chorus).mp3");
  WeDidIt = new SoundFile(this, "We Did It!.mp3");

  println("Loading mp3...");

  delay(5000);
  sixbpm.stop();

  analysis = new Amplitude(this);
  analysis.input(stayingalive);
}


void draw() {
 
  background(0);
  stroke(255);
  fill(255);

  // receive the values from Arduino
  getSerialData();
  getSerialData2();

  // use the values like this:
  int size1 = int(map(arduino_values[0], 0, 150, 0, width/2));
  int size2 = int(map(arduino_values2[0], 0, 150, 0, width/2));
  circle (100, height/2, size1);
  circle (400, height/2, size2);
  background (0);

  if (arduino_values[0]>=55 && arduino_values[0]<=65 && arduino_values2[0]>=55 && arduino_values2[0]<=65) {
    if (stayingalive.isPlaying()== false) {
      stayingalive.play();
    }
  }
  if (arduino_values[0]>=94 && arduino_values[0]<=102 && arduino_values2[0]>=94 && arduino_values2[0]<=102) {
    if (WeDidIt.isPlaying()== false) {
      stayingalive.stop();
      delay(20);
      WeDidIt.play();
      analysis.input(WeDidIt);
    }
  }

  float volume = analysis.analyze();
  float stayingalive = map(volume, 0, 1, 0, 60);
  float WeDidIt = map(volume, 0, 1, 0, 60);
  //println(volume);

  for (int i=0; i < NUM_LEDS; i++) {     // loop through each pixel in the strip
    if (i < volume * NUM_LEDS) {     // based on where we are in the song
      leds[i] = color(#AD1313);
    } else {
      leds[i] = color(#ED7878);
    }

    float diameter = map(volume, 0, 1, 0, width);
    // draw a circle based on the soundfile's amplitude (volume)
    fill(#ED7878);
    noStroke();
    circle(width/2, height/2, diameter);
    //float progress = sound.position() / sound.duration();
    //println(progress);     // find out where we are in the song (0.0-1.0)
  }

  sendColors();     // send the array of colors to Arduino
}


// the helper function below receives the values from Arduino
// in the "arduino_values" array from a connected Arduino
// running the "serial_AtoP_arduino" sketch
// (You won't need to change this code.)

void getSerialData() {
  while (serialPort.available() > 0) {
    String in = serialPort.readStringUntil( 10 );  // 10 = '\n'  Linefeed in ASCII
    if (in != null) {
      print("From A1: " + in);
      String[] serialInArray = split(trim(in), ",");
      if (serialInArray.length == NUM_OF_VALUES_FROM_ARDUINO) {
        for (int i=0; i<serialInArray.length; i++) {
          arduino_values[i] = int(serialInArray[i]);
        }
      }
    }
  }
}


void getSerialData2() {
  while (serialPort2.available() > 0) {
    String in = serialPort2.readStringUntil( 10 );  // 10 = '\n'  Linefeed in ASCII
    if (in != null) {
      print("From A2: " + in);
      String[] serialInArray = split(trim(in), ",");
      if (serialInArray.length == NUM_OF_VALUES_FROM_ARDUINO2) {
        for (int i=0; i<serialInArray.length; i++) {
          arduino_values2[i] = int(serialInArray[i]);
        }
      }
    }
  }
}


void sendColors() {
  byte[] out = new byte[NUM_LEDS*3];
  for (int i=0; i < NUM_LEDS; i++) {
    out[i*3]   = (byte)(floor(red(leds[i])) >> 1);
    if (i == 0) {
      out[0] |= 1 << 7;
    }
    out[i*3+1] = (byte)(floor(green(leds[i])) >> 1);
    out[i*3+2] = (byte)(floor(blue(leds[i])) >> 1);
  }
  serialPort.write(out);
}

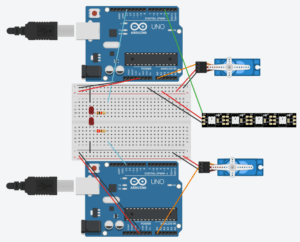
Wiring (pretend the Micro Servos are pressure sensors):
// For the basis of the Arduino to Processing code, we used the Arduino to Processing example given in class

// For the Neopixels, we also used the example code given in class
Midterm Project: Cloud Machine

Name: Serena Cajigal | Instructor: Andy Garcia | Project Title: Cloud Machine 

Context and Significance

A project called “The Ambient Machine” that I previously researched for the Group Research Project helped me in my understanding of what interaction was. The machine was a box that consisted of switches; each switch played a certain background sound when switched. This conversation of switches, sounds, and different combinations is what incited my interest in zooming in on this particular project. The uniqueness of sound that depended completely on the user’s will primarily influenced my definition. Inspired by “The Ambient Machine,” I defined ‘interaction’ as an ongoing conversation that promoted freedom of expression. In the midterm project, my partner and I wanted to incorporate this type of interaction into our Cloud Machine. With the Cloud Machine, the user (or more specifically, the music therapy patient) is able to translate their mood directly into sound. If feeling stressed, all one has to do is squeeze the cloud controller as hard as they desire (like a stress ball). In response, the Cloud Machine creates music according to the intensity of the squeezing. I believe the Cloud Machine has a special value to the music therapy community because it is a fun toy-like instrument that the users can have fun playing with, while also connecting to the music and their emotions.

Conception and Design

To make the interaction accessible and straightforward, we added two conspicuous cloud-like controllers to activate the music machine. Since the machine was dedicated to music and lightening the user’s mood, it was designed like a cloud to keep the mood light. We designed the machine while keeping a light spirit in mind; we wanted our users to feel the same way as the design while interacting with the music-maker since our project’s intended use was as a music therapy instrument. To make the cloud-like appearance, we used cotton covered with iridescent cloth. We used the same cotton and iridescent cloth to make the cloud controllers too. The overall structure of the machine was constructed using cardboard. At first, my partner and I debated keeping the Cloud Machine as just cardboard and decorating it with designs (similar to a real instrument) but later decided against it because we wanted to keep in mind the purpose of our machine (as a mood-lightening therapy instrument). We also debated on whether or not we should show the chimes in the design. In the end, we decided to show the chimes through a little window to engage the user by showing feedback when the user squeezes the cloud controllers.

Fabrication and Production

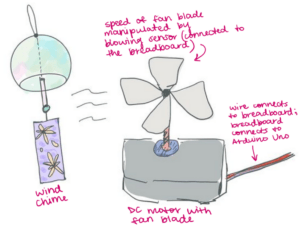
When we first started creating our project, our initial plan was to have a fan (analog) placed in front of the chimes to create sound. The fan would have been manipulated by a potentiometer or a blowing sensor (as shown in the sketch below). Therefore, I utilized code learned during a lecture to control the fan with a potentiometer.

However, when testing the fan on the chimes, we found that the fan was not strong enough to make the chimes make music, even with a higher voltage.

During the User Testing Session, we still had not come up with an alternative to the fan, so we had the users try to create music by directly hitting the moving fan on the chimes. Therefore, a lot of the feedback from the User Testing Session consisted of suggestions for improving the interaction (and functionality) between the user and the machine. Additionally, some users recommended that we improve the design to make the experience with the machine more aesthetically pleasant. Here is my partner and I at the User Testing Session:

After receiving all the feedback, my partner and I decided to add the clouds to the entirety of the design and add a window so that the users could see the chimes. Here is the final design of the machine:

Regarding the functionality of the machine, we decided to use servo motors instead of a fan to create sound. The servos were attached to the top of the individual chime to create music more easily; the intensity of the servos was controlled by an analog steam sensor. When testing the servo motors with our four chimes, we found that two of our chimes did not make a sound as easily as the other two. Therefore, we decided to use those two chimes as decoration and use the other two to make the music. When constructing the actual code for the servos, I used elements of code from a lecture and from a very helpful YouTube video**.

However, we did run into some problems with the code; both of the servo motors would react when one sensor was activated. We later found out that we needed to add a double ‘delay’ function to give the voltage some time to configure itself. After adding two delays into the code, the servo motors worked perfectly. We also could not manage to use the steam sensors as intended. Instead of using steam to control our machine, we found that pressing the sensor gave a greater result (the motors moved more when we touched the sensors directly). Here is the finalized (and working) code!

#include <Servo.h>

//**** servo 1 settings
Servo servo1;
const int servo1SensorPin = A0;
const int servo1Pin = 9;
int servo1Value;
//**** servo 1 settings END

//**** servo 2 settings
Servo servo2;
const int servo2SensorPin = A1;
const int servo2Pin = 10;
int servo2Value;
//**** servo 2 settings END

int servo1map;
int servo2map;

void setup() {
  Serial.begin(9600);
  servo1.attach(9);
  servo2.attach(10);
}

void loop() {
  servo1Value = analogRead(servo1SensorPin);
  delay(10);
   servo1Value = analogRead(servo1SensorPin);
   delay(10);
  servo1map = map(servo1Value, 0, 1023, 0, 180);
  servo1.write(servo1map); 
   Serial.println(servo1Value);

  servo2Value = analogRead(servo2SensorPin);
  delay(10);
    servo2Value = analogRead(servo2SensorPin);
    delay(10);
  servo2map = map(servo2Value, 0, 1023, 0, 180);
  servo2.write(servo2map);
 
  delay(15);
}

Finally, here is a demonstration video of the Cloud Machine in its entirety:

Overall, my partner and I made a great team. My partner is more creatively coded than I am, so she did most of the designing of the machine. Adding the clouds to the design was my partner’s, CJ’s, idea, and I am so grateful that she came up with the plan because it adds so much to the Cloud Machine’s purpose as a therapeutic device. Since she designed the machine, I created the code and constructed the entirety of the circuit for the machine. Throughout the entire building process, we consistently communicated with each other on what we were working on, and how our machine should function based on the design and code. What a great collaboration 🙂 !

Conclusion

The goal of this project was to create an interactive instrument that could be utilized in music therapy. Our project aligns with my definition of interaction due to its nature as a direct response to the user’s emotions and free use of expression when interacting with the Cloud Machine. However, in a way, the project did fail to align with my definition due to its limited mode of interaction. Our project contained a strict input/output (squeeze/sound) interaction, with only one type of sensor to initialize that interaction.

Ultimately, the audience did interact with the project as expected; although faced with a bit of hesitation, the users squeezed the sensors to their heart’s content and created as soft or as loud of a sound as they wanted. If I had more time, I would add different sounds (as there was only one type of sound, which was the chime). I would also add different sensors, or add to the design such as lights when the machine starts to make noise. Overall, I have learned that seeing things from different angles and other perspectives really helps grow a project. If enough work is put in, all one has to do is trust and enjoy the process.

Appendix

More pictures!

/**
* Two servo motors are controlled separately on the same Arduino Uno.
* This was adapted from the tutorial found here:
* https://www.youtube.com/watch?v=5zT9iZRa5b4 
*/

Group Research Project: The Mirror

For the Interaction Lab Group Research Project, my group and I decided to create a magical mirror based off the story “The Ones Who Walk Away from Omelas” by Ursula Le Guin. We titled our performance “The Mirror.”

The Design Process

Before settling on an artifact to create, my group members and I compiled all of our ideas into a single Google Doc. Our selection was based on which design was the most doable (to create) and which design connected best with its respective story that it was based on. In the end, The Mirror was chosen.

Our concept of The Mirror was that it would show the sacrificial boy from “The Ones Who Walk Away from Omelas” when people showed joy to remind them that their happiness came at the cost of the boy’s suffering. The point of the mirror was to promote conversation amongst the citizens of Omelas, so they could reassess their society and figure out if they were doing something wrong. 

Since we could not create a mirror that changed its screen from a reflective side to a see-through side that showed the boy (given our time constraint and lack of knowledge on how to create it), we opted for a mirror that swiveled around when people showed happy emotions instead.

Our initial designs:

Our final design and prototype:

To showcase the mirror’s function, one of my group members created a script for the performance based off of our concept of promoting communication and conversation:

[It starts with the boy being bullied for a little bit]

Boy: “Please, I’ll be good, I promise I’ll be good

Bully: Shut up, filthy. You disgust me, you represent everything that is wretched

[bully walks off stage]

boy, alone: But I’ll be good

Someone at the side where the audience can’t see:‘ hurry up we have to get to the festival’ 

12: ‘Okay okay let’s go’ 

[skipping with a 8 year old across stage until they see the mirror, maybe there’s bells chiming or they’re laughing or something and then they stop when they see the mirror]

8: I’ve never seen this mirror before

12: Do you see that? Inside, in there! It’s a boy

[points]

8: Quick Quick we have to get him out

12: [ name of 8 year old ] we can’t

8: What do you mean we can’t?

12: I’ve seen him before, hasn’t your mom told you about him?

8: No. . . but why can’t we let him out?

[pause]

12: Think about it like this: You’re happy, right?

8: Well, sure of course

12: How do you know?

8: [shrugs]

12: When you see that boy, you know.

8: But he’s just like me, why can’t I be his friend? 🙁

12: [frantic] Hey hey! look! when you frown I can’t see him..

8: Oh.. But every time I smile because of something that makes me happy he comes back

12: I wonder who put this mirror here, I’m not sure I like the way it makes me feel …

Horse: What are you kids doing here? Quickly, go up to the Green Fields for the procession

12: yea, we should do that. Quickly [ name of 8 year old ], c’mon

[ walk off stage]

Horse, talking to himself/horse: Oh what a lovely day it is to be joyous. What a lovely life . . . easy, quiet girl, can’t you see the beauty of the world around you? It’s the first day of summer, and the sun is shining so. What a gift it is to know joy. 

Horse: Come with me, observe the beauty of your mane in the reflection.

[stands in front of the mirror] 

[slowly realizes and gets disgusted]

[kids come back with their parents] 

[parent one steps up, kids and parent two talk in a little circle farther on stage]

Horse: have you seen this mirror, this monstrosity?

Parent 1: The children were just telling us about it, but sir it isn’t so bad is it . . . It’s not as if you didn’t know 

Horse: yes, I knew, but do you think it should just be out like this . . . wouldn’t you rather forget at times?

Parent 1: Well, sure, but we shouldn’t

Horse: Look at me, aren’t I the picture of joy? Exuberance? And my horse, don’t you think thinking about . . . it. . . that, takes away from the festivities?

Parent 1: I think you should be wary of vapid irresponsible happiness, lest you end up like him, unable to be helped. . .

[bully enters again, kicking and spitting on kid in the mirror] [people watch in shock] [bully walks around stage as if to walk out of building and towards town square]

Bully: Shouldn’t you all be out enjoying life?

Horse: look, this mirror, we just saw you through it

Bully: ugh, not that poor wretched thing

Horse: I suppose so . . .

Bully: I think it’s good to go and give it a good kick sometimes, keep things in order

Horse: wouldn’t you rather just forget it exists at all?

Bully: don’t you understand you can’t just forget about it? You need to hurt it. You can’t let it know that it is important or even cared for, that will ruin everything

Parent 2: you’re supposed to take those feelings and put them in your own children, don’t you understand?

Parent 1: This is just the way things are

Bully: This mirror shows you how the world works

Horse: I do understand but I don’t like it, it horrifies me . . . I don’t think I can stay here, are we not just prisoners? 

Parent 2: Maybe we are . . . but you can’t just leave Omelas. Too many young people have just left and never returned. You don’t know where you’re going and it could be dangerous out there

Horse: But how can I stay when I know that this is happening, when this mirror reminds me of reality every time I am happy?

Parent 2: [exasperated] Why can’t you honor this boys sacrifice? 

Horse: Because it is wrong

Parent 2: If that is wrong then all of our joy, the nobility of our architecture, the poignancy of our music, the profundity of our science is also wrong

Horse: I can not agree with you

Parent 2: I can not agree with you either, but please stay

8: please don’t go away

12: please don’t walk away from Omelas

Horse: I’ll stay

Parent 2: I’ve never been able to talk about the boy with anyone before, I try to just forget it like you, but no one here wants to ignore it anymore

12: maybe being able to talk about it is a good thing?

8: I think so too

Horse: maybe this mirror is what the people of Omelas need

Parent 2: There’s a chance it could make more people try to walk away, like you, but there’s also a chance that it makes people talk about the truth more

Bully: [kinda interjecting/interrupting, purposefully sounds awkward/ruins sentimental moment] Sooooo…. Do you guys want me to move this from the middle of town or..?

Parent 1: No, no, I think you should leave it

Horse: Yes, I agree, please leave it right there. 

Since there was a horse and horseman in the script, my group and I decided to create a cardboard horse as a prop. During a cardboard workshop, two of my groupmates created the base of the horse and the horse head, while I created the width of the horse to make it 3D. Afterwards, one groupmate and I used a hot glue gun to piece the horse together.

As for the mirror, everyone pitched in to paint and decorate it.

The Performance!

Successes and Failures of The Mirror

Overall, I believe our artifact did a fantastic job of delivering the message or moral of our performance. The artifact also complemented the original story of “The Ones Who Walk Away from Omelas” very well, and in a one-dimensional sense, the artifact was pretty interactive; for instance, when someone shows a happy or positive emotion, the seemingly normal mirror turns into a see-through glass that showcases the sacrificial boy from the original story. Otherwise, the mirror remains a normal mirror. 

Although I believe our artifact was very well executed, we did have our shortcomings. In my opinion, we failed when it came to providing context when we did our actual performance with the mirror. At the end of the performance, some people inquired about the background information and the context of the mirror; we could have included some explanation in our performance. Also, we did not fully think our artifact through during the design process and failed to make it more interactive than it already was. 

Regarding the topic of interaction, the mirror did not relate to the established form of interaction that I identified in my prior research. My definition was as follows: interaction is an ongoing conversation that promotes freedom of expression without following a certain regimen or structure. As mentioned above, the mirror interacted with a user based on their emotions; if they showed a positive emotion, the mirror showed the sad boy. However, this level of interaction displayed a certain structure and did not have any other function that could make it even more interactive. 

Although the mirror was not as interactive as I hoped, I believe my group’s performance clearly showcased the mirror’s detailed interaction through the mini-skit we performed. However, if I were to change anything, I would try to modify our artifact to better fit my (and my group members’) definition of interaction, in addition to making the artifact itself more interactive with higher functionality. I would also try to take a different approach to the performance and provide more context surrounding the mirror and its origins and/or functions.

Assessment of the Barbie AI

I very much enjoyed the performance and the concept of the Barbie AI. I also think that the design of the Barbie AI artifact was very well done and aesthetic!

As for meeting the criteria, I believe the Barbie AI group did a good job making their artifact interactive. I also liked how their performance presented the artifact; it highlighted the function of the artifact well and in a fun, creative way. When their group first brought the Barbie AI to the stage, I did have a general idea of what it might do, but for the most part, I was very curious about its function. The scenario they used to showcase their artifact was clever (the students are so tired that they do not have time to pick an outfit, so their friend introduces them to her dad’s invention, the Barbie AI), and it demonstrated its interactivity excellently. 

If I were to suggest any improvements to their project, I would suggest adding more functions (just as I suggested to my artifact) to increase its interactivity. Other than that, I believe their group did a great job!

Conclusion

Altogether, this was a very fun project. My group was very considerate of everyone’s opinions and ideas, and I believe that our group dynamics were very good. We were on the same wavelength most of the time, and when we had differing ideas, we compromised and created something great. 

I also believe the work was well-distributed within the group. Everyone’s ideas were incorporated in some way into our artifact and performance. To contribute, I created our shared Google Doc to organize our ideas and remind the group of the rubric. As mentioned above, I also helped create the horse and the actual artifact, and I played the 8-year-old child in our performance. 

My biggest takeaway is that everything is a group effort, and we were only able to pull this project off thanks to our teamwork and communication. Shoutout to Group E 🙂