Just Survive
Satya Tirtha
Rodolfo Cossovich
Just survive is a rogue-like video game that tries to create a new form of multiplayer rogue-like games. Traditionally, players in rogue-like games will cooperate with one another to survive for as long as they can – or until a final boss is killed. However, there is only a few, if not at all, rogue-like games where two players are playing against each other. Just Survive is inspired by a game mechanic that is implemented by the game ‘Left 4 Dead 2’ where the game has an in-game “artificial intelligence” called The Director. The role of The Director is to control the pace of the game, taking into account of different factors such as the player’s death count. Just Survive came to be after several design changes, which will be further explained later.
Process of Making Just Survive
Just Survive’s two payer game mechanic is made possible through the Arduino and Processing. The Arduino provides a more intuitive and straightforward way of playing the game, instead of just using the keyboard and mouse. Although due to time constraints, the other player will still be playing with the keyboard and mouse.
Initial Design
The initial design for Just Survive was a single-player rogue-like game where players must keep surviving by killing the enemies that are coming towards them. To kill bosses, players must complete a series of puzzle-like tasks that will allow players to “travel back into the past or into the future”. Players then will obtain an item that will help them kill the boss and, thus, progress further into the game.
However, due to the lack of time and skills needed to actually make this concept into a reality, I decided to change so that there will be no “traveling back into the past or into the future” but keeping the puzzle-like tasks idea.
During user testing, I found that this is still not be a good solution since the game will be too difficult to be played by a single player – controlling a fast-paced game while keeping track of a slower process to be done. Turning it into a two-player game is still not sufficient since one player will be doing majority of the gameplay while the other waits for something to happen.
After user testing, I decided that the mechanic that is described at the start of the website is how the game will be designed. A player will be using the keyboard and mouse, trying to survive. While the other uses a controller made with the Arduino to control factors such as the speed of the enemies and the size of the enemies. The player with the Arduino controller will also have the ability to “disarm” the other player. A demonstration of the gameplay can be seen here, or through this link:
Project Development
A bulk of the project is coding in Processing which can be found in this GitHub repository. The processing code is based off of a number of design patterns such as the States, Singleton, Flyweight and Mediator pattern. The most important part of the Processing code is reading the inputs from the Arduino and sending it to all the entities present on the screen. This is done by having a class that handles this mechanism, using a for loop that loops through a list of entities and setting the desired values. The code is as such:
class EntityManager {

    private Game game;
    private Player player = null;
    private Cursor cursor = null;

    public EntityManager(Game game) {
        this.game = game;
        this.player = null;
    }

    ...
    public void multEnemySpeed(float mult) {
        for(Entity entity : this.game.getEntities())
            if(entity instanceof Enemy)
                ((Enemy) entity).multSpeed(mult);
    }

    public void scaleEnemies(float mult) {
        for(Enemy enemy : getEnemies())
            enemy.setScaleMultiplier(mult);
    }

    ...
}
And whenever the game updates:
    ...
        if(arduinoPort.available() > 0) {
            String reading = arduinoPort.readStringUntil('\n');

            if(reading != null) {
                String[] converted = reading.split(",");

                if(converted[0].equals("S")) {
                    this.manager.multEnemySpeed(float(converted[1]) / 100.0f);
                    this.currentSpeedMultiplier = float(converted[1]) / 100.0f;
                } else if(converted[0].equals("SI")) {
                    this.manager.scaleEnemies(float(converted[1]) / 100.0f);
                    this.currentScaleMultiplier = float(converted[1]) / 100.0f;
                } else if(converted[0].equals("D")) {
                    this.player.disarm();
                }
            }
        }
    ...
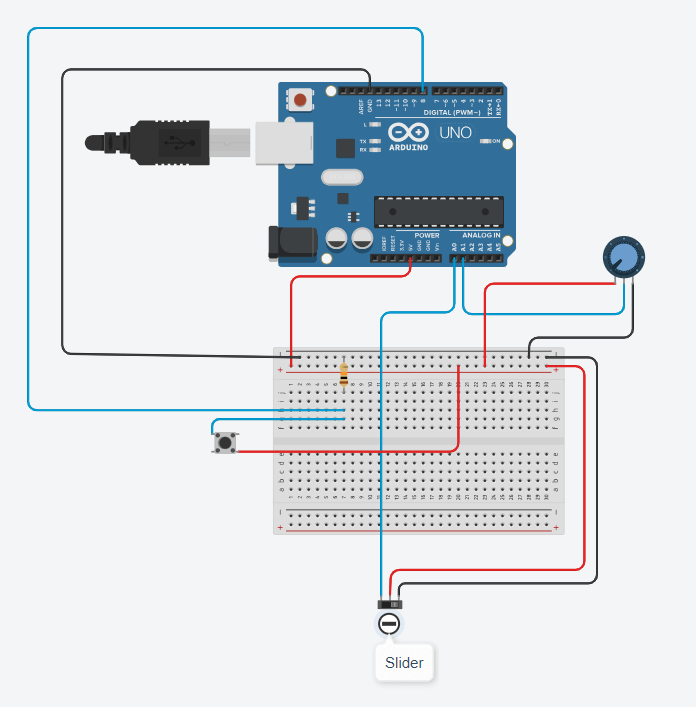
For the Arduino component, the project uses simple hardware:
-
-
- Button
- Disarms the player using the keyboard and mouse
- Slider Potentiometer
- Controls the speed of the game
- Rotating Potentiometer
- Controls the size of the enemies
- Button
-
The following block is the Arduino code:
const int SLIDER = A0;
const int POTENTIO = A1;
const int BUTTON_DISARM = 8;

bool disarmed = false;

long disarmTimer = 0;

int previousSpeedValue = 0;
int previousDisarmValue = 0;
int previousSizeValue = 0;

void setup() {
    Serial.begin(9600);

    pinMode(SLIDER, INPUT);
    pinMode(POTENTIO, INPUT);
    pinMode(BUTTON_DISARM, INPUT);

    Serial.println("Setup done");
}

void loop() {
    int speedValue = constrain(map(analogRead(SLIDER), 0, 1023, 200, 100), 100, 200);
    int disarmValue = digitalRead(BUTTON_DISARM);
    int sizeValue = constrain(map(analogRead(POTENTIO), 0, 1023, 100, 200), 100, 200);

    if(speedValue - previousSpeedValue != 0) {
        Serial.print("S");
        Serial.print(",");
        Serial.print(String(speedValue));
        Serial.println();
    }

    if(sizeValue - previousSizeValue != 0) {
        Serial.print("SI");
        Serial.print(",");
        Serial.print(String(sizeValue));
        Serial.println();
    }

    if(!disarmed && previousDisarmValue == 0 && disarmValue == 1) {
        Serial.print("D");
        Serial.print(",");
        Serial.println();

        disarmed = true;
        disarmTimer = millis();
    }

    if(disarmed) {
        if(millis() - disarmTimer >= 5000) {
            disarmTimer = 0;
            disarmed = false;
        }
    }

    previousDisarmValue = disarmValue;
    previousSpeedValue = speedValue;
    previousSizeValue = sizeValue;

    delay(10);
}
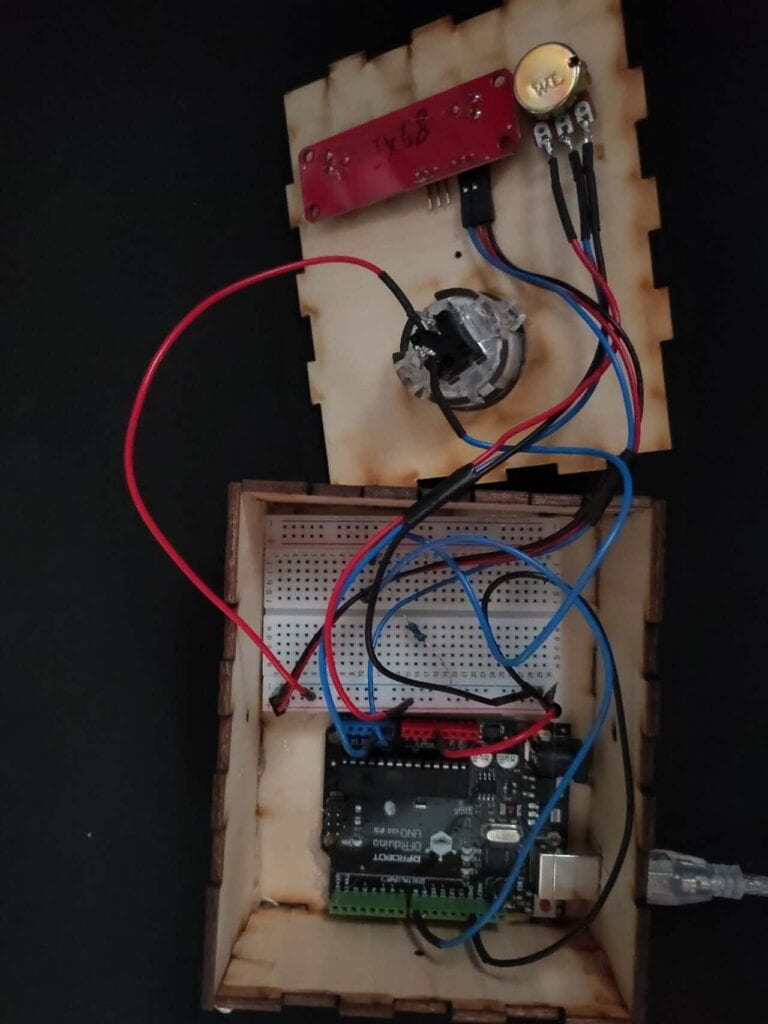
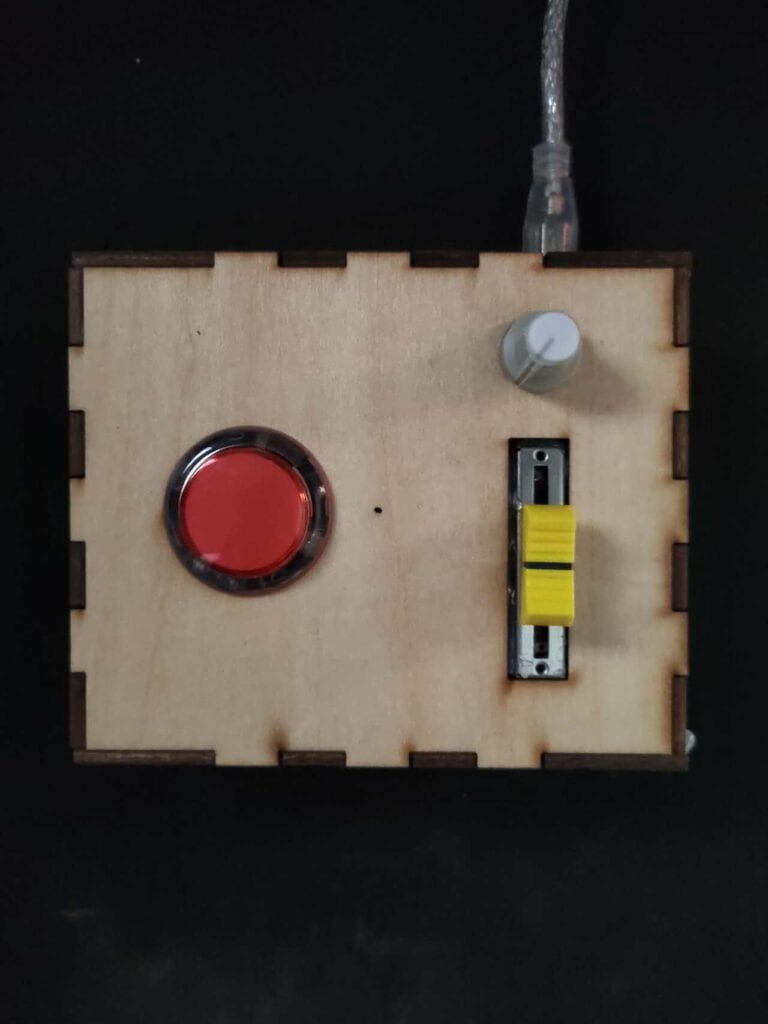
The important part of the Arduino code is where the signals are sent over to Processing only when it detects a change in the inputs instead of constantly sending values over. This makes sure that Processing does not slow down because it is overloaded with data. The Arduino code also has a timer system to prevent the button from being pressed many times in the span of, in this case, 5 seconds. The final circuit diagram and picture of the Arduino component is as follows:


Reflection
Majority of the project is the code in Processing, as such, making sure that the game works was my priority before moving into the Arduino component of the project. Since I was making a video game, it was difficult to find balance between gameplay and complexity – both regarding the mechanics of the game itself and how players are interacting with the video game. I felt like the controls for both players are very simple and there could be more improvements to what the players can or cannot do such as:
-
-
- The player with keyboard and mouse can do more things than shoot and move
- More details such as sound effects
- Replace keyboard and mouse into a different type of controller to give a more “arcade” feel
-
The most important thing that I learned from this project is that, in context of creating video games, everything about the game, both the digital and physical experience, must be thought of and well-balanced.
Citations
Assets used in the project:
Weapon pack by VladPenn. https://vladpenn.itch.io/weapon
Character pack by Penusbmic. https://penusbmic.itch.io/sci-fi-character-pack-12
Disassembly
