Sara Siniecka – Gottfried Haider
CONCEPTION – WHAT IS POT?
The main inspiration for this project was my mom. You know the saying “touch some grass”? I often wanted to tell that to my mom – unironically – whenever I saw her stressing about work. But see, that is the problem. For a person who works 24/7 on the 20th floor of a skyscraper, touching grass might be hard. Sure there might be some plastic or half-dead plants scattered around, but it doesn’t really give you the sensation, does it?
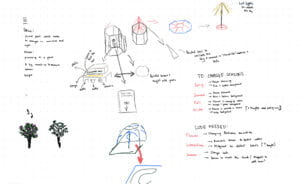
I decided to come up with an alternative for people who spend a lot of time staring at the computer screen. Plant Observer Technology (POT) allows a user to interact with a computer in a similar way they would with a real plant – physically. At first, I decided to watch some animations of plants growing to a) derive some inspiration and b) understand the sensation of seeing plants and communing with nature. Then I went for a walk and started thinking about factors that make touching grass an actual sensation and not just a make believe. There were a few things i noted down:
- Peace and quiet
- Input – output relationship
- Surroundings
FABRICATION AND PRODUCTION – HOW DID I MAKE IT?
Soon after, an idea started forming in my mind. What if I made a plant one could interact with? By using a moisture sensor I could measure the amount of water in the pot and using the magnetic sensor could work as a switch, and by removing a magnet, the switch would turn off. Additionally, the plant will move through seasons, and the neopixels would add to an overall experience.
I started mentally preparing a more developed description of my project: users interact with technology through touch and vision. By following instructions on an animation of a plant, such as adding water or adding a seed, they’re directly influencing the behavior of a plant.
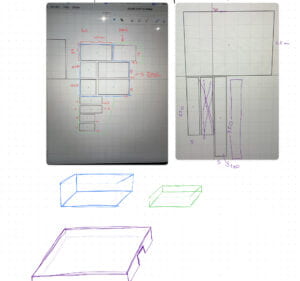
I started drafting my ‘background’ and the animation of a plant. I wanted the plant to be animated to add a sense of amusement so that the users would be more drawn to my project. At first I started off with Blender however I quickly gave up because I had no prior experience with this website and it was hard to get a grasp on all the functions. So the only thing I could do was to work on my animation manually. The funny thing that I noticed, after a few hours in the IMA studio spent on drawing and redrawing the same tree over and over again, was that animations were extremely hard to make and very time consuming. For an animation which lasted just over one minute in total I had to draw over 600 frames. That added up to around 10 hours of drawing, and mind you, my animation wasn’t even half as developed as those you see in movies.
After realizing my newfound respect for animators, I started working on the background. My first idea was to make it seem like the plant was in a glasshouse so I went with that vision until user testing. I have to admit, it looked relatively unpolished because I find it really hard to think in 3D. That’s why drawing ideas of physical things is always a big challenge for me. But after some work with cardboard I finally had my prototype. I made sure to make my project as intuitive as possible by adding clear directions on the animations and showing the place for a seed by signs.
After that, I started drafting up my code. I used an arduino to control the sensors and neopixels, and processing to control the animation. At first I wanted to start slowly, so I took up neopixels. Writing a code for them was really easy, I had to multiply the number of leds in one strip by the amount of strips I used (60 * 5). I decided to check if the code was working, so I just wanted them to shine in a solid color. You can not possibly imagine the happiness I felt when 300 lights all shone in a vibrant green.
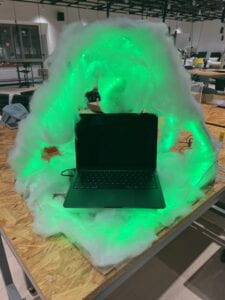
After establishing that my code, in fact worked, it was time to time the LEDs to the animation. I checked how long it approximately takes for each season to last, and then added a few seconds to that as a margin of safety for users to actually add water or a seed. And everything worked… except for the sensors. See, the main problem wasn’t actually the code itself, moreso the video. For some reason instead of showing up horizontally, it was vertical. No matter how I exported it. Because of that I couldn’t exactly work with sensors, and user testing was just around the corner.
USER TESTING – FIRST INTERACTION
Fast forward a few days spent in the studio and it was the time for user testing. My sensors and the video didn’t work, and the only thing that actually seemed to be doing fine were the neopixels. I decided to just demo my project and fix the video and sensors later.
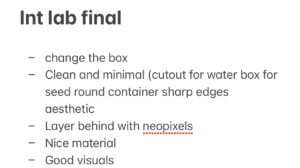
During user testing, I was able to gather some informative feedback. I honestly thought that I would get some criticism, especially since I tend to be self-critical when presenting projects. Surprisingly, I only got two actual suggestions for improvement, the rest was positive feedback. My favorite part of user testing was probably how people enjoyed my project. I could see the glimmer in their eyes and excited ‘Whoa’s. As for improvements, I had to change the presentation and possibly add something more for the experience to be even more immersive.
TUNING – MAKING POT BETTER
After user testing came to an end, I started refining my project right away. By adding some lines of code, the video was finally horizontal and fully in the frame. After that, I had to figure out the sensors. I think the hardest part of writing the code was getting a grasp on what I wanted to do. Since I had a lot of conditions (eg. When the moisture sensor detects water and when the magnet sensor val = 1 then plays video 2) it was relatively challenging to know what was going on in my code. I was suggested to make a simple table which would outline each condition so that code writing would be smoother. Here’s a little snippet of the code:
// ARD_VALS NAMES: v1 = magnet V2 = moisture pin
//ard_vals: v1 v2
//0: Video 1 : 1 –
//1: Video 2 : 1 1
//2: Video 3 : 1 2
//3: Video 4 : 0 –
Another problem I noticed was how I confused the stages. Given that I wanted the user to ‘move’ through seasons, it sort of worked like levels in a game which therefore calls for a ‘state’ function. I had 4 videos in total, but 3 stages since I started from state 0. It was confusing for me so I accidentally added one more state which confused the whole code. After tuning those bugs out, everything worked out.
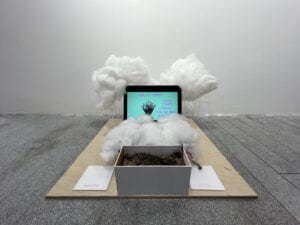
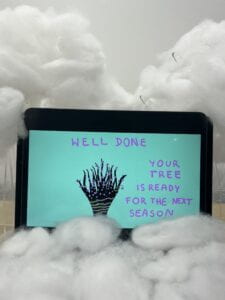
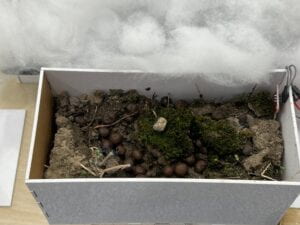
On the side, I started designing my new background. I opted for something clean. I used a 60cm x 60cm wooden board as my base and laser cut 3D tree which I covered in cotton fabric. I also laser cut some boxes for soil and my computer. Lastly I added some plastic platforms for water and seed so that the project would be even more intuitive.
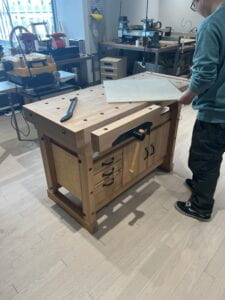
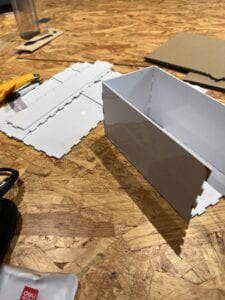
I moved to neopixels. I did not want to add sound but I decided to communicate things through light. The Neopixels would have a color accordingly to the stage a user was in (eg. blue for winter, green for spring) and there would be lights blinking after completion of each task. I combined the codes and tested everything. I was relieved to see that everything worked. Finishing the project made me glad because it felt like I completed my goal which was letting people ‘touch grass’ virtually.
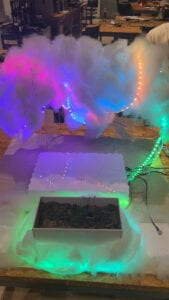
However, then came the final presentation. I woke up stressed because I realized that my reference moisture value was too low. The ref. Moisture value is a variable in my code which describes the moisture value of soil in state 0, and which would change after one adds water, which allowed me to be a bit more flexible in terms of writing code for the moisture sensor since i didn’t have to give exact values. I rushed to the studio to change the code a bit and I decided to run it again. But then I realized that it wasn’t working.
REFLECTIONS – WHAT HAPPENED, AND WHY I’M GLAD IT DID
I was confused, “it worked last night, why isn’t it working now?” I kept muttering to myself. The time was limited so I just had to present my project as it was. The LEDs weren’t exactly the key part so it wasn’t like my project was not working but I still felt a bit discouraged, after all I spent so much time on this project only for it to break. However I got some really important takeaways from this experience, which I started applying to a lot of things.
I should not over-complicate things. I got really scared that my project wouldn’t score highly because it would be too simple, so I wanted to add Neopixels and what not, but during the final presentation I saw a lot of projects which used less materials and which I absolutely loved. So after all; less is more I suppose?
CONCLUSION
All in all, I’m proud of my project. Given that I was working alone, I got to exercise my time management skills as well as coding and manual skills. Since the project was not supposed to be a game, and more so a way for busy people, like my mom, to interact with technology in a different way than they usually do, POT met my expectations. Sure, I wish my neopixels worked, but them not working does not take away from the fact that the rest functioned well. This project taught me many things, such as patience, new code functions, animation (and how time consuming it is), and designing. But most importantly, it taught me that interactions between humans and computers don’t always have to be through a mouse or a keyboard.
APPENDIX:
Project documentation:
https://drive.google.com/file/d/1kJFy_W3p1rOnLQ6PbaTP4tQL6RC0LnKa/view?usp=sharing
Code:
import processing.video.*;

import processing.serial.*;


Movie myvideo1, myvideo2, myvideo3, myvideo4;

Serial serialPort;


int NUM_OF_VALUES_FROM_ARDUINO = 2;


/* This array stores values from Arduino */

int arduino_values[] = new int[NUM_OF_VALUES_FROM_ARDUINO];


int currentState = 0;

// ARD_VALS NAMES: v1 = magnet V2 = moisture pin

//ard_vals:  v1   v2

//0: Video 1 :  1    -

//1: Video 2 :  1    1

//2: Video 3 :  1    2

//3: Video 4 :  0    -


void setup() {

  size(720, 480);


  myvideo1 = new Movie(this, "1C.MOV");

  myvideo2 = new Movie(this, "2.MOV");

  myvideo3 = new Movie(this, "3.MOV");

  myvideo4 = new Movie(this, "4.MOV");


  serialPort = new Serial(this, "/dev/cu.usbmodem101", 9600);

}


int refMoistureValue = 0;

int moistureState;


void draw() {

  getSerialData();

  background(0);


  println("Current state " + currentState);


  if (currentState == 0) {

    // first video

    if (arduino_values[1] >= 600) {

      refMoistureValue = arduino_values[1];

      currentState = 1;

      println("Reference moisture value is " + refMoistureValue + ", going to state 1");

    } else {

      myvideo1.play();

      pushMatrix();

      translate(width/2, height/2);

      rotate(radians(90));

      image(myvideo1, -myvideo1.width/3, -myvideo1.height/3, myvideo1.width/1.5, myvideo1.height/1.5);

      popMatrix();

    }

  } else if (currentState == 1) {

    // second video

    if (arduino_values[1] > refMoistureValue+60 ) {

      // ADD THIS TO () && arduino_values[1] >= 200

      //if (arduino_values[0] <= 0 && moistureState == 1  ) {

      println("Moving to state 2");

      delay(500);

      getSerialData();

      refMoistureValue = arduino_values[1];

      currentState = 2;

    } else {

      myvideo2.play();

      pushMatrix();

      translate(width/2, height/2);

      rotate(radians(90));

      image(myvideo2, -myvideo2.width/3, -myvideo2.height/3, myvideo2.width/1.5, myvideo2.height/1.5);

      popMatrix();

    }

//  } else if (currentState == 2) {

    // second video

 //   if (myvideo2.available()) {

 //     myvideo2.read();

 //   }

 //   pushMatrix();

 //   translate(width/2, height/2);

  //  rotate(radians(90));

 //   image(myvideo2, -myvideo2.width/3, -myvideo2.height/3, myvideo2.width/1.5, myvideo2.height/1.5);

 //   popMatrix();


}  else if (currentState == 2) {

    if (arduino_values[0] == 0 ) {

      println("Moving to state 3");

      currentState = 3;

    } else  {

      myvideo3.play();

      pushMatrix();

      translate(width/2, height/2);

      rotate(radians(90));

      image(myvideo3, -myvideo3.width/3, -myvideo3.height/3, myvideo3.width/1.5, myvideo3.height/1.5);

      popMatrix();

    }

  } else if (currentState == 3) {

    // third video

      myvideo4.play();

    pushMatrix();

    translate(width/2, height/2);

    rotate(radians(90));

    image(myvideo4, -myvideo4.width/3, -myvideo4.height/3, myvideo4.width/1.5, myvideo4.height/1.5);

    popMatrix();


  }

}


void movieEvent(Movie m) {

  m.read();

}


void getSerialData() {

  while (serialPort.available() > 0) {

    String in = serialPort.readStringUntil(10);  // 10 = '\n'  Linefeed in ASCII

    if (in != null) {

      print("From Arduino: " + in);

      String[] serialInArray = split(trim(in), ",");

      if (serialInArray.length == NUM_OF_VALUES_FROM_ARDUINO) {

        for (int i=0; i<serialInArray.length; i++) {

          arduino_values[i] = int(serialInArray[i]);

        }

      }

    }

  }

}
#include <FastLED.h>

#define NUM_LEDS 60  // How many LEDs in your strip?

#define DATA_PIN 3   // Which pin is connected to the strip's DIN?

CRGB leds[NUM_LEDS];

int next_led = 0;

byte next_col = 0;

byte next_rgb[3];

const int moisturePin = A0;

const int magneticSensorPin = 2;

int moistureState;

void setup() {

 Serial.begin(9600);

 pinMode(moisturePin, INPUT);

 pinMode(magneticSensorPin, INPUT);

 FastLED.addLeds<NEOPIXEL, DATA_PIN>(leds, NUM_LEDS);

 FastLED.setBrightness(50);  // external 5V needed for full brightness

 leds[0] = CRGB::Red;

 FastLED.show();

 delay(3000);

 leds[0] = CRGB::Black;

 FastLED.show();

}

void loop() {

 int moistureValue = analogRead(moisturePin);

 int magneticSensorValue = digitalRead(magneticSensorPin);

 while (Serial.available()) {

   char in = Serial.read();

   if (in & 0x80) {

     //  first color of the first LED

     next_led = 0;

     next_col = 0;

   }

   if (next_led < NUM_LEDS) {

     next_rgb[next_col] = in << 1;

     next_col++;

     if (next_col == 3) {

       leds[next_led] = CRGB(next_rgb[0], next_rgb[1], next_rgb[2]);

       next_led++;

       next_col = 0;

     }

   }

   if (next_led == NUM_LEDS) {

     FastLED.show();

     next_led++;

   }

 }

 Serial.print(magneticSensorValue);

 Serial.print(",");

 Serial.print(moistureValue);

 Serial.println();

 delay(50);

}
references used from:
https://arduinogetstarted.com/tutorials/arduino-neopixel-led-strip
https://forum.arduino.cc/t/led-color-changing-according-to-time/1154053
https://forum.arduino.cc/t/changing-an-led-color-at-a-certain-time-time-based-visual-alert/232463