PLANT OBSERVER TECHNOLOGY (POT)


Sara Siniecka – Gottfried Haider 


CONCEPTION – WHAT IS POT? 

The main inspiration for this project was my mom. You know the saying “touch some grass”? I often wanted to tell that to my mom – unironically – whenever I saw her stressing about work. But see, that is the problem. For a person who works 24/7 on the 20th floor of a skyscraper, touching grass might be hard. Sure there might be some plastic or half-dead plants scattered around, but it doesn’t really give you the sensation, does it? 

I decided to come up with an alternative for people who spend a lot of time staring at the computer screen. Plant Observer Technology (POT) allows a user to interact with a computer in a similar way they would with a real plant – physically. At first, I decided to watch some animations of plants growing to a) derive some inspiration and b) understand the sensation of seeing plants and communing with nature. Then I went for a walk and started thinking about factors that make touching grass an actual sensation and not just a make believe. There were a few things i noted down: 

  • Peace and quiet 
  • Input – output relationship 
  • Surroundings 

FABRICATION AND PRODUCTION – HOW DID I MAKE IT? 

Soon after, an idea started forming in my mind. What if I made a plant one could interact with? By using a moisture sensor I could measure the amount of water in the pot and using the magnetic sensor could work as a switch, and by removing a magnet, the switch would turn off. Additionally, the plant will move through seasons, and the neopixels would add to an overall experience. 

I started mentally preparing a more developed description of my project: users interact with technology through touch and vision. By following instructions on an animation of a plant, such as adding water or adding a seed, they’re directly influencing the behavior of a plant. 

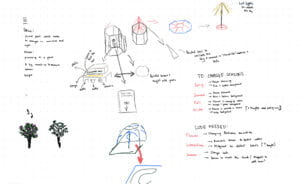
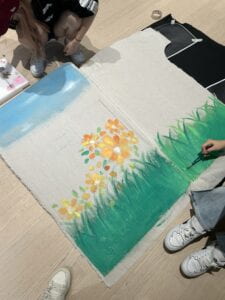
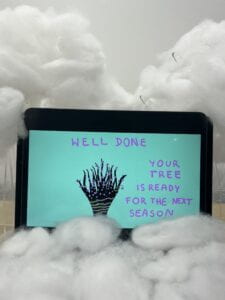
I started drafting my ‘background’ and the animation of a plant. I wanted the plant to be animated to add a sense of amusement so that the users would be more drawn to my project. At first I started off with Blender however I quickly gave up because I had no prior experience with this website and it was hard to get a grasp on all the functions. So the only thing I could do was to work on my animation manually. The funny thing that I noticed, after a few hours in the IMA studio spent on drawing and redrawing the same tree over and over again, was that animations were extremely hard to make and very time consuming. For an animation which lasted just over one minute in total I had to draw over 600 frames. That added up to around 10 hours of drawing, and mind you, my animation wasn’t even half as developed as those you see in movies.


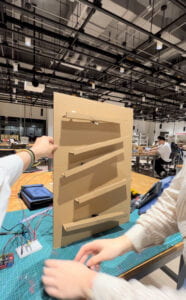
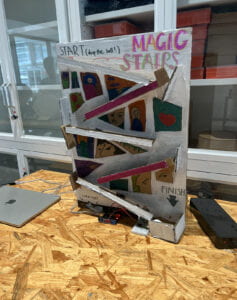
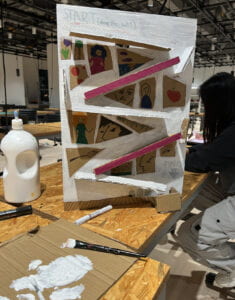
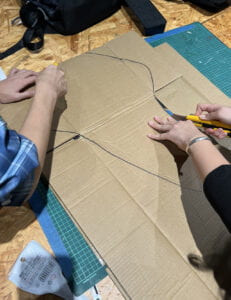
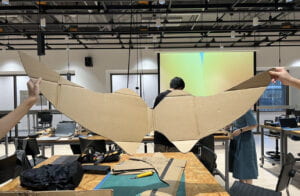
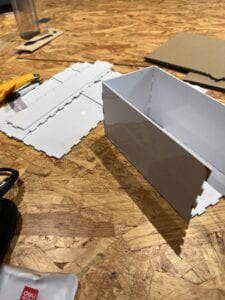
After realizing my newfound respect for animators, I started working on the background. My first idea was to make it seem like the plant was in a glasshouse so I went with that vision until user testing. I have to admit, it looked relatively unpolished because I find it really hard to think in 3D. That’s why drawing ideas of physical things is always a big challenge for me. But after some work with cardboard I finally had my prototype. I made sure to make my project as intuitive as possible by adding clear directions on the animations and showing the place for a seed by signs. 

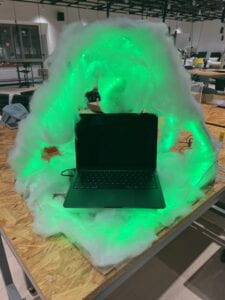
After that, I started drafting up my code. I used an arduino to control the sensors and neopixels, and processing to control the animation. At first I wanted to start slowly, so I took up neopixels. Writing a code for them was really easy, I had to multiply the number of leds in one strip by the amount of strips I used (60 * 5). I decided to check if the code was working, so I just wanted them to shine in a solid color. You can not possibly imagine the happiness I felt when 300 lights all shone in a vibrant green. 


After establishing that my code, in fact worked, it was time to time the LEDs to the animation. I checked how long it approximately takes for each season to last, and then added a few seconds to that as a margin of safety for users to actually add water or a seed. And everything worked… except for the sensors. See, the main problem wasn’t actually the code itself, moreso the video. For some reason instead of showing up horizontally, it was vertical. No matter how I exported it. Because of that I couldn’t exactly work with sensors, and user testing was just around the corner. 

USER TESTING – FIRST INTERACTION

Fast forward a few days spent in the studio and it was the time for user testing. My sensors and the video didn’t work, and the only thing that actually seemed to be doing fine were the neopixels. I decided to just demo my project and fix the video and sensors later. 

During user testing, I was able to gather some informative feedback. I honestly thought that I would get some criticism, especially since I tend to be self-critical when presenting projects. Surprisingly, I only got two actual suggestions for improvement, the rest was positive feedback. My favorite part of user testing was probably how people enjoyed my project. I could see the glimmer in their eyes and excited ‘Whoa’s. As for improvements, I had to change the presentation and possibly add something more for the experience to be even more immersive. 

TUNING – MAKING POT BETTER

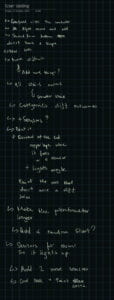
After user testing came to an end, I started refining my project right away. By adding some lines of code, the video was finally horizontal and fully in the frame. After that, I had to figure out the sensors. I think the hardest part of writing the code was getting a grasp on what I wanted to do. Since I had a lot of conditions (eg. When the moisture sensor detects water and when the magnet sensor val = 1 then plays video 2) it was relatively challenging to know what was going on in my code. I was suggested to make a simple table which would outline each condition so that code writing would be smoother. Here’s a little snippet of the code: 

// ARD_VALS NAMES: v1 = magnet V2 = moisture pin

//ard_vals:  v1   v2

//0: Video 1 :  1    –

//1: Video 2 :  1    1

//2: Video 3 :  1    2

//3: Video 4 :  0    –

Another problem I noticed was how I confused the stages. Given that I wanted the user to ‘move’ through seasons, it sort of worked like levels in a game which therefore calls for a ‘state’ function. I had 4 videos in total, but 3 stages since I started from state 0. It was confusing for me so I accidentally added one more state which confused the whole code. After tuning those bugs out, everything worked out. 

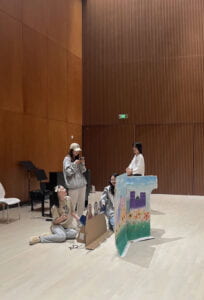
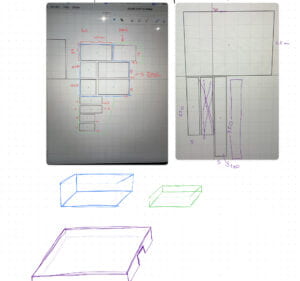
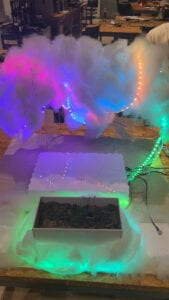
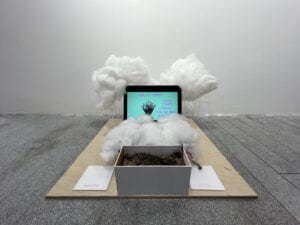
On the side, I started designing my new background. I opted for something clean. I used a 60cm x 60cm wooden board as my base and laser cut 3D tree which I covered in cotton fabric. I also laser cut some boxes for soil and my computer. Lastly I added some plastic platforms for water and seed so that the project would be even more intuitive. 

I moved to neopixels. I did not want to add sound but I decided to communicate things through light. The Neopixels would have a color accordingly to the stage a user was in (eg. blue for winter, green for spring) and there would be lights blinking after completion of each task. I combined the codes and tested everything. I was relieved to see that everything worked. Finishing the project made me glad because it felt like I completed my goal which was letting people ‘touch grass’ virtually. 

However, then came the final presentation. I woke up stressed because I realized that my reference moisture value was too low. The ref. Moisture value is a variable in my code which describes the moisture value of soil in state 0, and which would change after one adds water, which allowed me to be a bit more flexible in terms of writing code for the moisture sensor since i didn’t have to give exact values. I rushed to the studio to change the code a bit and I decided to run it again. But then I realized that it wasn’t working. 

REFLECTIONS – WHAT HAPPENED, AND WHY I’M GLAD IT DID

I was confused, “it worked last night, why isn’t it working now?” I kept muttering to myself. The time was limited so I just had to present my project as it was. The LEDs weren’t exactly the key part so it wasn’t like my project was not working but I still felt a bit discouraged, after all I spent so much time on this project only for it to break. However I got some really important takeaways from this experience, which I started applying to a lot of things. 

I should not over-complicate things. I got really scared that my project wouldn’t score highly because it would be too simple, so I wanted to add Neopixels and what not, but during the final presentation I saw a lot of projects which used less materials and which I absolutely loved. So after all; less is more I suppose? 


CONCLUSION 

All in all, I’m proud of my project. Given that I was working alone, I got to exercise my time management skills as well as coding and manual skills. Since the project was not supposed to be a game, and more so a way for busy people, like my mom, to interact with technology in a different way than they usually do, POT met my expectations. Sure, I wish my neopixels worked, but them not working does not take away from the fact that the rest functioned well. This project taught me many things, such as patience, new code functions, animation (and how time consuming it is), and designing. But most importantly, it taught me that interactions between humans and computers don’t always have to be through a mouse or a keyboard. 


APPENDIX: 

Project documentation: 

https://drive.google.com/file/d/1kJFy_W3p1rOnLQ6PbaTP4tQL6RC0LnKa/view?usp=sharing 

Code: 

import processing.video.*;

import processing.serial.*;


Movie myvideo1, myvideo2, myvideo3, myvideo4;

Serial serialPort;


int NUM_OF_VALUES_FROM_ARDUINO = 2;


/* This array stores values from Arduino */

int arduino_values[] = new int[NUM_OF_VALUES_FROM_ARDUINO];


int currentState = 0;

// ARD_VALS NAMES: v1 = magnet V2 = moisture pin

//ard_vals:  v1   v2

//0: Video 1 :  1    -

//1: Video 2 :  1    1

//2: Video 3 :  1    2

//3: Video 4 :  0    -


void setup() {

  size(720, 480);


  myvideo1 = new Movie(this, "1C.MOV");

  myvideo2 = new Movie(this, "2.MOV");

  myvideo3 = new Movie(this, "3.MOV");

  myvideo4 = new Movie(this, "4.MOV");


  serialPort = new Serial(this, "/dev/cu.usbmodem101", 9600);

}


int refMoistureValue = 0;

int moistureState;


void draw() {

  getSerialData();

  background(0);


  println("Current state " + currentState);


  if (currentState == 0) {

    // first video

    if (arduino_values[1] >= 600) {

      refMoistureValue = arduino_values[1];

      currentState = 1;

      println("Reference moisture value is " + refMoistureValue + ", going to state 1");

    } else {

      myvideo1.play();

      pushMatrix();

      translate(width/2, height/2);

      rotate(radians(90));

      image(myvideo1, -myvideo1.width/3, -myvideo1.height/3, myvideo1.width/1.5, myvideo1.height/1.5);

      popMatrix();

    }

  } else if (currentState == 1) {

    // second video

    if (arduino_values[1] > refMoistureValue+60 ) {

      // ADD THIS TO () && arduino_values[1] >= 200

      //if (arduino_values[0] <= 0 && moistureState == 1  ) {

      println("Moving to state 2");

      delay(500);

      getSerialData();

      refMoistureValue = arduino_values[1];

      currentState = 2;

    } else {

      myvideo2.play();

      pushMatrix();

      translate(width/2, height/2);

      rotate(radians(90));

      image(myvideo2, -myvideo2.width/3, -myvideo2.height/3, myvideo2.width/1.5, myvideo2.height/1.5);

      popMatrix();

    }

//  } else if (currentState == 2) {

    // second video

 //   if (myvideo2.available()) {

 //     myvideo2.read();

 //   }

 //   pushMatrix();

 //   translate(width/2, height/2);

  //  rotate(radians(90));

 //   image(myvideo2, -myvideo2.width/3, -myvideo2.height/3, myvideo2.width/1.5, myvideo2.height/1.5);

 //   popMatrix();


}  else if (currentState == 2) {

    if (arduino_values[0] == 0 ) {

      println("Moving to state 3");

      currentState = 3;

    } else  {

      myvideo3.play();

      pushMatrix();

      translate(width/2, height/2);

      rotate(radians(90));

      image(myvideo3, -myvideo3.width/3, -myvideo3.height/3, myvideo3.width/1.5, myvideo3.height/1.5);

      popMatrix();

    }

  } else if (currentState == 3) {

    // third video

      myvideo4.play();

    pushMatrix();

    translate(width/2, height/2);

    rotate(radians(90));

    image(myvideo4, -myvideo4.width/3, -myvideo4.height/3, myvideo4.width/1.5, myvideo4.height/1.5);

    popMatrix();


  } 

}


void movieEvent(Movie m) {

  m.read();

}


void getSerialData() {

  while (serialPort.available() > 0) {

    String in = serialPort.readStringUntil(10);  // 10 = '\n'  Linefeed in ASCII

    if (in != null) {

      print("From Arduino: " + in);

      String[] serialInArray = split(trim(in), ",");

      if (serialInArray.length == NUM_OF_VALUES_FROM_ARDUINO) {

        for (int i=0; i<serialInArray.length; i++) {

          arduino_values[i] = int(serialInArray[i]);

        }

      }

    }

  }

}


#include <FastLED.h>

#define NUM_LEDS 60  // How many LEDs in your strip?

#define DATA_PIN 3   // Which pin is connected to the strip's DIN?

CRGB leds[NUM_LEDS];

int next_led = 0;    

byte next_col = 0;   

byte next_rgb[3];    

const int moisturePin = A0;

const int magneticSensorPin = 2;

int moistureState;

void setup() {

 Serial.begin(9600);

 pinMode(moisturePin, INPUT);

 pinMode(magneticSensorPin, INPUT);

 FastLED.addLeds<NEOPIXEL, DATA_PIN>(leds, NUM_LEDS);

 FastLED.setBrightness(50);  // external 5V needed for full brightness

 leds[0] = CRGB::Red;

 FastLED.show();

 delay(3000);

 leds[0] = CRGB::Black;

 FastLED.show();

}

void loop() {

 int moistureValue = analogRead(moisturePin);

 int magneticSensorValue = digitalRead(magneticSensorPin);

 while (Serial.available()) {

   char in = Serial.read();

   if (in & 0x80) {

     //  first color of the first LED

     next_led = 0;

     next_col = 0;

   }

   if (next_led < NUM_LEDS) {

     next_rgb[next_col] = in << 1;

     next_col++;

     if (next_col == 3) {

       leds[next_led] = CRGB(next_rgb[0], next_rgb[1], next_rgb[2]);

       next_led++;

       next_col = 0;

     }

   }

   if (next_led == NUM_LEDS) {

     FastLED.show();

     next_led++;

   }

 }

 Serial.print(magneticSensorValue);

 Serial.print(",");

 Serial.print(moistureValue);

 Serial.println();

 delay(50);

}

references used from:

https://arduinogetstarted.com/tutorials/arduino-neopixel-led-strip

https://forum.arduino.cc/t/led-color-changing-according-to-time/1154053

https://forum.arduino.cc/t/changing-an-led-color-at-a-certain-time-time-based-visual-alert/232463


MAGIC STAIRS

   Sara Siniecka             •         Gottfried Haider 

INTRODUCTION 

How it started

About a month or so ago we finished the Group Research Project, which tested our ability to prototype and design. While I was working on my project, I got to reflect on the class contents as well as my own interpretations of interaction and technology. Parenthetically our work represented a debate about the dangers of technology. Somehow, I remember thinking about what exactly do I even consider as useful and safe, in terms of technology that is. The topic of computer and arcade games came into my mind at that time. What are the dangers and benefits of games? 

Inspiration and Interaction, where’s the common ground? 

I started casually researching the interactive aspect of games of skill, such as simple arcade games or shooting PC games. In the back of my head I still had my definition of interaction – technology that is responding, not passive. And see, on one hand computer games could be considered to fall under that umbrella, but I would say that arcade games have their own magic of interaction and immersiveness. Mostly because I believe that there is a distinct difference between solely clicking your keyboard or a mouse and playing with big, lit up buttons, handles, and joysticks.  That is exactly what prompted the idea for the midterm. 

Uniqueness hides in nostalgia

After talking a bit with my partner, we decided to utilize an idea of magic stairs seen in Harry Potter movies, while incorporating it in an arcade-style game. It would be a crossover between modern pinball machines and a 1975 ball game.  Honestly, at first I thought that it’s such a simple and boring idea but then I talked with my friends and family, and it turns out that mixing up modernity with nostalgic skill-games created a unique experience. Thanks to that, I believe that my game has a distinctive charm.  For this exact reason, I think that the project doesn’t have a target audience, it’s for people who want to have fun – even if it’s for a few minutes. 

PROCESS 

Intuition is the best guide for design

Anyone who has ever tried to design anything has probably heard of interaction design before. I’m jealous of those people, this somewhat furtive knowledge proved to be extremely useful in daily life. After taking notes in class, I got a better idea about how people work, and therefore, a draft of how I wanted the design to look started slowly coming to light. During the lecture me and my partner exchanged a few glances, which were supposed to mean something along the lines of: Are you hearing this? We have to make our project as easy to understand as possible. This simplicity was extremely important for us since our project was a game, something which nature is generally easy to understand

Hands on!

We wanted our game to be interactive obviously. I really wanted the user to touch and to feel. I wanted the technology to actively respond. Because of that our somewhat informal discussion about the exact movements of stairs resolved itself, and we decided to use servo motors along with a potentiometer. Therefore users actually interact with technology, they can touch, feel, and see. We also wanted the game to be simple. We wanted people to react quickly and not think too much. Because of that, there were a few things I noted down: clear Start and Finish lines, easy to understand control mechanism, short instructions. And even with all of this knowledge, I did not quite oversee one important thing; the game might not be as self explanatory as I thought it was. I would find that out a week later during user testing.  

Materials

We decided on materials relatively easily. The servos and the potentiometer were a no-brainer, but we still had to design the interface in a way that’s logical and relatively clean. We opted for long cables and a singular breadboard since that would make it easier to hide everything behind the game. We were debating over using a sensor to make the game even more interactive, yet before the user testing nothing was added. 

Our game was made out of a thick piece of cardboard as it was stable enough and aesthetically pleasing. As for components such as the ‘stairs’ we opted for a thinner piece of cardboard since it was easier to cut. Now that I think about it though, we could have used the thick cardboard for smaller pieces as well, as it proved to be more stable, which was much needed for moving parts. Nevertheless, thin cardboard was way easier to handle, therefore a more attractive option nonetheless. 

How does it work?

Let’s move on to the game mechanics! I have explained it so many times already, mostly to myself to make sure that I’m understanding what I’m doing, that I have an informal speech created. The game’s goal is to let the ball fall into the finish basket by controlling the ‘magic stairs’, so the moving tracks. The user has to drop the ball at the top of the game, and by twisting the potentiometer left and right, they’re supposed to form a path for the ball to fall into the basket. By utilizing the map function, we sort of synced the moves of servos and the potentiometer together, resulting in an interactive interface completely controlled by the user’s hands. 

Homemade… kind of. 

The process of building our project was stressful and… should I say long? We built everything in one day, from cutting out the parts, to gluing everything together, to sticking the servos and cleaning out the breadboard. Generally, since we wanted the game to be simple to understand, the design was simple as well. We had to calculate the distances between the tracks and anticipate the range of the moving pisces. We also had to figure out the angle at which the servos would be taped, because we didn’t want them to end up in identical positions while twisting the potentiometer. As for materials we used glue guns and paper tape. Everything was built in the IMA studio, which felt just like home after six hours of undisrupted and somewhat chaotic work. 

My contributions 

I was responsible for cutting out the parts, as well as gluing them. After the group research project I got comfortable with glue guns and the knife, so the task was relatively easy. I also sourced the code and tweaked it a bit so that it fit our unique project better, eg. I changed the pin numbers. I honestly don’t feel comfortable with coding but I don’t think I will ever admit it out loud so being responsible for code gave me an opportunity to manipulate reality (*cough* gaslight *cough*) into thinking that I can actually do it. But hey, it worked! The code ended up functioning nicely. 

Strength in numbers! Collaboration and challenges

Me and my roommate worked well together, and while she was taping servos to the back, I was gluing the stairs and so on. We mostly worked together on the issue that emerged. The problem that we faced was connected to merging three codes into one. As three servos had to be connected to only one potentiometer, three identical codes had to be merged into one which, surprisingly enough, was hard. I wasn’t sure if I should just copy everything three times and pray that Ardulino understands what I mean or if there’s a formula. After visiting office hours, it turned out that we simply had to delete some parts, mostly defining lines or starting lines. After that, everything worked. 

Smooth like butter – our successes

I would, not so modestly, say that our project in general can be considered a success. From writing code, to circuit construction, to the assembly of physical components. Everything went smoothly and we finished relatively quickly. Normally I would say that mistakes are the best teacher, but various successes along the way proved to me that I’m, in fact, doing quite well in this course. It boosted my confidence.

USER TESTING 

Test drive

The user testing was a great opportunity for feedback which saved our project in many ways. We tried to not explain anything so that people playing could give genuine opinions, for which we asked them to say out loud. There were a lot of great comments and suggestions that we were able to utilize. During the testing, I was noting down everything the testers said in an attempt to sort out what works and what doesn’t. Remember when I wrote that the design was not as intuitive as I thought it would be? The students, LAs, and professors were kind enough to point out that our game lacks this intuitive guidance. “You get the ball, but what do you do with it?” “How do I control the stairs?” “How do you even play?” were a few comments that made me realize that we had to change the design to make our game better – more understandable. 

Changes, Changes!

There were many things we changed in our project. Firstly, we made sure to use a lot of colors. While the background was plain white, I painted some drawings so that it remotely looked like the Harry Potter stairs. Moreover, we decided to paint the stairs that don’t move differently from the ones that move, that allowed the users to differentiate. We added big START and FINISH signs along with some short and easy to understand instructions so that the user knows what to do. We also added a hole through which we put a potentiometer, in order to hide the breadboard as well as make the role of the potentiometer more intuitive for the users. As for the more challenging parts, we added a distance sensor and a buzzer. That was made in order to enhance the interactivity of the game, to let the user hear their victory. We did encounter a big issue which we couldn’t quite tackle. To this day, I do not know the reason why the buzzer only makes a very quiet sound once you get the ball to the basket. 

CONCLUSIONS

Our goal

The game was supposed to be fun and interactive. We wanted the users to ultimately take a break from their life and just play, go back to the times they were kids and would watch Harry potter or play arcade games. I believe that the goal was ultimately accomplished, as we received many comments saying that the game was really fun and engaging. As I mentioned before, in my opinion interactive technology is one that is not passive. It has to act, respond, and our game did exactly that. The stairs moved, responded. The buzzer, quietly but still, made a sound. The game talked, acted. 

Feedback, users’ and mine

We received many good pointers during the user testing which we addressed when making improvements. During the final presentations we were also asked about future innovations for the projects if we had time. Well, I would definitely try to resolve the buzzer issue, and maybe make the last track a bit wider so that the ball has no problems getting through. I would also maybe change the way users would control the stairs, making it more Harry Potter themed, by perhaps utilizing other interesting forms of servo motor control. overall, I’m happy with how the project turned out and I’m happy how I performed. 


APPENDIX

INTRODUCTION

a) inspiration for the game: 

  1.  https://images.app.goo.gl/o768ryboeeoXevw59 
  2. https://harrypotter.fandom.com/wiki/Grand_Staircase 
  3. https://buildyourownkits.com/product/pinball-machine/

PROCESS

b) Materials: 

  1. M/M cables (16) 
  2. buzzer (1)
  3. distance sensor (1)
  4. servo motors (3) 
  5. cardboard (2) 
  6. glue sticks 
  7. glue gun 
  8. paper tape 
  9. paint 
  10. markers 

c) code: 

// defines pins numbers
const int trigPin = 9;
const int echoPin = 10;
const int buzzer = 11;
const int ledPin = 13;
// defines variables
long duration;
int distance;
int safetyDistance;
long startBuzzer = -1;
void setup() {
pinMode(trigPin, OUTPUT); // Sets the trigPin as an Output
pinMode(echoPin, INPUT); // Sets the echoPin as an Input
pinMode(buzzer, OUTPUT);
pinMode(ledPin, OUTPUT);
Serial.begin(9600); // Starts the serial communication
}
void loop() {
// Clears the trigPin
digitalWrite(trigPin, LOW);
delayMicroseconds(2);
// Sets the trigPin on HIGH state for 10 micro seconds
digitalWrite(trigPin, HIGH);
delayMicroseconds(10);
digitalWrite(trigPin, LOW);
// Reads the echoPin, returns the sound wave travel time in microseconds
duration = pulseIn(echoPin, HIGH);
// Calculating the distance
distance= duration*0.034/2;
safetyDistance = distance;
if (safetyDistance <= 5){
tone(11, 440);
startBuzzer = millis();
digitalWrite(ledPin, HIGH);
}
else{
digitalWrite(ledPin, LOW);
}
if (startBuzzer != -1 && millis()-startBuzzer > 1000) {
noTone(11);
startBuzzer = -1;
}
// Prints the distance on the Serial Monitor
Serial.print(“Distance: “);
Serial.println(distance);
}
made using:
https://docs.arduino.cc/learn/electronics/servo-motors 
https://projecthub.arduino.cc/Isaac100/getting-started-with-the-hc-sr04-ultrasonic-sensor-7cabe1 
https://create.arduino.cc/editor/mertarduinotech/d3dde748-e44e-44dd-a09b-25dadc34a508/preview 
 
circuits made using: 
https://images.app.goo.gl/ik2FWEdcRPCzV2uo9
https://images.app.goo.gl/qZuhdw2p1YshkrK89
 
d) photos: 
 
e) videos: 
https://drive.google.com/file/d/1ocPnHQEG9In4W90hIW3y9G2rhSM6XWEx/view?usp=sharing 
https://drive.google.com/file/d/1Gz2aQ2Mcgtt0N_rMWR7Frej5ev14zXvX/view?usp=sharing
 
USER TESTING: 


Interaction Lab Group Project – ProMax Nebulous 3000 Cyber

Sara, 0.9/2023


Introduction: 

This blog post describes the ups and downs of a project for Interaction Lab. The main purpose of this project was to explore interactive art. By designing a cardboard prototype of an advanced technologically interactive artifact, we could test ourselves creatively and technically. The technology was supposed to be based on one of three stories: “The Veldt” by Ray Bradbury, “The Ones Who Walk Away from Omelas” by Ursula K. Le Guin or “The Plague” by Yan Leisheng. Our group decided on “The Ones Who Walk Away From Omelas”. 

Discussion: 

Did We Succeed? 

The main criterion for the project was to make it as interactive and creative as possible. We have worked hard to come up with an artifact that wouldn’t be considered cliche, and yet would be understandable enough for the performance to make sense. After long discussions and a few changes of minds, we decided to design interactive wings with IA built in. 

I believe that our “ProMax Nebulous 3000 Cyber”  met the expectations really well, from its physical presentation to the idea behind it. We used a reflective material to cover the surface which created an optical illusion, perfectly expressing modernity. The mechanism behind the wings – a Siri-like voice and an ability to fly – is interesting and creative.


Now, if it comes to our definitions of interaction, we all had different ones. Nevertheless, a common theme was that to make something interactive, it has to react. Either to human gestures, or as an answer to lines of code, it doesn’t matter. Therefore, I believe that our wings meet the definition of interaction. They reacted to the change in environment, and to human voice. 

Our performance projected a story of a girl who wants to see the child, which keeps Omelas intact. The wings were a vital part of the story as they highlighted the ethical issue of Omelas, whilst taking the girl away at the end. We showed the interaction through gestures (pulling the wings with strings to make them seem like they’re moving and therefore flying) and dialogues, therefore I believe that we showed the interaction really well. 

I believe that every performance has room for improvement. We could have definitely polished our script and perhaps rehearsed it more times than we already did. We could have possibly also worked a bit more on the wings to make them even more interactive by coming up with a slightly different, more subtle, way of making the wings move. Nevertheless, I believe that even without this, we did really well.  

Thoughts On Another Group’s Project! 

One performance that stood out to me was “BarbieAI”. Their artifact was an interactive closet which, based on your mood and the weather, would pick an outfit. I thought that the idea in itself is really interesting and fun, it made me want to own such a closet. 

I believe that this project met the criteria pretty well. Their execution was interesting and well prepared, while showcasing the interaction between humans and technology. I also think that they were well prepared in terms of the script. 

Nevertheless, my only critique concerns the theme. An important part of this project was to design the artifact based on the short stories. While watching the performance, I wasn’t exactly sure which world it was from. They did mention the name of the story once but this artifact didn’t exactly relate to the world nevertheless. I think it could be placed in any story and it wouldn’t make any difference. 

I believe that this group could think about their theme once more and adjust it accordingly. For example, they could set the scene in the home “The Veldt” was taking place at. 

Group Dynamics: 

My contributions: 

I organized a lot of work and contributed with different ideas and improvements to our drafts. I worked on the wings and their mechanism along with one of the team members. I also cut out cardboard people and figured out how to make them move (the mechanism looked different at the beginning and the team decided to simplify it later as we were running out of time and cardboard). Moreover, I greatly contributed to the script by coming up with lines and role distribution. I also informally took the role of a leader along with one other team mate, which means that I delegated tasks whilst resolving disputes between team members. Lastly, as for the presentation, I was playing a role of the mother while also helping ‘behind the scenes’. 

Teamwork: 

I think that our group worked really well together. We were able to agree on most things whilst staying active and coming to every meeting. 

We did encounter problems though. One of our members had many contrasting opinions to the rest of the group, whilst also questioning our every decision. It was flustraining at times and we couldn’t come to a consensus. This member, however, came up with many great ideas, which proves that disputes can lead to great things.  

While there were a lot of things to cut out, paint, design, and write, no one felt overwhelmed. Everyone did equally as much, which I think is truly uplifting. Task division wasn’t fixed and we all did things that we had time and energy for, which turned out to be a great motivator. 

We also communicate often, mostly through group chat or face-to-face. Everyone stayed active and replied to any questions or concerns of fellow members. We only had one situation during which one member wasn’t exactly active, however it turned out fine later on, as that member made up for their absence.  

Final Thoughts: 

Overall, I think that this project was really fun and very different from what I’m used to. I was able to explore cardboard, with which I stopped playing at the end of pre school. I also met amazing people with great ideas. I believe that this project improved my communication skills as well as my manual dexterity. 

Attachments: 

  1. The Script: 

Jennifer- The wing wearer

Sara- The child

Ninj- AI wing

Leo- Narrator 1

Jess – Narrator 2/Staff/Citizens

Sara – Staff/Mother/Citizens 


Scene: 1 

In Omelas

Narrator 1: 

“This is Jenny, she’s a happy citizen in a happy place, Omelas.”

Jenny waves. 

“Here in Omelas, everyone is happy.”

Jenny walking around.

Jenny:

“Hey, Eric, Andy and Gottfried! What’s up guys?”

Citizen 1: 

“Good morning, Jenny! Another beautiful day in Omelas, isn’t it?”

Jenny:

“It sure is! The sun is shining, and everyone seems so content.”

Citizen 2:

“Have you tried the new ProMax Nebulous 3000 Cyber? It’s amazing!”

Jenny:

“I have! It’s like having a personal assistant and more.”

Narrator 1:

“Recently, the citizens of Omelas have gotten their hands on a new piece of technology. Take a look at the ProMax Nebulous 3000 Cyber, our incredible wing.”

The wing moves up and down.

“In Omelas, people don’t need Didis because of this. It has transformed the lives of its citizens, offering multifunctional wings that serve as their all-encompassing aides, seamlessly integrating into every facet of their existence.”

Pause. 

“Jenny’s mother comes to see her.”

Mother: 

“Jenny! You’re finally eighteen. I know how much you wanted to see the child and now you finally can!” 

Jenny:

“My mom says that our happiness depends on the suffering of a child…”

Prepares to go through the door 

Scene: 2

In the Basement

Jenny Goes through the door, into the basement

Narrator 2: 

“As Jenny steps into the basement, a stinky smell welcomes her. The dimly lit room is small, uncomfortable, and most certainly not suitable for life.”

Jenni: 

“Ew. What is this smell? Why is this place so dark? How can it be so small?” 

AI Wing: 

“Unhealthy air condition, unhealthy air condition, this place is not sanitary, leave immediately”

Scene 3:

Meeting the child

Jenny:

“But I want to explore more…”

Walks around and bumps into the child.

AI Wing:

“Child detected, Child detected.”

Jenny: 

“That’s the child?”

AI Wing:

“Obviously” 

Jenny:

Jenny walks up to the child, the child won’t speak

“Why is this child so sad? She looks very miserable…”

Child (whispering):

“Help me…”

Jenny:

“Oh I see it now… the price of our happiness.”

AI Wing: 

“Indeed, Jenny. The cost of our utopia is a heavy one.”

Narrator 2:

“The wings, sensing Jenny’s torn feelings of empathy and the desire to stay in Omelas, begin to activate regardless.”

The wings, sensing Jenny’s feelings of empathy, begin to activate.

Jenny:

“But I don’t want to leave…”

AI Wing:

“But is that fair for the child? According to my moral programming, it is unethical to let the child suffer, even though everyone in Omelas is happy, but based on my calculations and data bases, the best thing to do is to make everyone leave.”

AI Wing starts to lift Jenni and flies away, the people flying away.

Jenny: 

“But is it fair for the wings to sacrifice the happiness of everyone else?!” 

Screams and flies away

Citizens: 

The citizens also start flying away 

“Where are we going?? What is happening?? The wings are doing their own thing!” 

Narrator 1: 

The child gets up and walks out to see the world.

“The child finally leaves the basement and she finally can explore the world of happiness. The end.”

THE END


Hello world!

Welcome to Web Publishing @ NYU. This is your first post. Edit or delete it, then start creating your site!

Online help is available via the Web Publishing Knowledge Site (wp.nyu.edu/knowledge) and the ServiceLink knowledge base (www.nyu.edu/servicelink). Through ServiceLink, you can find step-by-step instructions, as well as tutorials.

Digital Accessibility

As content creators who create and publish text, images, video, and audio, you must adhere to the NYU Website Accessibility Policy (https://www.nyu.edu/digitalaccessibility/policy) when creating and publishing digital content.

Web Publishing-specific Digital Accessibility Best Practices and examples of how to ensure your content are compliant are available at https://wp.nyu.edu/digitalaccessibility

If you have additional questions, contact the IT Service Desk for assistance. Support is available 24/7/365. For more details, visit www.nyu.edu/it/servicedesk.