Sara Siniecka • Gottfried Haider
INTRODUCTION
How it started
About a month or so ago we finished the Group Research Project, which tested our ability to prototype and design. While I was working on my project, I got to reflect on the class contents as well as my own interpretations of interaction and technology. Parenthetically our work represented a debate about the dangers of technology. Somehow, I remember thinking about what exactly do I even consider as useful and safe, in terms of technology that is. The topic of computer and arcade games came into my mind at that time. What are the dangers and benefits of games?
Inspiration and Interaction, where’s the common ground?
I started casually researching the interactive aspect of games of skill, such as simple arcade games or shooting PC games. In the back of my head I still had my definition of interaction – technology that is responding, not passive. And see, on one hand computer games could be considered to fall under that umbrella, but I would say that arcade games have their own magic of interaction and immersiveness. Mostly because I believe that there is a distinct difference between solely clicking your keyboard or a mouse and playing with big, lit up buttons, handles, and joysticks. That is exactly what prompted the idea for the midterm.
Uniqueness hides in nostalgia
After talking a bit with my partner, we decided to utilize an idea of magic stairs seen in Harry Potter movies, while incorporating it in an arcade-style game. It would be a crossover between modern pinball machines and a 1975 ball game. Honestly, at first I thought that it’s such a simple and boring idea but then I talked with my friends and family, and it turns out that mixing up modernity with nostalgic skill-games created a unique experience. Thanks to that, I believe that my game has a distinctive charm. For this exact reason, I think that the project doesn’t have a target audience, it’s for people who want to have fun – even if it’s for a few minutes.
PROCESS
Intuition is the best guide for design
Anyone who has ever tried to design anything has probably heard of interaction design before. I’m jealous of those people, this somewhat furtive knowledge proved to be extremely useful in daily life. After taking notes in class, I got a better idea about how people work, and therefore, a draft of how I wanted the design to look started slowly coming to light. During the lecture me and my partner exchanged a few glances, which were supposed to mean something along the lines of: Are you hearing this? We have to make our project as easy to understand as possible. This simplicity was extremely important for us since our project was a game, something which nature is generally easy to understand.
Hands on!
We wanted our game to be interactive obviously. I really wanted the user to touch and to feel. I wanted the technology to actively respond. Because of that our somewhat informal discussion about the exact movements of stairs resolved itself, and we decided to use servo motors along with a potentiometer. Therefore users actually interact with technology, they can touch, feel, and see. We also wanted the game to be simple. We wanted people to react quickly and not think too much. Because of that, there were a few things I noted down: clear Start and Finish lines, easy to understand control mechanism, short instructions. And even with all of this knowledge, I did not quite oversee one important thing; the game might not be as self explanatory as I thought it was. I would find that out a week later during user testing.
Materials
We decided on materials relatively easily. The servos and the potentiometer were a no-brainer, but we still had to design the interface in a way that’s logical and relatively clean. We opted for long cables and a singular breadboard since that would make it easier to hide everything behind the game. We were debating over using a sensor to make the game even more interactive, yet before the user testing nothing was added.
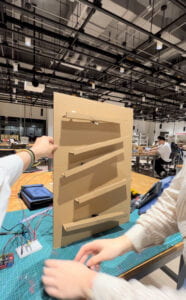
Our game was made out of a thick piece of cardboard as it was stable enough and aesthetically pleasing. As for components such as the ‘stairs’ we opted for a thinner piece of cardboard since it was easier to cut. Now that I think about it though, we could have used the thick cardboard for smaller pieces as well, as it proved to be more stable, which was much needed for moving parts. Nevertheless, thin cardboard was way easier to handle, therefore a more attractive option nonetheless.
How does it work?
Let’s move on to the game mechanics! I have explained it so many times already, mostly to myself to make sure that I’m understanding what I’m doing, that I have an informal speech created. The game’s goal is to let the ball fall into the finish basket by controlling the ‘magic stairs’, so the moving tracks. The user has to drop the ball at the top of the game, and by twisting the potentiometer left and right, they’re supposed to form a path for the ball to fall into the basket. By utilizing the map function, we sort of synced the moves of servos and the potentiometer together, resulting in an interactive interface completely controlled by the user’s hands.
Homemade… kind of.
The process of building our project was stressful and… should I say long? We built everything in one day, from cutting out the parts, to gluing everything together, to sticking the servos and cleaning out the breadboard. Generally, since we wanted the game to be simple to understand, the design was simple as well. We had to calculate the distances between the tracks and anticipate the range of the moving pisces. We also had to figure out the angle at which the servos would be taped, because we didn’t want them to end up in identical positions while twisting the potentiometer. As for materials we used glue guns and paper tape. Everything was built in the IMA studio, which felt just like home after six hours of undisrupted and somewhat chaotic work.
My contributions
I was responsible for cutting out the parts, as well as gluing them. After the group research project I got comfortable with glue guns and the knife, so the task was relatively easy. I also sourced the code and tweaked it a bit so that it fit our unique project better, eg. I changed the pin numbers. I honestly don’t feel comfortable with coding but I don’t think I will ever admit it out loud so being responsible for code gave me an opportunity to manipulate reality (*cough* gaslight *cough*) into thinking that I can actually do it. But hey, it worked! The code ended up functioning nicely.
Strength in numbers! Collaboration and challenges
Me and my roommate worked well together, and while she was taping servos to the back, I was gluing the stairs and so on. We mostly worked together on the issue that emerged. The problem that we faced was connected to merging three codes into one. As three servos had to be connected to only one potentiometer, three identical codes had to be merged into one which, surprisingly enough, was hard. I wasn’t sure if I should just copy everything three times and pray that Ardulino understands what I mean or if there’s a formula. After visiting office hours, it turned out that we simply had to delete some parts, mostly defining lines or starting lines. After that, everything worked.
Smooth like butter – our successes
I would, not so modestly, say that our project in general can be considered a success. From writing code, to circuit construction, to the assembly of physical components. Everything went smoothly and we finished relatively quickly. Normally I would say that mistakes are the best teacher, but various successes along the way proved to me that I’m, in fact, doing quite well in this course. It boosted my confidence.
USER TESTING
Test drive
The user testing was a great opportunity for feedback which saved our project in many ways. We tried to not explain anything so that people playing could give genuine opinions, for which we asked them to say out loud. There were a lot of great comments and suggestions that we were able to utilize. During the testing, I was noting down everything the testers said in an attempt to sort out what works and what doesn’t. Remember when I wrote that the design was not as intuitive as I thought it would be? The students, LAs, and professors were kind enough to point out that our game lacks this intuitive guidance. “You get the ball, but what do you do with it?” “How do I control the stairs?” “How do you even play?” were a few comments that made me realize that we had to change the design to make our game better – more understandable.
Changes, Changes!
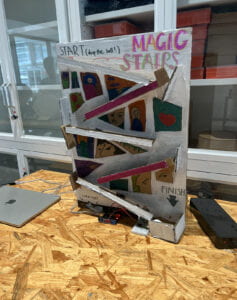
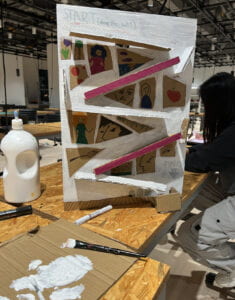
There were many things we changed in our project. Firstly, we made sure to use a lot of colors. While the background was plain white, I painted some drawings so that it remotely looked like the Harry Potter stairs. Moreover, we decided to paint the stairs that don’t move differently from the ones that move, that allowed the users to differentiate. We added big START and FINISH signs along with some short and easy to understand instructions so that the user knows what to do. We also added a hole through which we put a potentiometer, in order to hide the breadboard as well as make the role of the potentiometer more intuitive for the users. As for the more challenging parts, we added a distance sensor and a buzzer. That was made in order to enhance the interactivity of the game, to let the user hear their victory. We did encounter a big issue which we couldn’t quite tackle. To this day, I do not know the reason why the buzzer only makes a very quiet sound once you get the ball to the basket.
CONCLUSIONS
Our goal
The game was supposed to be fun and interactive. We wanted the users to ultimately take a break from their life and just play, go back to the times they were kids and would watch Harry potter or play arcade games. I believe that the goal was ultimately accomplished, as we received many comments saying that the game was really fun and engaging. As I mentioned before, in my opinion interactive technology is one that is not passive. It has to act, respond, and our game did exactly that. The stairs moved, responded. The buzzer, quietly but still, made a sound. The game talked, acted.
Feedback, users’ and mine
We received many good pointers during the user testing which we addressed when making improvements. During the final presentations we were also asked about future innovations for the projects if we had time. Well, I would definitely try to resolve the buzzer issue, and maybe make the last track a bit wider so that the ball has no problems getting through. I would also maybe change the way users would control the stairs, making it more Harry Potter themed, by perhaps utilizing other interesting forms of servo motor control. overall, I’m happy with how the project turned out and I’m happy how I performed.
APPENDIX
INTRODUCTION
a) inspiration for the game:
- https://images.app.goo.gl/o768ryboeeoXevw59
- https://harrypotter.fandom.com/wiki/Grand_Staircase
- https://buildyourownkits.com/product/pinball-machine/
PROCESS
b) Materials:
- M/M cables (16)
- buzzer (1)
- distance sensor (1)
- servo motors (3)
- cardboard (2)
- glue sticks
- glue gun
- paper tape
- paint
- markers
c) code: